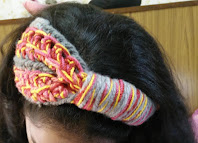
My friend’s
daughter is in her exercise mode and has started running every evening. Her mother (as all mums) worries that the
sudden change in temperature will affect her ears and the cool winds will bring
her down with a cold. So while we will not argue with the over active mum-mind, I will thank her for the opportunity to create something for her.
I had some
really chunky bulky yarn left over from a cowl
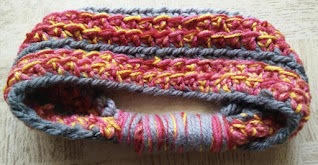
I also used a combination of our lovely Indian yarn to make this cute head band / ear muff.
Thank you for joining me.
In case you have just joined me, know that you can access all of my earlier creations by checking under ‘categories’ on the right hand side of this blog under “Labels”. Then, for your convenience, follow me here or on Facebook, You Tube, Pinterest, Twitter or Instagram.
Check out all my social media handles at the bottom of this blog
Oh, and may I add that the fastest way to find any of my blogs is via Pinterest.
All my blogs can be printed. Find the printer friendly (green) link at the bottom of this blog. You can also hit Control P (or Command P for Mac) on your keyboard, and the blog will go directly to the connected printer.
Remember that you only print if absolutely essential. Save paper – Save Our Earth.
Do remember to add my blog URL when you make and show off your creation.
Just copy the link on the search bar above - that's the blog URL.
To purchase this or similar yarn online, click here to buy your yarns online via Amazon. While you will still pay the same, I may get paid by Amazon as well.
This is a free blog - so do pay it forward for me. Cheers.
Materials used : Today
I’ve used some Red heart & Bravo Big Bulky weight yarn along with our lovely
Vardhaman millennium acrylic yarn, with a 6.5 mm crochet hook In general : Use any yarn with a suitable hook to make these projects.
For Indians : If you do not have bulky yarn, use 4 - 5 strands of our lovely Indian Vardhaman Millenium and you’ll get a nice bulky yarn. So my grey yarn is the bulky one and the berry coloured combination is made up with with a few shades of red/pink and one yellow Vardhaman Millenium yarn to make up the same thickness as my bulky yarn.
Remember that working with 4 – 5 yarns is not easy as they keep slipping out, especially with the 6.5 mm hook, but that’s all that’s difficult with this pattern.
International yarns : Among the international yarns I have used , I’d suggest Aunt Lydia Cotton 10, Aunt Lydia Bamboo-Viscose 10, DMC Petra, Sullivans knitting cotton (Australia), Milford Soft, Hilaza Rustica Eclat , Alize cotton yarn and Alize bamboo yarn.
Skill level : Easy
.. Well , the pattern itself is easy .. It’s just that working
with the multiple yarns is a bit tricky.
Abbreviations used : (Using U.S. terminology)
sc : Single crochet
ch : chain ch-sp
: chain space
sp : space rep
: Repeat
MC : Main Colour
CC : Contrast Colour
e-sc : Extended Single Crochet
hdc : Half double crochet
Stitches used (Using U.S. terminology)
Extended Single Crochet (e-sc) : hk into st, yo (2 lps on hk), pull through one
lp, yo (2 lps on hk),pull through both lps.
One e-sc made. (An e-sc is basically an sc on an sc)
(Photo tutorial of a "how-to do an e-sc" at the bottom of the blog
Half Double Crochet : Hdc : yo, insert hk into st ; yo (3 lps on hk) ;
yo, draw through all 3 lps. One hdc made.
Chainless start for Half Double Crochet : I dislike the ch-2 start, and this is what I do to start my row of hdc. Check out the video at https://youtu.be/lWXpl1KdbZ8
Instructions : (Using U.S. terminology)
Please note that I start all my rows with a ch 1, turning chain for ease.
Please check the top of this blog for easy video tutorials on all stitches used in today's pattern.
Please read through all my notes before you pick up your hook, so you know just where we're heading in our pattern.
In my patterns I work with the principle of stitch count and body measurement. This means that you need to work the stitch count in pattern, till you get the measurement (length and/or width) that you need for your project.
This is a really quick headband and I’ve used
the e-sc or extended single crochet for this. However you could use a dc, hdc
or sc as well.
So we will start with a chain (yes, I am finally
using the plain ole chain and not my fsc) and we will work in rounds.
Start : with MC :
and sufficient chains to make a chain length that goes around your head (or the
head of the person intended for this headband / ear muff).
Keeping the chain flat, join to the 1st
st to make one continuous round.
Check that the
round fits snug. This is specially so if
using Vardhaman Millenium, as our yarn really stretches well.
Round 1 : with CC : (or a combination of the berry colours in
Vardhaman millennium), e-sc in the 1st st and each st till end. Join with a sl-st to the 1st st.
Remember to bring
the main colour yarn up to this level
Round 2 : with CC : Rep Round 1
Round 3 : with MC : Rep Round 1
Note : As I’m
using this super bulky yarn, I’ve done an sc with this yarn and not an e-sc so
choices for you – see what works for you.
Rep Rounds 1 – 3 once more.
Fasten off leaving a long long tail that we will
use to wrap that end or join point. I
think I left about 2’ (24”) or thereabouts.
Finishing :
I love this finishing which I’ve used for a cowl
as well. So basically you just wrap all
your yarns round and round the start point, which not only give you this cute
end but it also covers up all the start points and extra threads etc.. and it’s
easy peasy.
Just that when you finish wrapping it all in,
ensure that you fasten that end well, and then using your hook, pull the end of
this wrap-around bit all the way through the bottom and/or glue it in such that
it doesn’t unravel on you while wearing.
Remember that this is a headband and will be pulled around a lot, so the
finishing and tying up of that last bit is pretty critical.
The great part of this ear muff cum head band is
now.. go and show it off!!
You can wear it with the tied up bit on the top
of your head or hidden behind your neck.. and with each wear, methinks it looks
different. So hey, cute 2-in-1 I’d say.
How to work an e-sc photo tutorial :
Enjoyed this ?? I sure did.. Come back right here for more freebie patterns
Remember to share this blog post when you share your photos with me on Facebook. I’d love to feature your photos on my FB page. Cheers.
If you're visiting me here for the first time, and have liked the experience, do add me to your mailing list (for your convenience) , and all my future free patterns will come straight to your mail box.
I’d appreciate if you could credit my blog (and link the original pattern link) when you make your own creation. Thanks.
Have a great day and see you soon.
Here are some of my other headwear creations. Have fun with these patterns too
Enjoy.


No comments:
Post a Comment
Thanks for taking the time to stop by. Do tell me what you think. Cheers