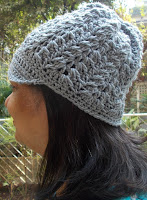
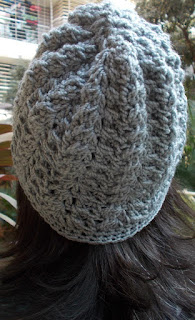
Start with a magic circle and 12 dc into that circle.
Join with a sl-st to the 1st sc.
Pull lightly to close.
In our pattern we use a lot of the unique front post double crochet stitch (fpdc).
The only thing is that we will be using it as a dc 2-tog, and we will also be skipping stitches in between to give it a neat arrow like pattern – which makes it all so lovely.
Front Post Double Crochet : fpdc : Post stitches are stitches worked around the post of a stitch of the row below.
How to work the fpdc : yo, hk into sp between posts of st from row below – going from back of stitch, around st and into the front of the st ; yo, pull yarn through the sps (3 lps on hk), (yo & pull through 2 lps) twice. One fpdc complete
In our next round, we will use one dc twice.
So we will use dc 1 and 2 for our 1st fpdc 2-tog, and then use the dc 2 and 3 for the next set of fpdc 2-tog ; then dc 3 and 4 for the next set of fpdc 2-tog, so on and so forth.
Now as this is going to be troublesome to write out, I’m just going to say it once in brackets, and you will follow this detailed explanation.
In addition to this, (like this is not complicated enough), we’re also going to use the space (though we’re not doing a chain , just the space) between 2 dc’s
Front Post Double Crochet 2-together : fpdc 2-tog : Post stitches are stitches worked around the post of a stitch of the row below.
Round 1 : fpdc 2-tog over the 1st two dc ;
2 dc in the space between this dc and the next ;
(fpdc 2-tog over the same 2nd dc and the next dc ;
2 dc in the space between this dc and the next) ;
rep (to) till end.
Join with st to the 1st st.
(12 fpdc 2-tog and 24 dc)
In the following row we’re working a dc 3-tog, but it’s a different 3-tog.
So we will work the first leg of our 3-tog as an fpdc in the 1st dc, then a dc on top of the dc 2-tog of the earlier round, and finally a fpdc in the next dc, and all these three together will make the fpdc / dc 3-tog.
The dc’s we’re using here for the fpdc are those two new ones we’ve placed in the ‘space’ between dc’s.
So as this is too complicate to write in the instructions below, I’m just going to term it dc 3-tog, Ok?
And yet again there’s a set of 3 sts that we’ll add in the space between dc’s.
Round 2 : sl-st the dc 2-tog and next dc ;
(dc 3-tog over the next 3 sts,
3 dc between this dc and the next) ;
rep (to) till end.
Join with a sl-st to the 1st st.
In the following round, we will use the same dc 3-tog as with Round 2, that has the fpdc over 2 sts and a dc in the centre st that make up a dc 3-tog.
We will also be doing 5 dc between two dc 3-tog sets.
So these 5 dc will be as follows : 2 dc in the sp between the dc 3-tog and the next dc, dc in the next dc, and 2 dc once again in the space between 2 dc.
So for this dc 3-tog, we’re using the 3 dc that we’ve added in the space between the dc 3-tog of Round 2.
Round 3 : sl-st the dc 2-tog and next 3 dc ;
(dc 3-tog over the next 3 sts,
2 dc between this dc and the next ;
dc in the next dc ; 2 dc in the next sp) ;
rep (to) till end.
Join with a sl-st to the 1st st.
For the next three rounds we will use a little varied dc 3-tog.
Now the dc 3-tog yet again uses 2 fpdc stitches on the 1st and 3rd leg of the 3-tog and the centre one is the regular dc.
The difference here is that we will skip a stitch, and work our 3-tog over five stitches.
So let me see if I can explain this any better.
We have our dc 3-tog from Round 3, and 5 dc in between two sets of dc 3-tog.
OK so far.
So we will work our dc 3-tog skipping the dc’s on either side of the dc 3-tog, (so this means that we are skipping dc # 1 and dc # 5 using dc # 2 and dc # 4 for the dc 3-tog) ;
and we will work our 2 dc just before dc # 3 ;
a dc on dc #1 and dc # 5 ;
then we will use dc # 2 and dc # 4 for the dc 3-tog ;
and we will work our 2 dc just before dc # 3, ;
a dc on dc ;
and then 2 dc just after dc # 3.
This way we get this ‘new’ dc 3-tog and once again 5 dc between the two dc 3-tog sets.
Hopefully this has clarified the stitch pattern.
So we will work this for Rounds 4 – 6. Phew..
Round 4 : sl-st the dc 2-tog and next 3 dc ;
(dc 3-tog over the next 5 sts, 2 dc between this dc and the next ; dc in the next dc ; 2 dc in the next sp) ; rep (to) till end. Join with a sl-st to the 1st st.
Round 5 – 10 : Rep Round 4
Round 11 : sl-st the dc 2-tog and next 3 dc ;
(dc 3-tog over the next 5 sts, 2 dc between this dc and the next ; 2 dc in the next dc ; 2 dc in the next sp) ; rep (to) till end. Join with a sl-st to the 1st st.
Round 12 : sc in the 1st st ; sc in each dc and each dc 3-tog all the way around. Join with a sl-st to the 1st st.
Round 13 – 15 : Rep Round 12
We will now work on the peaked portion of our cap.
Peak Row 1 : sc in the 1st dc 3-tog ; hdc in the next 11 sc ; 2 hdc in the next sc ; sc in the next sc ; 2 hdc in the next sc ; sc in the next 4 sc ; 2 hdc in the next sc ; sc in the next sc ; 2 hdc in the next sc ; hdc in the next 11 sc ; sc in the next sc. Turn.
Peak Row 2 : sc in the 1st sc ; sc in the next 3 hdc ;
{(2 hdc in the next sc ; sc in the next sc) ; sc in the next sc} ;
rep {to} 4 times ; sc in the next 9 sts ;
rep {to} 5 times ; sc till the 2nd last st ; sk the last st. Turn.
Now we will basically be repeating the pattern of Rows 1 and 2, but with a few changes.
As we’re all advanced level here, we can actually follow with the chart, so to simplify our instructions.. let’s put in a few markers. There is a centre section that has 4 sc dead centre. We then have 2 sets of 2-hdc with an sc in between. So these are the 2 hdc sets that mark the centre of our peak. Mark the two end 2-hdc sets and we will work a hdc 2-tog in each of these hdc 2-tog every alternate row.
Every other row, we will work an sc in each st all the way from end to end.
The other thing that we are going to do is sk the 1st sc at each end of each row so that we get this neat gradual curve for the peak cap.
I must also confess that I did not work the full number of rows shown in the chart for my peak section. So writing the instructions was getting a bit difficult, when I was not doing it myself.
That said, this is what makes it creative.. and exclusive, so have fun.


No comments:
Post a Comment
Thanks for taking the time to stop by. Do tell me what you think. Cheers