Welcome to Sweet Nothings Crochet for loads of free crochet patterns, video tutorials & awesome creations. If you want to learn, or just want to see some great free patterns, you're in the right place. All my blogs have video tutorials with loads of ideas thrown in for good measure. Thanks for dropping by and I hope you'll stay a while.
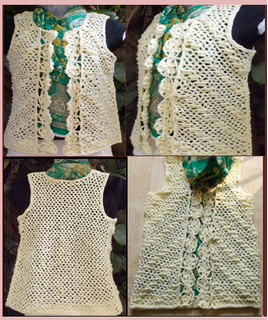
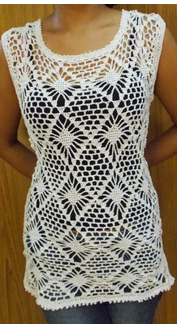
This shelled top is a beauty - not only does the pattern work up pretty fast, it's also a pretty easy repeat and the end result will definitely put a smile on your face.
Lately it feels like the faster I work, the faster someone is tempting me with ideas .. oh, I am not complaining at all .. just loving every creative moment.
Thank you for joining me. In case you have just joined me, know that you can access all of my earlier creations by checking under ‘categories’ on the right hand side of this blog under “Labels”. Then, for your convenience, follow me here or on Facebook, You Tube, Pinterest, Twitter or Instagram.
Check out all my social media handles at the bottom of this blog
Oh, and may I add that the fastest way to find any of my blogs is via Pinterest and if you want more crochet tops, come straight HERE
All my blogs can be printed. Find the printer friendly (green) link on the right side of this blog. You can also hit Control P (or Command P for Mac) on your keyboard, and the blog will go directly to the connected printer.
Remember that you only print if absolutely essential. Save paper – Save Our Earth.
Do remember to add my blog URL when you make and show off your creation.
Just copy the link on the search bar above - that's the blog URL.
To purchase this or similar yarn online, click here to buy your yarns online via Amazon. While you will still pay the same, I may get paid by Amazon as well.
This is a free blog - so do pay it forward for me. Cheers.
I have come on a short trip out of Mumbai, and am with a friend. Their daughter loved the last creation I’d made for my niece, and this is what she has chosen – and of course, I am thrilled to make something new and beautiful… and obviously you agree with me, as here we are..together yet again
Here’s a photo of my inspiration.. just in case this was on your “to-do” list as well… then come along, let's make this together. The inspiration in white and blue and my creation is in fawn/nude/skin colour on the right
Materials used : About ~ 170 gms our local Indian Red rose knitting cotton yarn with a 3 mm crochet hook to make a top for a Size
33 - 34" (chest / bust)
General material info : You can make this pattern using
any yarn with a suitable hook, and make it to any size using my
pattern instructions. Yarn requirement given is only as a guide for
estimation.
Please note that I start all my rows with a ch 1, turning chain for ease.
Please check the top of this blog for easy video tutorials on all stitches used in today's pattern.
Please read through all my notes before you pick up your hook, so you know just where we're heading in our pattern.
In my patterns I work with the principle of stitch count and body measurement. This means that you need to work the stitch count in pattern, till you get the measurement (length and/or width) that you need for your project.
So as we start
off, let’s look at what we’re going to do today with our
top.
We start at the base of
our top and work upwards towards the armhole and neckline.
So this is a bottom
up construction.
We will work one piece
each for the front and back and then join at the sides and shoulder to
complete.
The designer has not done any major reductions, but has smartly
added a thin belt-like cord around the waist that cinches it for shape.
The only reductions are for the armhole and then neckline.
The lovely pattern also
has two sets of shells – and then for a difference, the designer has alternated
colours for the shells to give it the lovely finish.
I am planning on using
just one colour for this – as I think that the lovely shells will pop out on
their own. So you can now decide .. single or dual colour
The chart given below is just to show you what we are working on -
the numbers and wordings are in Spanish. Please do not worry about the numbers as we are working on a slightly different calculation from this chart- using stitch count
multiples.
I am also writing out
the color changes in case you’d like to do this with two
colours.
In case you are using
only one colour, do ignore the instructions for changing colors.
Instructions are the
same for single or multiple color. Here is a video tutorial for the stitch pattern. The small swatch shows you the pattern till Row 5 and then the four rows for the armhole repeat as well. Do pause the video after Row 5, and return to it when you are at the armhole point.
As always I ask you to take the largest measure for your start round measurement
- so you will measure your round bust/chest and round waist and use the larger
measure. You can work in one single color (as I have) or work with 2 colors.
Foundation double crochet (fdc) : This is a unique way of starting a project directly with a row of double crochet stitches. Here is an easy video tutorial https://youtu.be/hjNUYVvyU9k
Start(with Main colour) with a multiple of 10 + 2
fdc for half the round bust / waist measurement. Turn.
I, as usual, like to start with a row of fdc – and as I said before, if you’re comfortable with this stitch, then great.. else go ahead and start with the usual chain row.
If working with a regular chain start, then you will add 2 chain , and you will work your 1st dc in the 3rd ch from hook. At the end of your 1st dc row, please count to check you have the right stitch count. Go to Row 1 for pattern.
From this row on we will start with our pattern –
and here are our two shell stitches.
Small shell :(dc ; ch 1, dc) all in the same st
or ch-sp
Large shell :(3 dc ; ch 1, 3 dc) all in the
same st or ch-sp
Single Crochet : Sc :yo, insert hk into st ; yo (2 lps on hk); yo, draw through both lps. One sc made. Check out the video at https://youtu.be/ghACqBpA-3k
Double Crochet : dc :yo, insert hk into st ; yo (3 lps on hk);
Small shell :(dc ; ch 1, dc) all in the same st or ch-sp
Row 2 :(with Contrast colour) : 2 dc in 1st sc
;
*ch 3, sk next sc and 3 dc, sc in next ch-1
sp ;
ch 3, sk next 3 dc and 1 sc , small shell in next
sc* ;
rep *to* till last 2 sc ;
2 dc in the last sc. Turn
Large shell :(3 dc ; ch 1, 3 dc) all in the same st or ch-sp
Row 3 :(with Main colour) : 4 dc in 1st dc
;
*[sc in next ch-3 sp , sc in next sc , sc in next
ch-3 sp] ;
large shell in next small shell* ;
rep *to* till last dc ;
4 dc in last dc. Turn
Row 4 : (with Main colour) : sc in 1st dc
;
*ch 3, sk next 3 dc and 1 sc , small shell in next sc ;
ch 3, sk next sc and 3 dc, small shell in next sc* ;
rep *to* till last 4 dc,
sk 3 dc and sc in last dc. Turn
Row 5 :(with Contrast colour) : sc in 1st sc
, sc in the next ch-3 sp ;
*large shell in next small shell ;
[sc in next ch-3 sp , sc in next
sc , sc in next ch-3 sp]* ;
rep *to* till the last ch-3 sp ;
sc in the last ch-3 sp ; sc in last sc. Turn
Rep Rows 2 – 5 till your project reaches armhole level ; ending
with Row 5.
Now here's where we use that chart given above - for the sizing of top and IF your
full length equals that given there, then yaay.. you don’t need to calculate
anything.. lucky you.
Else, well, like the rest of us, you’ll get your
trusted tape measure out right now, won’t you?
Armhole decreases : So
once your project reaches the armhole level, we will need to slowly
decrease. Now once again, my trusted trick is to use a well-fitting top
(of the person intended) for this.. else we’ll go by the general rule of
thumb.. which is a larger decrease in the 1st row, then a
smaller decrease in the next 3 rows.
Decrease Row 1 : sl-st
till you’re in the ch-1 sp of the 1st large shell ;
sc in that
1st ch-1 sp ;
and then rep instructions
for Row 2 all the way till you reach the last large shell ;
sc in the ch-1 sp of
that last large shell ; Turn.
You have the first
decrease completed.
Decrease Row 2 : sc
in same 1st st ; sc in next ch-3 sp ;
large shell in next small
shell ;
and then rep
instructions for Row 3 all the way till you reach the last small shell ;
then large shell in that
small shell and 1 sc in the last ch-3 sp and sc in the last st. Turn.
Decrease Row 3 : dc
in the 1st st ; ch 3, sc in the ch-1 sp of the 1st large
shell ;
and then rep
instructions for Row 4 all the way till you reach the last large shell ;
sc in that ch-1 sp of
the last large shell ; ch 3, and dc in the last st. Turn.
Decrease Row 4 : 3 dc in the 1st st ; [sc
in next ch-3 sp , sc in next sc , sc in next ch-3 sp] ;
and then rep instructions for Row 5 all the way till you reach the st ;
3 dc in that last st. Turn.
Now continue without
decreases rep Rows 2 to 5 once
again till you reach the neckline.
Neckline decreases :
We have already done one decrease, so you have an idea of what to
do. For the neckline, you need to put
markers for the following points
a)Decide what shape you want
b)Decide how deep you want your neck
c)You will then mark the two side points for your neckline
with markers.
d)You will then start pattern at the armhole and only work
till that marked point.
e)You will continue working just these stitches all the way to
the shoulder.
f)Once you reach the shoulder, fasten off and re-attach your
yarn for the second side of the shoulder.
g)For the back, I have decided to keep it higher and worked
all the way to the top.
h)Once you have completed both shoulders, join neatly at the
shoulder, using one of the joining techniques given at the top of this blog.
So like you have for the
armhole, you will need to decrease for the neck.
The only difference here
will be that you will decrease in the centre bit of your top.
So to figure out where
you want your decrease(s), what I do is fold my work in half, and mark the
centre front and centre backs.
I then decide how deep I
want the neckline and then mark that point, which will be deciding point for
the neckline decrease.
Few quick decreases
and we should have a good curve for our neckline.
You will then continue
without decrease in either neckline or armhole sides till you reach the
shoulders.
Once you have completed
one side of the shoulder, you will fasten off and re-attach yarn for the next
side of the shoulder.
This will then complete
one side of your top.
You will repeat all
instructions till here for the other side of the top, remembering to mirror the
armhole decreases, but if you want a different depth for necklines of back and
front, adjust that accordingly.
Once done, a simple
attachment of sides and shoulders and the beautiful top is complete.
So you’ve attached your
front and back at the shoulders and sides. I am quite happy with the fdc row at
the bottom being the way it is, without embellishments.. but you and your
creativity can take it away to another dimension.
I’ve done a quick picot all around the neckline and armholes.
How to work a picot stitch : Traditionally for a ch-3 picot, you work (ch 3, sl-st in 3rd ch from hook). For a ch-5 picot, you will do (ch 5, sl-st in 5th ch from hook).
So just to make this an
even and neat finish, I ran one round of (ch 2, sk 2 sts, sc in next st), all
around the edges for the first row.
Now as the areas we’re
working on are curved, there are some places where it will be difficult to
figure out where you have 2 sts (that you need to skip).. so
basically you work a ch 2 , sc evenly all around ... and as long as its all
even and neat, that’s good.
The picots then will
neatly go into the ch-2 sps.
The picot I used is a (ch 3, sl-st into the
1st ch) all around, and to get them neatly spaced, I worked
*picot in the 1st ch-2 sp ; ch 1, sk next sc and picot in the
next ch-2 sp* all around, joining with a sl-st at the end.
This picot pattern is
done around the neckline as well.
If you so desire, you
could actually do this around the baseline fdc row too.. just sk 2 fdc and
picot in the next fdc.. you could also do the ch-2, sl 2 fdc, sc in the next
fdc for a start row, and then (like you have done here) ; do the picot in the
ch-2 sps. The only tricky part is getting your ch-2 sps.. i.e in case you
run out of an fdc, just play with the calculations a bit and adjust it such
that you end with a ch-2 sp evenly.
Fasten off.. weave in
all ends... and then block as per your yarn instructions.. and c’est
tout. You have yet another brilliantly beautiful top all made .. ready
for the night in town
Enjoyed this ?? I sure did.. Come back right here for more freebie patterns
Remember to share this blog post when you share your photos with me on Facebook. I’d love to feature your photos on my FB page. Cheers.
If you're visiting me here for the first time, and have liked the experience, do add me to your mailing list (for your convenience) , and all my future free patterns will come straight to your mail box.
I’d appreciate if you could credit my blog (and link the original pattern link) when you make your own creation. Thanks.