Pattern Instructions : (Using US terminology)
Please note that I start all my rows with a ch 1, turning chain for ease.
Please check the top of this blog for easy video tutorials on all stitches used in today's pattern. For your convenience there video tutorials through the blog too
Please read through all my notes before you pick up your hook, so you know just where we're heading in our pattern.
In my patterns I work with the principle of stitch count and body measurement.
This means that you need to work the stitch count in pattern, till you get the measurement (length and/or width) that you need for your project.
This is not my pattern , but here are my pattern notes as I make my own original project
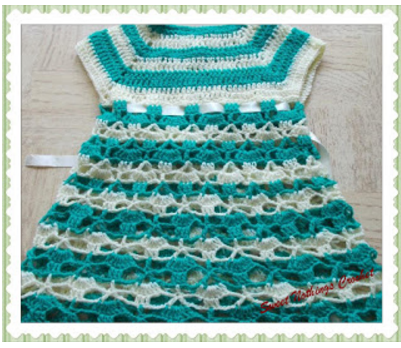
I’ve made this dress for a 9 -12 month old Size 20 chest, and started with (14 sts x 3 sides) + (7 sts x 2 for back) = 56 fsc.
In the chart above, the ‘circles’ represent ch and the other symbol is for dc.
Now using the chart (as a guide for a square necked yoke, as the no. of sts used differ from our start count), start with 56 fsc if you too want this sized dress.
Please note however, that I’ve substituted the start ch line with fsc.
This pattern can be used to make a dress of any size.
As I have made a dress for a particular size, I am writing the specific instructions.
However, just below here, you will see a links for charts for general neck sizes and sizing. These sizes coordinate with ages, and these are my "go-to" counts.
Using these numbers you can make the yoke for any size.
Thereafter , for the skirt portion, there is a stitch count given - and if you get that bit right too, you will make the dress for the size needed. Fun and easy enough, right?
Here is a sizing chart for general neck sizing here or here
Here is a sizing chart for general sizing here , here or here
PART 1 : YOKE
Double Crochet : dc : yo, insert hk into st ; yo (3 lps on hk); [yo, draw through 2 lps] twice. One dc made. Check out the video at https://youtu.be/xdnjB27zpYo Chainless start for Double Crochet : I dislike the ch-2 / ch – 3 start, and this is what I do to start my row of dc.
Start with 56 fsc :
dc in 1st fsc ; dc in the next 5 fsc ;
2 dc in the next fsc ;
*ch 2, 2 dc in next fsc ; dc in the next 13 fsc ;
2 dc in next fsc* ;
rep from * to* twice till last 7 fsc ;
ch 2, 2 dc in next fsc ;
dc in each fsc till end. Turn. (8 sts increased)
Row 2 : dc in the 1st dc ;
(dc in next dc, ch 1, sk next dc) ;
rep from (to) 3 times ;
dc in ch-2 sp (at corner) ;
ch 2, dc in ch-sp ;
*dc in next dc ; ch 1, dc in next dc ;
rep from (to) 6 times ;
dc in next dc ;
ch-1, dc in next dc ; ch 2* ;
rep from *to* twice ;
rep from (to) 3 times till end. Turn.
Row 3 : dc in the 1st dc ;
(dc in next dc, dc in next ch-1 sp) ;
rep from (to) 3 times ;
dc in next dc, 2 dc in ch-2 sp, ch 2 ;
*2 dc in ch-2 sp ;
rep
from (to) 10 times ;
dc in next dc, 2 dc in ch-2 sp, ch-2* ;
rep from *to* twice
;
2 dc in ch-2 sp ;
rep
from (to) 4 times ;
dc in last 2 dc. Turn.
Rep Rows 2 and 3 five
times = yoke of length ~ 3.75 - 4” and width of 9.5-10”.
For start with 75 fsc : dc in the 1st fsc ;
dc in the next 7 fsc ; 2 dc in the next fsc ;
*ch 2, 2 dc in next fsc, dc in the next 17 fsc,
2 dc in next fsc* ;
rep from * to* twice till last 9 fsc ;
ch 2, 2 dc in next fsc ;
dc in each fsc till end. Turn. (8 sts increased)
Row 2 : dc in the 1st dc ;
(dc in next dc, ch 1, sk next dc) ;
rep from (to) 4 times ;
dc in ch-2 sp (at corner) ;
ch 2, dc in ch-sp ;
*dc in next dc, ch 1, dc in next dc ;
rep from (to) 9 times ;
dc in next dc ;
ch-1, dc in next dc ; ch 2* ;
rep from *to* twice ;
rep from (to) 5 times till end. Turn.
Row 3 : dc in the 1st dc ;
(dc in next dc, dc in next ch-1 sp) ;
rep from (to) 4 times ;
dc in next dc ;
2 dc in ch-2 sp ; ch 2 ;
*2 dc in ch-2 sp ;
rep from (to) 12 times ;
dc in next dc ;
2 dc in ch-2 sp ; ch-2* ;
rep from *to* twice ;
2 dc in ch-2 sp ;
rep from (to) 5 times ;
dc in last 2 dc. Turn.
Rep Rows 2 and 3 three times, and then Row 2 once more = yoke of ~ 3.75 - 4” and width of 11 – 11.5”.
General Start :
Remember the chart for neck sizes, so double check which size suits your child.
So just to get this going, let's look at one for 18-24 months (meses) and the start there is with 66 stitches (cadenas).
The break up is 10 + 13 + 20 + 13 + 10. So this means that there are 20 sts each for back and front, and 13 each for the shoulder/sides.
The back is broken into 10+10 to accommodate the button flap.
So if you are using these charts, you need to do the following :
a) Find which chart suits your child
b) Place a marker at the stitch as per the numbers given. So for the above chart, you'd have one on the 10th, then 13th after that , then 20th after that.. so on till the end.
c) The four markers that you will place, will be your four corners.
d) Row 2 below tells you what stitch to use till corner, and what to do at each corner. Follow these instructions and you're on your way to making it just right for your baby girl.
e) Remember though that Row 2 is giving instructions specifically for a start with 56 fsc.
If you are not starting with 56 fsc, then the rep (to) will differ.
So for example, it reads rep (to) 3 or 6 times in Row 2, but you may have to work a different count.
Just remember that you work the pattern not the repeat count between corners, and you work the pattern stitches at the corners as given.
After completion of yoke and
before starting on the skirt portion, I worked 2 rows of sc for placket along the
back edge, ensuring I made the button holes for my buttons on the left hand
side, and then joined the placket at the bottom edge, so it is now
easier to calculate stitches for start of skirt portion.
For the skirt portion,
we will work in rounds.
Please join your yoke up on the last round (with
a sl-st in the 1st st).
The stitch
count for the skirt part is in multiples of 15 sts , so ensure you are
in multiples thereof all around.
A quick idea : If you want to make your dress more flared (as
against the "A"-line I have made), you need to increase the
number of stitches you start with, keeping it still in multiples of 15
So figure out how flared you want it, add in the stitches and
let's start on the skirt.
The chart is in blue for
every alternate row, and the joining chains are shown in red
Each large shell in this
pattern is made up of 4 rows of shells, as explained below
Round 1 : Shell is 3 dc, ch 3, 3 dc
Round 2 : Shell is dc in 1st 3 dc ;
2 dc in ch-5 sp ;
ch 5, 2 dc in ch-5 sp ; dc in last 3 dc
Round 3 : Shell is dc in 1st 5 dc ;
2 dc in ch-5 sp ;
ch 5, 2 dc in ch-5 sp ; dc in last 5 dc
Round 4 : Shell is dc in 1st 7 dc ;
2 dc in ch-5 sp ;
ch 5, 2 dc in ch-5 sp, dc in last 7 dc.
The joining chain between two sets of shells is a ch-5. In the last join, instead of sl-st into the ch (as we usually do to join a round), sometimes the join is with a dc / trc or dbl trc
Joining for Round 1 : ch 3, 1 dc (so you are where you need to be to start with ch-5 for Round 2)
Joining for Round 2 : Join with a regular ch-5
Joining for Round 3 : Join with a double treble – (which means you loop your yarn around hook 5 times)
How to work a Double Triple Crochet : dtrc : wrap yarn three times around hook, insert hk into st ; yo (4 lps on hk); [yo, draw through 2 lps] three times.
One trc made.
Joining for Round 4
: Join to the top of the 1st dc
For those of you who can somewhat follow a chart, please use these
steps above, so you can try to improve your chart reading skills.
You can
take a sneak peek to see that you are doing it right, as I am giving the
detailed instructions below.
Please do not get confused with the duplicate
set of instructions.
So for a more detailed
instruction, let's get down to the nitty gritty.
Please look at joining
instructions here and try to follow chart as well.
Single Crochet : Sc : yo, insert hk into st ; yo (2 lps on hk); yo, draw through both lps. One sc made. Check out the video at https://youtu.be/ghACqBpA-3k
First stitch for Single Crochet : This is how I like to start my row of sc. Check out the video at https://youtu.be/6pVYRfsf4_M
Round 1 : sc in the 1st st ;
*ch 5, sk next 3 sts, (3 dc, ch 3, 3 dc) all in the next st ;
[ch 5, sk next 3 sts, sc in the next st] ;
rep [to] 2 times* ;
rep *to* all around ;
ch 3, and dc to join with a sl-st to the 1st st.
As we used a dc to join, you are now in the center of the last ch-5 sp.
Round 2 : sc in the 1st ch-5 sp ;
*[ch 5, sc in the next ch-5 sp] ;
ch 5, dc in the next 3 dc ;
(2 dc in the next ch-3 sp ;
ch 3, 2 dc in the same ch-3 sp) ;
dc in the next 3 dc ;
rep [to] once* ;
rep *to* all around ;
ch 5, and dc to join with a sl-st to the 1st st.
Round 3 : sc in the 1st ch-5 sp ;
*[ch 5, sc in the next ch-5 sp] ;
ch 5, dc in the next 5 dc ;
(2 dc in the next ch-3 sp ; ch 3, 2 dc in the same ch-3 sp) ;
dc in the next 5 dc* ;
rep *to* all around ;
and join with a dtr (double treble) to the 1st st.
Check the video for a dtr / Double treble above
Round 4 : sc in the 1st ch-5 sp ;
*ch 5, dc in the next 7 dc ;
(2 dc in the next ch-3 sp ;
ch 3, 2 dc in the same ch-3 sp) ;
dc in the next 7 dc* ;
rep *to* all around ;
and join with a sl-st to the 1st st.
Rep Rounds 1 - 4 to get the length needed.


No comments:
Post a Comment
Thanks for taking the time to stop by. Do tell me what you think. Cheers