YOGA
MAT BAG
IRISH
ROSE GRANNY SQUARE
A
friend asked me for a yoga mat bag using the Irish rose. She has an extra large and extra thick yoga
mat, and I thought that rather than having a tube-like bag, this open and button-down shut
bag would be a better idea.
Here’s
what I have done for my original creation and design for this yoga mat bag.
I
am going to create an Irish rose granny square and then join squares together.
In
case you have just joined me, just check under “labels” on the right hand side
of this blog and look under “crochet granny squares” or “crochet blankets” for
what we’ve been working on.
Then
feel free to follow me here on Blogspot or via Facebook, Twitter or Pinterest
(all links at the end of this blog) so that all future feeds and patterns come
right to you. Cheers.
Thank you for joining me.
In case you have just joined me, know that you can access all of my earlier creations by checking under ‘categories’ on the right hand side of this blog under “Labels”. Then, for your convenience, follow me here or on Facebook, You Tube, Pinterest, Twitter or Instagram. Check out all my social media handles at the bottom of this blog.
Oh, and may I add that the fastest way to find any of my blogs is via Pinterest.
Do remember to add my blog URL when you make and show off your creation. Cheers. Enjoy
Materials used : Today I’ve used our lovely Indian
polyester purse yarn with a 4 mm crochet hook.
General yarn info : This yarn is available only in India, but it is
not specific for this pattern. It is a 4-ply thickness.
It does not matter what yarn / hook you
use. Use any yarn, to make this project
to any size you want.
Skill : Intermediate to Advanced skill level
Abbreviations used :
sc
: single crochet dc
: Double crochet
ch
: chain ch-sp
: chain space
sp
: space rep
: Repeat
trc
: Treble / triple crochet
dtrc
: Double triple crochet
fpsc
: Front post single crochet
Stitches used :
Starting slip knot : Here’s how you start with a slip knot. https://youtu.be/lJcqsVcs8cw
Starting slip knot 1 or the Sloppy Slip knot : This is a neat new way to start your work without a slip knot. https://youtu.be/YfC7KmGpifs
Instructions using U.S terminology
Please note that I start all my rows with a ch 1, turning chain for ease.
Please check the top of this blog for easy video tutorials on all stitches used in today's pattern. For your convenience there video tutorials through the blog too
Please read through all my notes before you pick up your hook, so you know just where we're heading in our pattern.
In my patterns I work with the principle of stitch count and body measurement.
This means that you need to work the stitch count in pattern, till you get the measurement (length and/or width) that you need for your project.
For
our project today, we will work one granny square with an Irish rose as the
centre.
You
can start with a magic circle, or a set of chain. With the magic circle, you can pull the work
close and not have a hole in the centre, as you would with the ‘fixed’
chain. You decide how you are starting
that first round.
The
rest of the pattern is common for everyone (no matter how you start).
Basic Granny Square pattern
Magic circle : To refresh your skill, please view this easy video https://youtu.be/ISC39yOqWro
What is a slip stitch : Here is a neat video tutorial at https://youtu.be/weB3QNbA8Iw
Double Crochet : dc : yo, insert hk into st ; yo (3 lps on hk);
[yo, draw through 2 lps] twice. One dc made.
Check out the video at https://youtu.be/xdnjB27zpYo
Chainless start for Double Crochet : I dislike the ch-2 / ch – 3 start, and this is what I do to start my row of dc.
Check out the video at https://youtu.be/wskv3iTjRx0
What is a chain stitch ? Here is an easy video tutorial https://www.youtube.com/watch?v=pXx5ukBjKkY
Start Round 1 : with a magic circle and we will work 1 dc ;
(ch
3, dc) ;
rep (to) 4 times.
Join with a
sl-st to the 1st st.
Pull together (6 dc ; 6 ch-3 sps)
In
case you want to start with chain, work ch 4.
Join with a sl-st to the 4th
ch from hk.
Then work 1 dc ; (ch 3, dc)
;
rep (to) 4 times.
Join with a sl-st to
the 1st st.
Pull together (6 dc ; 6 ch-3 sps)
Now
pattern is same for everyone, no matter how you started.
Single Crochet : Sc : yo, insert hk into st ; yo (2 lps on hk); yo, draw through both lps. One sc made. Check out the video at https://youtu.be/ghACqBpA-3k
First stitch for Single Crochet : This is how I like to start my row of sc. Check out the video at https://youtu.be/6pVYRfsf4_M
Half Double Crochet : Hdc : yo, insert hk into st ; yo (3 lps on hk) ;
yo, draw through all 3 lps. One hdc made.
Check out the video at https://youtu.be/sDiELJdB2Dg
Chainless start for Half Double Crochet : I dislike the ch-2 start, and this is what I do to start my row of hdc. Check out the video at https://youtu.be/lWXpl1KdbZ8
Round 2 :
sl-st into the 1st ch-3 sp ;
(1
sc, 1 hdc, 3 dc, 1 hdc, 1 sc) all in the same 1st ch-3 sp ;
*sk
next dc, rep (to) in the next ch-3 sp* ;
rep
*to* all around
and join with a sl-st to the 1st st.
Now
here’s where it gets a bit complicated and this is what makes it an Irish
rose. We will be working our next round
from behind this first round of petals and into the first round of dc we
have made.
We
will work a fpsc (Please check the top of this blog for a ‘how to’)
Round 3 :
From behind your petals of Round 2, work an fpsc around the 1st dc from
Round 1 ;
(ch
5, sk next set of petal sts,
fpsc around the next dc from Round 1) ;
rep
(to) all around
and join with a sl-st to the 1st st. (6 dc ; 6 ch-5
sps)
Round 4 :
sl-st into the 1st ch-5 sp ;
(1
sc, 1 hdc, 5 dc, 1 hdc, 1 sc) all in the same 1st ch-3 sp ;
*sk
next dc, rep (to) in the next ch-3 sp* ;
rep
*to* all around
and join with a sl-st to the 1st st.
In
case you want something a little cuter but a little more work and increased
difficulty, add a picot in the middle of this round of petals.
If you so decide, here are the instructions.
Oh, check the top of this blog for a ‘how to’ work a picot.
May
I suggest though that you work the picot only if you are making these into
Irish flower motifs and not the square.
How to work a picot stitch : Traditionally for a ch-3 picot, you work (ch 3, sl-st in 3rd ch from hook). For a ch-5 picot, you will do (ch 5, sl-st in 5th ch from hook).
Here’s a great video https://youtu.be/8s3zVaBcn4s
Round 4 A : sl-st into the 1st ch-5 sp ;
(1
sc, 1 hdc, 3 dc + picot + 2 dc, 1 hdc, 1 sc) all in the same 1st
ch-3 sp ;
*sk
next dc, rep (to) in the next ch-3 sp* ;
rep
*to* all around
and join with a sl-st to the 1st st.
In
case you want to just make an Irish rose motif, you stop right here.
For
creating our Irish rose granny mitered square, come along.
Visualise
what we are going to do now.
We will be joining the tips of the petals and the
base of the petals to make one continuous round.
So we will work a trc into the base of each
petal and a sc into the tips of the petals.
To
get it all even, for the base of each petal, we will work between the 2
sc that form the base of 2 adjoining petals.
Got it?
In
case you have worked a picot in Round 4, you will be using the top of this
picot to join in Round 5.
Triple Crochet : trc : wrap yarn twice around hook, insert hk into st ; yo (4 lps on hk); [yo, draw through 2 lps] three times. One trc made.
Check out the video at https://youtu.be/A0y4BbgDTbs
Chainless start for Triple / Treble Crochet : I dislike the ch-2 / ch – 3 start, and this is what I do to start my row of trc.
Check out the video at https://youtu.be/f42MO0cGYC0
Round 5 :
trc in the 1st st ;
(ch
5, sk next 4 sts, sc in the next dc or picot ;
ch 5, sk next 4 sts, trc in the
next sp between the next 2 sc) ;
rep
(to) 5 times ;
join
with a sl-st to the 1st st. (12 ch-5 sps ; 6 sc ; 6 trc)
Ta
da! And just like that we’ve created a square!
In
our following round, we will work a Shell stitch, which is (dc 3-tog ; ch 3, dc
3-tog) all in the same st or ch-sp
Double crochet 3-tog : dc 3-tog : Here is an easy video tutorial at https://youtu.be/qlnqXDB3OUM
Round 6 :
sl-st into the 1st ch-5 sp ;
Shell st in the same ch-5 sp ;
*(ch
5, sk next st, sc in the next ch-5 sp) ;
rep (to) once ;
ch 5, Shell st in the next ch-5 sp* ;
rep
*to* all around ;
ch 5, and join with a sl-st to the 1st st.
Place
your work down and check that you have a square with four corners of Shell
stitches and three ch-5 sps between them.
This
is the basic Irish rose granny mitered square.
Round 7 :
sl-st into the 1st ch-3 sp of the 1st Shell st ;
Shell st
in the same ch-3 sp ;
*(ch
5, sc in the next ch-5 sp) ;
rep (to) 2 times ;
ch 5, Shell st in the next Shell st* ;
rep
*to* all around ;
ch 5, and join with a sl-st to the 1st st.
Now
depending on how large a square you want, you can go ahead and increase the
size of your square.
Remember
you will work ch-5 sps between the corner shell sts, and work the corner shell
st in the earlier corner shell st.
Easy
enough? Now go ahead, create something
beautiful.
Once
again, before you start on your 2nd square, please read through
joining instructions.
So
for the purpose of this yoga mat project, how do you decide how large a granny square you want?
Before
we go there, let’s see / visualize how we are going to join our squares to make
our bag.
We
will first make a rectangle and then we will roll it round to make it into a
cylinder.
The
cylinder needs two squares each end as well.
So
with this visual in mind, read what measurements you’ll need.
The diagrams are for
representation only and are not to scale.
1.
Roll
your mat tightly and check the length and circumference of your mat.
2.
As
we are working a rectangle, you will calculate the ‘flattened width’ of the
circumference.. i.e how many inches you will need when making this a rectangle.
This means that your circumference becomes the ‘width’ of your bag.
3.
Measure
the size of your square.
4. Calculate
how many squares you’d need to get the length and width of your mat.
5.
I’d
suggest that you use either the size you need to get your L x B of mat or the
circumference you’d need. Remember that
we have large ch-sps, so it will afford a lot of stretch and movement, so
either calculation / measurement should work.
Two End rounds :
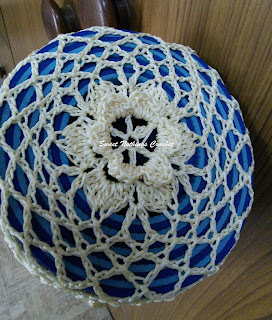
For
the two ends of our bag, we need a similar pattern, but in a round.
Here’s where this gets a bit complicated.
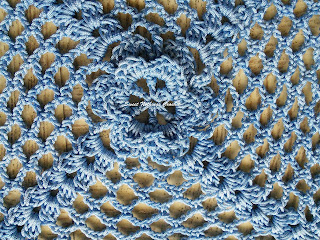
I
have made two rounds, and worked them for as large a round needed to fit
against the rolled ends of my mat. So
first roll your mat up and calculate the diameter (across round of the
rolled end) of your mat ends and worked these two ends for that measurement.
These
are just ideas of how to get doing that – and not actual calculations.
Rounds 1 - 4 : Work exactly as you did for the granny
square to make that Irish rose in the centre.
In
the following round, we will work sts in the centre stitch of each
petal, and then in the space between two petals
Round 5 :
dc in the 1st st ; ch 3, dc in the same 1st st ;
*ch
3, sk next 4 sts of petal, sc in the next st ;
ch 3, sk next 4 sts of this
petal, (dc ; ch 3, dc) all in the space between the petals* ;
rep
*to* all around and join with a sl-st to the 1st dc. (18 ch-3 sps)
Now
you will basically work with just these 18 ch-3 sps, till you get to the
diameter you need.
Round 6 :
sl-st into the 1st ch-3 sp ;
sc in the 1st ch-3 sp ;
(ch
3, sc in the next ch-3 sp) ;
rep
(to) all around
and join with a sl-st to the 1st sc. (18 ch-3 sps)
Round 7 :
sl-st into the 1st ch-3 sp ;
sc in the 1st ch-3 sp ;
(ch
4, sc in the next ch-3 sp) ;
rep
(to) all around
and join with a sl-st to the 1st sc. (18 ch-4 sps)
Round 8 :
sl-st into the 1st ch-4 sp ;
sc in the 1st ch-4 sp ;
(ch
4, sc in the next ch-4 sp) ;
rep
(to) all around
and join with a sl-st to the 1st sc. (18 ch-4 sps)
See
how your circle has slowly grown in size.
Now continue working it till you get the size needed.
Increase as needed every two rounds and keep
checking against your measurement requirement.
When
you reach the diameter needed, join it to one end of your rectangle to close
that end up.
Read joining and finishing
instructions below.
Joining and finishing :
Once you have all your calculations
in hand, go ahead and create your squares.
To join, I’d suggest the seamless way to join is to join as you go.
There are several links (and lots of photos of my work) given above, do check
them out.
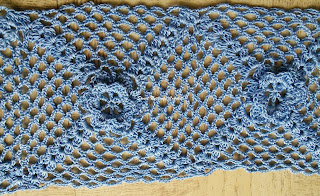
Basically,
you will join the ch-5 sps and the ch-3 corner sp of adjoining squares.
To get the join in the centre, with every
ch-5 sp, you will work ch 2, join to the adjoining square ; ch 2 and join to
the square you are working on.
For
every corner join, you will work a dc 3-tog ;
ch 1, join to the corner of the
adjoining square,
ch 1 and dc 3-tog in the square you are working on.
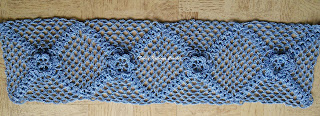
Using
this technique create a flat rectangle that will cover the length and width of your
yoga mat.
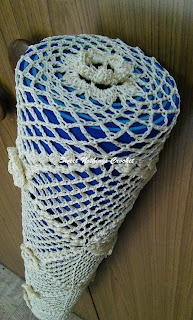
Once
done, roll it to create the cylinder, and attach one of the circles on each end
of your rectangle.
This then rolls the
flat rectangular mat into a cylinder.
If
you are using the continuous join method to join, you should ensure that you
join 18-ch sps neatly till end – and they will neatly line up.
It
does not matter if you do not have ch-5 sps on both the ends (i.e of the circle
and the square).
You just join the
centre of each ch-sp together and it will still be a neat seamless join.
Whipstitch to join : Here’s a quick tutorial on how to join using the whipstitch at https://youtu.be/wZ-9LNzftMA
Invisible join : Here’s a quick tutorial on how to join using the embroidery needle and whipstitch to get an invisible join at https://youtu.be/a6XZQ6VzJFM
Single crochet to join : Here’s a quick tutorial on how to join using the single crochet at https://youtu.be/6FXoW_47_dI
Rather
than adding a zipper at the end, I have opted to work a row of buttons and
button holes along the open end of the bag.
Whatever
you decide, you would need to work a row (or a few rows) of hdc all along the
two ends of your work, to tighten it up before you attach in a zipper or set of
buttons.
If
working buttons, ensure that work in button holes along one end.
Here’s
a link for attaching a zipper http://frogknitting.blogspot.se/2013/08/att-sy-i-dragkedjor-installing-zippers.html?m=1
Finally
you could decide to make this a closed cylindrical bag and have it open only
one end.
If
you so decide, then you will work only one circular end piece and leave
the top end such that you can slide in your yoga mat. I’d suggest that you work in a tie for this
end – and you also run a round of hdc all around this opening, with holes to
allow you to thread in your tie rope for this end.
Cord :
I did not make a cord as the yoga mat already had a carrying cord. This cord is the basic one that just wraps
around the mat and cinches tight. (This is
why my client wanted this bag, as you can see)
However,
if you decide to make a cord, check this link
Easiest I-cord : Check out this video for a really easy I-cord at https://www.youtube.com/watch?v=e_AQ9m0QeZI
I
am dead sure you love your yoga mat carry bag.
Do tag me when you show it off
on social media.
If you're visiting me here for the first time, and have liked the experience, do add me to your mailing list (for your convenience) , and all my future free patterns will come straight to your mail box.
I’d appreciate if you could credit my blog (and link the original pattern link) when you make your own creation. Thanks.
Check out my awesome pins on Pinterest at https://in.pinterest.com/shyamanivas/
OR just my free patterns at https://in.pinterest.com/shyamanivas/free-patterns-made-by-me/
Join me on YouTube at https://youtube.com/shyamanivas
And on my Facebook page at https://www.facebook.com/Sweet-Nothings-Crochet/ for more patterns.
Do follow me on Twitter https://twitter.com/ShyamaNivas
Do follow me on Instagram https://www.instagram.com/sweetnothingscrochet/
Find me on Ravelry at ravelry.com/projects/shyamanivas/
Do also visit me at http://www.craftsy.com/user/2573073/pattern-store?_ct=cx-buvjdql&_ctp=my-pattern-store,manage
Have a great day and see you soon.
.. and some home use miscellaneous patterns..







No comments:
Post a Comment
Thanks for taking the time to stop by. Do tell me what you think. Cheers