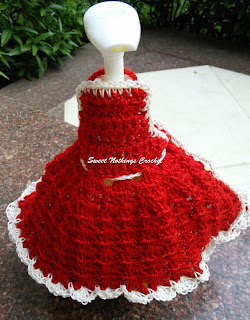
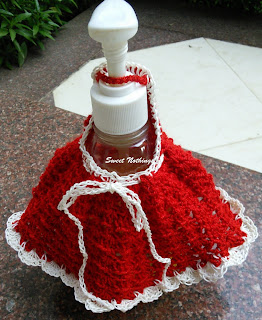
WINE BOTTLE COVER &/or SOAP DISPENSER COVER 3
APRON 2A
Just a few days back I shared the apron inspired soap
dish dispenser I’d made. As soon as I’d
finished and shared that project, I was asked to make a wine bottle cover, and
thought of tweaking the same pattern.
This is my third apron inspired soap dispenser
cover .. which can double up as a wine bottle cover too. Come along .. let’s
work on this together.
Thank you for joining me.
In case you have just joined me, know that you can access all of my earlier creations by checking under ‘categories’ on the right hand side of this blog under “Labels”. Then, for your convenience, follow me here or on Facebook, You Tube, Pinterest, Twitter or Instagram. Check out all my social media handles at the bottom of this blog.
Oh, and may I add that the fastest way to find any of my blogs is via Pinterest.
Do remember to add my blog URL when you make and show off your creation. Cheers. Enjoy
Materials used : Just
a little bit of the lovely Indian Hobby India All Seasons (Ganga agrowool)
acrylic yarn, with a 3 mm crochet hook.
You can make this project with any yarn
and a hook that suits it.
Skill level : Easy
Stitches used :
Starting slip knot : Here’s how you start with a slip knot. https://youtu.be/lJcqsVcs8cw
Starting slip knot 1 or the Sloppy Slip knot : This is a neat new way to start your work without a slip knot. https://youtu.be/YfC7KmGpifs
What is a slip stitch : Here is a neat video tutorial at https://youtu.be/weB3QNbA8Iw
Half Double Crochet : Hdc : yo, insert hk into st ; yo (3 lps on hk) ;
yo, draw through all 3 lps. One hdc made.
Check out the video at https://youtu.be/sDiELJdB2Dg
Chainless start for Half Double Crochet : I dislike the ch-2 start, and this is what I do to start my row of hdc. Check out the video at https://youtu.be/lWXpl1KdbZ8
Double Crochet : dc : yo, insert hk into st ; yo (3 lps on hk);
[yo, draw through 2 lps] twice. One dc made.
Check out the video at https://youtu.be/xdnjB27zpYo
Chainless start for Double Crochet : I dislike the ch-2 / ch – 3 start, and this is what I do to start my row of dc.
Check out the video at https://youtu.be/wskv3iTjRx0
Triple Crochet : trc : wrap yarn twice around hook, insert hk into st ; yo (4 lps on hk); [yo, draw through 2 lps] three times. One trc made.
Check out the video at https://youtu.be/A0y4BbgDTbs
How to work a picot stitch : Traditionally for a ch-3 picot, you work (ch 3, sl-st in 3rd ch from hook). For a ch-5 picot, you will do (ch 5, sl-st in 5th ch from hook).
Here’s a great video https://youtu.be/8s3zVaBcn4s
Abbreviations used :
(Using U.S terminology)
lp(s) : Loop(s)
sc
: Single crochet
dc : Double crochet sp
: Space
sl-st : Slip stitch ch : Chain
st(s) : Stitch(es) hk : Hook
yo : Yarn Over
Instructions using U.S terminology
Please note that I start all my rows with a ch 1, turning chain for ease.
Please check the top of this blog for easy video tutorials on all stitches used in today's pattern.
Please read through all my notes before you pick up your hook, so you know just where we're heading in our pattern.
In my patterns I work with the principle of stitch count and body measurement.
This means that you need to work the stitch count in pattern, till you get the measurement (length and/or width) that you need for your project.
For today’s
apron inspired soap dish cover, I’ve once again been inspired by the free
pattern at https://www.ravelry.com/patterns/library/liquid-dish-soap-apron
What did I do
differently?
1.
Measure
your bottle(s) and figure out what approx length and width you’d like.
2.
Work
the pattern as given till Row 6.
3.
The
stitch count for the frilly lower part of the dress is in multiples of 3 + 1
(so as the designer starts her pattern with 22 sts, we have 8 shell patterns)
4.
At
any time when you find that you have reached the length for your bottle and are
on a “V”-st row, stop the pattern and work that final row of scallops and
border.
As per the
pattern, after Rnd 6 is where you start the scalloped pattern and add in the
ties (at the end). So this is where I’ve
decided to make it a skirt and ‘fitted’ waist.
So at this
point, depending on whether you are making this for a wine bottle or a soap
dispenser, check the length you have worked, and the round measure of your
bottle and add on stitches / chain accordingly.
All we are doing is adding chain and joining it to make a round, and
then working the pattern as given in the pattern sheet in rounds – so that you
have a halter back ‘dress’ rather than an apron. Got it?
As mentioned
earlier, the stitch count for the lower part of the dress is in multiples of 3
+ 1. We have 22 sts so far – so you need
to add sts till you have a round bottle measure and have as many sts in
multiples of the st count.
For simplicity,
add sts in multiples of 3 because 22 is already in the stitch count needed (i.e
22 = 3 x 7 + 1). With my yarn and work
tension, I’ve added 21 ch. Got it?
Right so just
before I started on the pattern Rnd 7, I added my 21 sts.
Once you have
added the sts as desired, join with a sl-st to the last st and then work the
scallop pattern as given in the pattern sheet for the lower part of the dress. So add sts, join, and carry on with Rnd
7. Easy enough, right?
As I wanted
more flare for my dress, I decided to add in a few more “V”-sts. Per pattern, we work a “V” st in the ch-sp of
the earlier Shell st. I worked one
“V”-st in the ch-sp and one “V”-st in the space between two Shell sts.
Depending on how much of a flare you’d like, add in “V”-sts in Rnd 8.
Depending on how much of a flare you’d like, add in “V”-sts in Rnd 8.
Then carry on
with pattern as given from Rnd 9.
After working
Rnd 7 and 8 per pattern, I tweaked the Shell st and “V” st a bit, because I
wanted more flare on my dress
So my Shell st
became (3 dc ; ch 1, 3 dc) all in the same ch-sp,
and my “V”-st
became (dc ; ch 3, dc) all in the same ch-sp.
Go and make
something beautiful and unique then.
Have a fun creative day.
Enjoyed this ?? I sure did.. Come
back right here for more freebie patterns
Remember
to share this blog post when you share your photos with me on Facebook. I’d love to feature your photos on my FB
page. Cheers.
If
you're visiting me here for the first time, and have liked the experience, do
add me to your mailing list (for your convenience) , and all my future free
patterns will come straight to your mail box.
I’d
appreciate if you could credit my blog (and link the original pattern link)
when you make your own creation. Thanks.
Check
out my awesome pins on Pinterest at https://in.pinterest.com/shyamanivas/
OR
just my free patterns at https://in.pinterest.com/shyamanivas/free-patterns-made-by-me/
Join
me on YouTube at http://youtube.com/shyamanivas
And
on my Facebook page at https://www.facebook.com/Sweet-Nothings-Crochet/ for more
patterns.
Do follow me on Twitter https://twitter.com/ShyamaNivas
Do follow me on Instagram https://www.instagram.com/sweetnothingscrochet/
Find
me on Ravelry at ravelry.com/projects/shyamanivas/
Do
also visit me at http://www.craftsy.com/user/2573073/pattern-store?_ct=cx-buvjdql&_ctp=my-pattern-store,manage
Have
a great day and see you soon.
You may
want to take a look at some more beautiful and unusual bag / purse patterns.


No comments:
Post a Comment
Thanks for taking the time to stop by. Do tell me what you think. Cheers