Welcome to Sweet Nothings Crochet for loads of free crochet patterns, video tutorials & awesome creations. If you want to learn, or just want to see some great free patterns, you're in the right place. All my blogs have video tutorials with loads of ideas thrown in for good measure. Thanks for dropping by and I hope you'll stay a while.
Sunday, 1 January 2017
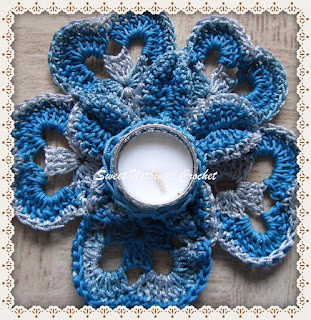
POINSETTIA TABLE COASTERS
POINSETTIA TABLE COASTER
( #Blogaday 01/365 )
Christmas is around the corner .. and I thought
I’d add a few Christmassy cheery ideas to my blog.. so welcome back and let’s
have fun.
Yes, I am aware that by the time I've written out this blog, Christmas is behind us.. but then we're going to have one in 300+ days, so why not start well in advance and not panic this year? ;) .. AND these table coasters are an "all the year kinda gift" too. If you attach on a shiny thread, you can hang it onto the tree as well.. so this is quite a useful pattern, don't you think?
Thank you for joining me.
In case you have just joined me, know that you can access all of my earlier creations by checking under ‘categories’ on the right hand side of this blog under “Labels”. Then, for your convenience, follow me here or on Facebook, You Tube, Pinterest, Twitter or Instagram.
Check out all my social media handles at the bottom of this blog
Oh, and may I add that the fastest way to find any of my blogs is via Pinterest.
All my blogs can be printed. Find the printer friendly (green) link at the bottom of this blog. You can also hit Control P (or Command P for Mac) on your keyboard, and the blog will go directly to the connected printer.
Remember that you only print if absolutely essential. Save paper – Save Our Earth.
Do remember to add my blog URL when you make and show off your creation.
Just copy the link on the search bar above - that's the blog URL.
To purchase this or similar yarn online, click here to buy your yarns online via Amazon. While you will still pay the same, I may get paid by Amazon as well.
This is a free blog - so do pay it forward for me. Cheers.
Inspired by aphoto with its attached graph / chart , here are
my original pattern notes.
Materials used : Today I have
used ~ about a little bit of our lovely Indian Red rose cotton yarn with a 1.3 mm crochet hook ; fabric glue to seal ends and Mod Podge for stiffening & protecting your project.
This yarn is not specific for this project.
You can use any yarn with a suitable hook to make this project to any size.
One quick note : I found that my Indian Red Rose bled a bit, so if you too are using two colors, one of which is light, please ensure that the darker color does not bleed. Lesson well learned
International yarns : Among the international yarns I have used, I’d suggest Aunt Lydia Cotton 10, Aunt Lydia Bamboo-Viscose 10, DMC Petra, Sullivans knitting cotton (Australia), Milford Soft, Hilaza Rustica Eclat , Alize cotton yarn and Alize bamboo yarn.
Please note that I start all my rows with a ch 1, turning chain for ease.
Please check the top of this blog for easy video tutorials on all stitches used in today's pattern. For your convenience there video tutorials through the blog too
Please read through all my notes before you pick up your hook, so you know just where we're heading in our pattern.
In my patterns I work with the principle of stitch count and body measurement.
This means that you need to work the stitch count in pattern, till you get the measurement (length and/or width) that you need for your project.
Chainless start for Half Double Crochet : I dislike the ch-2 start, and this is what I do to start my row of hdc. Check out the video at https://youtu.be/lWXpl1KdbZ8
Start (with Color
1) with a magic circle and 12 hdc in that circle.
Join with a sl-st to the 1st hdc.
Fasten off Color 1. Attach red.
In the following round, we’re going to make the
base for our poinsettia petal. For that
we will work a long chain, and this forms the base.
Single Crochet : Sc : yo, insert hk into st ; yo (2 lps on hk); yo, draw through both lps. One sc made. Check out the video at https://youtu.be/ghACqBpA-3k
First stitch for Single Crochet : This is how I like to start my row of sc. Check out the video at https://youtu.be/6pVYRfsf4_M
Triple Crochet : trc : wrap yarn twice around hook, insert hk into st ; yo (4 lps on hk); [yo, draw through 2 lps] three times. One trc made.
So before you attach your new yarn, let’s look at your poinsettia flower
petals, and see where we re-attach.
Place down the motif and look at the chart.
So we will attach your new yarn in the 5th
dc (of the ch-16 sp).
We will be working
in between two petals, so you will re-attach your yarn in the right
hand side petal between two petals in the dc mentioned above.
Right now that we’ve worked out where we’re
attaching our yarn, let’s figure out which are the two sts that we will work a
dc 2-tog with.
So your yarn is attached
at the last dc on that set, correct?
You
will now mark the last dc on the petal to it’s left, and the dc 2-tog
will be worked in these two marked dc.
How to work a picot stitch : Traditionally for a ch-3 picot, you work (ch 3, sl-st in 3rd ch from hook). For a ch-5 picot, you will do (ch 5, sl-st in 5th ch from hook).
We will also work in a ch-3 picot in the
following round.
Our ch-3 picot is (ch 3
; sl-st in the 3rd ch from hk)
Finally we’re
working our next set of {to} sts in a really unusual way.
Now
usually you work your stitch in the st of the round below, right?
But here, as
we want this little Xmas tree-like shape, we will be working our st in the vertical bar of the earlier st.
So what does this mean? You will work your first dtr + picot, and then work the
next trc in the vertical bar of the dtr you just made ; then you will work the
next dc in the vertical bar of this trc you’ve just made, so on and so forth.
There are a total of five dc at the top of
this little creation… the 1st dc is worked in the vertical bar of
the trc ; the next three will be worked in the same point on the vertical bar
of the dc ; the last dc will be once again worked on the earlier trc vertical
bar.
As you continue to complete the mirror image of
the for the second part of this little creation, we will work in the same
spaces for the same stitch. This means
that where ever you worked your dtr for the right side, you will work
the dtr in the same point / st / sp for the left side of this little
creation.
Sounds terribly confusing? It isn’t.
Look at the chart .. look at the instructions.. and slowly follow.
Once you’ve done one, you’ll know why this sounds
a lot more confusing than it is!
Triple Crochet : trc : wrap yarn twice around hook, insert hk into st ; yo (4 lps on hk); [yo, draw through 2 lps] three times. One trc made.
Double Treble /Triple Crochet : dtrc : wrap yarn three times around hook, insert hk into st ; yo (4 lps on hk); [yo, draw through 2 lps] three times. One trc made.
(ch 2, as turning ch to facilitate working the
dtr) ;
*{dtr + picot ; ch 1, trc + picot ;
[ch 1, dc + picot] ;
rep [to] 4
times ;
ch 1, trc + picot ; dtr} all on top of the trc 2-tog ;
ch 2, < 3 sc
+ picot + 3 sc> all in the next ch-5 sp ;
ch 2, sk next 10 trc , trc 2-tog
over the next 2 dc* ;
rep *to* all around
and join with a sl-st to the 1st
dtr.
Fasten off and weave in ends.
We’ve completed one beautiful poinsettia
table coaster ready to go.
I have an idea (which I have not actually done), but I thought that if one used a thicker yarn, one could actually get a fantastic centre piece that would neatly match these tinier coasters... but that's for another day.. OR if you try it out, do add your comments to this blog, so that we can help someone else along.
Finishing : I'd suggest you block your finished product. I would suggest you lightly iron it out on completion, and then use either a light start, stretch all the outer points out so that it stands out like the star flower it is meant to be and then allow it to shade dry flat.
The other blocking method is using a white glue (or Mod Podge) in the proportion of 1 portion glue : 2 portions water ; and then applying this paste on the back of your product with a brush. Once again ensure that you have all the peaks and ridges of your work neatly accented (pinning it down on a blocking board if need be) and allow it to flat shade dry. Oh, and as I said right at the start of this blog, if you add on a small thread onto one side, you can hang this off your tree.. of course, add bling (beads, nice shiny ones) and you got yourself an eye-catcher ;)
Happy holidays, and wish you a wonderful New Year too.
Have a fun creative time.
Enjoyed this ?? I sure did.. come back right
here for more freebie patterns
If you're visiting me here for the first time, and have liked the experience, do add me to your mailing list (for your convenience) , and all my future free patterns will come straight to your mail box.
I’d appreciate if you could credit my blog (and link the original pattern link) when you make your own creation. Thanks.
I have a few miscellaneous crochet products
already made, andjust
in case you want a dekho at those free patterns … here you go .. Click on the photo or the link below to get to the pattern blog


No comments:
Post a Comment
Thanks for taking the time to stop by. Do tell me what you think. Cheers