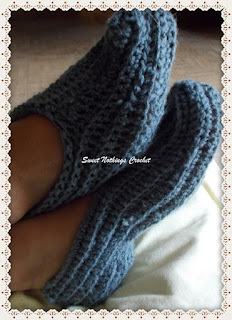
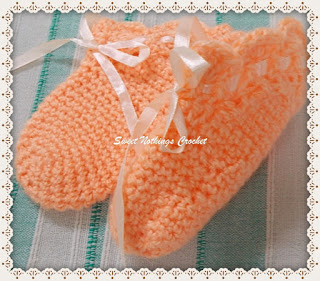
A REALLY SIMPLE PAIR OF SOCKS
( #Blogaday 08/365 )
This is a
really quick project and can make a lovely gift for anytime of the year, but
you can also start on your next year’s Xmas gifts right now
Thank you for joining me.
In case you have just joined me, know that you can access all of my earlier creations by checking under ‘categories’ on the right hand side of this blog under “Labels”. Then, for your convenience, follow me here or on Facebook, You Tube, Pinterest, Twitter or Instagram.
Check out all my social media handles at the bottom of this blog
Oh, and may I add that the fastest way to find any of my blogs is via Pinterest.
All my blogs can be printed. Find the printer friendly (green) link at the bottom of this blog. You can also hit Control P (or Command P for Mac) on your keyboard, and the blog will go directly to the connected printer.
Remember that you only print if absolutely essential. Save paper – Save Our Earth.
Do remember to add my blog URL when you make and show off your creation.
Just copy the link on the search bar above - that's the blog URL.
To purchase this or similar yarn online, click here to buy your yarns online via Amazon. While you will still pay the same, I may get paid by Amazon as well.
This is a free blog - so do pay it forward for me. Cheers.
In this blog, I have used several free pattern ideas to come up with this pair of socks. So come along and check out which one works for you.
Materials used :
Today I’ve used one skein of our lovely Indian Oswal Cashmilon acrylic yarn,
with a 4 mm crochet hook ; fabric glue to seal ends
This yarn is not specific for this project.
You can use any yarn with a suitable hook to make this project to any size.
International yarns : Among the international yarns I have used, I’d suggest Aunt Lydia Cotton 10, Aunt Lydia Bamboo-Viscose 10, DMC Petra, Sullivans knitting cotton (Australia), Milford Soft, Hilaza Rustica Eclat , Alize cotton yarn and Alize bamboo yarn.
Skill level :
Easy to Intermediate.
Stitches used :
Half Double Crochet : Hdc : yo, insert hk into st ; yo (3 lps on hk) ;
yo, draw through all 3 lps. One hdc made.
Chainless start for Half Double Crochet : I dislike the ch-2 start, and this is what I do to start my row of hdc. Check out the video at https://youtu.be/lWXpl1KdbZ8
Double Crochet : dc : yo, insert hk into st ; yo (3 lps on hk); [yo, draw through 2 lps] twice. One dc made. Check out the video at https://youtu.be/xdnjB27zpYo
Chainless start for Double Crochet : I dislike the ch-2 / ch – 3 start, and this is what I do to start my row of dc.
Invisible join : Here’s a quick tutorial on how to join using the embroidery needle and whipstitch to get an invisible join at https://youtu.be/a6XZQ6VzJFM
How to change colors seamlessly : Here’s an easy video tutorial to show you how to change from the Main color to the Contrast or second color of yarn seamlessly. View it at
https://youtu.be/fRzSBja9jno
How to carry your yarn when using two colors : Here’s an easy video tutorial to show you how to carry your yarn along when working with two colours.
Abbreviations used :
lp(s) : Loop(s) sc : Single crochet
dc : Double crochet sp : Space
sl-st : Slip stitch ch : Chain
st(s) : Stitch(es) hk : Hook
yo : Yarn Over
Instructions : (Using U.S terminology)
Please note that I start all my rows with a ch 1, turning chain for ease.
Please check the top of this blog for easy video tutorials on all stitches used in today's pattern.
Please read through all my notes before you pick up your hook, so you know just where we're heading in our pattern.
In my patterns I work with the principle of stitch count and body measurement. This means that you need to work the stitch count in pattern, till you get the measurement (length and/or width) that you need for your project.
You know me and my laziness.. and my need to
find something easier to do.
So thanks for joining me on this journey with this
easy pair of socks too.
Two patterns caught my fancy, but neither of them really worked with the yarn I was using, so I kind-of smushed these two patterns up and made my project as I went along
which I thought would suit my yarn better, thanks to the use of sc, which I preferred.
Sadly though, this is a just
an idea of what to do, (which is great.. as it is what I was going to do
anyway.. ) ; but as it didn’t have specifics, I thought I’d just jot my notes down as I went along.
This write up, then is going to be a combination
of these two patterns and then some idea(s) from my head.
Start Round 1 : with a magic chain and 6
sc in that circle.
Join with a sl-st to
the 1st st.
From the following round on, I have opted
to work in continuous rounds. I suggest
you place a marker in the last st of your start round, and then move the marker
every round.
You could also join with a sl-st at the end of each row, and the ensure that that joint line falls right at the back along the heel, if think this is easier.
Round 2 : 2 sc in the
1st sc and in each sc till end. (12 sc)
Move marker.
Round 3 : 2 sc in the
1st sc and in each sc till end. (24 sc)
Move marker.
Round 4 : sc in the 1st
sc and in each sc till end. (24 sc)
Move marker.
Round 5 : sc in the 1st
3 sc ; 2 sc in the next sc ;
*sc in the next 3 sc ; 2 sc in the next sc* ;
rep *to* 5 times. (30 sc)
Move marker.
Round 6 : sc in the 1st
sc and in each sc till end. (30 sc)
Move marker.
Gauge check :
At this point, my little circle diameter is about 3”. I am looking for an around-the-toe diameter
of 3.5”, so I am going to stop increases right now. My yarn stretch and looseness of stitching
will accommodate the needed 0.5”.
If you need a further increase, add 6 sts in the
next round so your next round will read as follows. I am assuming that there are no further
increase(s), so I am going to keep our round count going, and adding an “A”
only for one last additional increase.
Round 6A : sc in the 1st
4 sc ; 2 sc in the next sc ;
*sc in the next 4 sc ; 2 sc in the next sc* ;
rep *to* 5 times. (36 sc)
Move marker.
As we are not making any further increases, we
don’t really need to move the marker any further. The marker is just to show you the start/end
point.
Finally my Round counts.. I am going to write it
for the foot size I am making it for. I
am making it for a foot length of 9.5” (So rather than going with the regular
sizes, I’ve asked my friend to give me a pencil drawing, marking of her foot with measurements, and as you can see, we got a terrific fit.)
Round 7 – 34 :
sc in the 1st sc and in each sc till end. (30 sc)
Work this till you have it at the arch of
your foot , closest to the end of your ankle.
Before we move further a few thoughts and a
visual image of what we’re going to do.
Fold the piece you have worked so far to gauge how many inches from toe as well
as how many inches across. We have
established that this will cover across your toes, so we are not going to
increase any further but continue working in rounds without any increase till
you reach the top of your foot near your ankle ; or more than halfway up the
curve / arch of your lower foot.
At that point, we will divide for the back part of the foot, and work back and
forth in rows.
We will work back and forth rows, till your work
reaches the back of your heel.
Yes, I hear your question.. how do you gauge how far you need to work if you
are making this as a gift. Well, right
at the top of this blog is a foot measure.
So my suggestion is to check that measure board OFF your foot and see if
the sizes there match your foot and work.
If they do (which I am sure they will), then all you need to calculate and
estimate is the increase / decrease for the person you are making this
for. Easy enough, right? Let’s hook on
then.
Now that we’re at the end of the foot arch, we
will work in Rows. Let’s start
renumbering for convenience.
Move your marker up to the row to mark where
we’re going to start Row 1 for the heel.
Row 1 - 14 :
sc in the 1st sc and in the next 20 sts (21 sc)
Work for the heel, side to side, for as many
inches as you want to get the heel.
So how do you measure this bit? Place your work flat on the surface and
measure all the way from the toe till the end of the rows you’ve just completed
and see if you get the full length of foot.
I need 9.5”, so I need 9.5” from heel to end of Row 14. Once done, fasten off leaving a long tail to
attach back of foot.
Tweak Ideas :
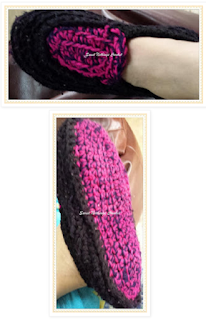
I have worked a change of yarn colour along the last 14 rows. So I worked every alternate row in a
different colour. Use one of the ideas
on how to work with two colours at the top of the blog. This gives the shoe a really complicated
look, but as you know, it’s not that much hard work!
Joining : Use one of
the joining methods at the top of this blog to join the two ends of the heel. So to join, fold the row that we’ve just
worked on in half, and then attach the two sides together. This forms the back
of the heel. Fasten off.
If using two colours, then you will fasten off
any one colour (i.e the colour that you have used to join your two sides) and
we will continue working with the other yarn around the round ankle portion.
If using only one yarn, re-attach your yarn at
the back heel join, and we will work all around the round ankle portion now.
Final finishing :
For the around ankle portion, I’ve used the idea
from here
Round 1 : sc in the 1st
st and in each st evenly all around.
Join with a sl-st to the 1st st.
It does not matter how many sc you have. Ensure only that it is a comfortable fit and
you are not scrunching your stitches together.
As a general rule, place one sc in each vertical
sc bar (for the sides of your work) and 1 sc in each sc all around.
From the following row on, we will work in post
stitches. You can work either the Front
post double crochet (fpdc) or the Front post half double crochet (fphdc). Choose your stitch and work accordingly.
Round 2 - 5 :
fphdc in the 1st st and in each st all around.
Join with a sl-st to the 1st st.
Check the top of this blog for a “how – to” on
post stitches.
Fasten off and weave in ends.
Repeat all these instructions for the 2nd
matching pair, as well as all other pairs that you are going to work on henceforth!
Now tell me, this IS a superbly easy pattern,
isn’t it? AND it gives such a cool fit too.
Enjoyed this ?? I sure did.. come back right
here for more freebie patterns
If you're visiting me here for the first time, and have liked the experience, do add me to your mailing list (for your convenience) , and all my future free patterns will come straight to your mail box.
I’d appreciate if you could credit my blog (and link the original pattern link) when you make your own creation. Thanks.
Have a great day and see you soon.
You may want to take a look at some more beautiful and unusual footwear patterns.


No comments:
Post a Comment
Thanks for taking the time to stop by. Do tell me what you think. Cheers