Sunday 31 December 2017

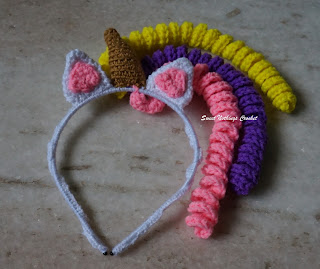
THREE UNIQUE UNICORN HEADBANDS

THREE UNIQUE UNICORN HEADBANDS

Not too long ago, I’d made one unicorn headband with a tiny unicorn stuff toy.  Day before yesterday, I posted a blog with the project I’d worked on for a cuddly, much larger unicorn stuff toy.  These three headbands were then requested for three lil kids also crazy about unicorns – I mean, who isn’t enamored by that elusive creature, right?

As you know, I like making something new and different each time – so while part of the pattern stays the same, there are differences in each headband.

Thank you for joining me.

In case you have just joined me, know that you can access all of my earlier creations by checking under ‘categories’ on the right hand side of this blog under “Labels”.  Then, for your convenience, follow me here or on Facebook, You Tube, Pinterest, Twitter or Instagram.

Check out all my social media handles at the bottom of this blog

Oh, and may I add that the fastest way to find any of my blogs is via Pinterest.


All my blogs can be printed.  Find the printer friendly (green) link at the bottom of this blog.  You can also hit Control P (or Command P for Mac) on your keyboard, and the blog will go directly to the connected printer.

Remember that you only print if absolutely essential.  Save paper – Save Our Earth. 


Do remember to add my blog URL when you make and show off your creation. 

Just copy the link on the search bar above - that's the blog URL.


To purchase this or similar yarn online, click here to buy your yarns online via Amazon.  While you will still pay the same, I may get paid by Amazon as well. 

This is a free blog - so do pay it forward for me.  Cheers.


Do join me on YouTube for a video tutorial on this project at https://youtu.be/SQMMFQPhcoE.  


Check all my social media links at the bottom of this blog – or just write Sweet Nothings Crochet or Shyama Nivas and find me on any and all social media 
Thanks for joining me.  Come along, let’s create something beautiful 

Materials used : Today I’ve used some of our lovely Indian Oswal Cashmilon 4-ply acrylic yarns with a 3 mm crochet hook ; metal headband ; embroidery needle
This yarn is not specific for this project.
You can use any yarn with a suitable hook to make this project to any size.

For Indians : You could use Anchor , Red ros ; Red rose metallic or   unbranded knitting cotton as well as  or Vardhaman acrylic yarns


Skill level : Easy to intermediate.  Basic sewing skills needed.

Abbreviations used :
lp(s) : Loop(s)                  sc : Single crochet
dc : Double crochet         sp : Space                                           
sl-st : Slip stitch               ch : Chain
st(s) : Stitch(es)               hk : Hook
yo : Yarn Over


Stitches used :
Starting slip knot : Here’s how you start with a slip knot.  https://youtu.be/lJcqsVcs8cw

Starting slip knot 1 or the Sloppy Slip knot : This is a neat new way to start your work without a slip knot.  https://youtu.be/YfC7KmGpifs

What is a slip stitch : Here is a neat video tutorial at https://youtu.be/weB3QNbA8Iw

What is a chain stitch ? Here is an easy video tutorial https://www.youtube.com/watch?v=pXx5ukBjKkY

Foundation half double crochet (fhdc) : This is an easy way to start a row of hdc without the starting chain row.
Here is an easy video tutorial https://youtu.be/SEG2UCRfypA

Half Double Crochet : Hdc :  yo, insert hk into st ; yo (3 lps on hk) ;
yo, draw through all 3 lps.  One hdc made. 
Check out the video at https://youtu.be/sDiELJdB2Dg

Chainless start for Half Double Crochet : I dislike the ch-2 start, and this is what I do to start my row of hdc. Check out the video at https://youtu.be/lWXpl1KdbZ8  

Here is a sizing chart for general head sizing :

Whipstitch to join : Here’s a quick tutorial on how to join using the whipstitch at https://youtu.be/wZ-9LNzftMA

Invisible join : Here’s a quick tutorial on how to join using the embroidery needle and whipstitch to get an invisible join at https://youtu.be/a6XZQ6VzJFM

Single crochet to join : Here’s a quick tutorial on how to join using the single crochet at https://youtu.be/6FXoW_47_dI


Instructions : (Using U.S terminology)
Please note that I start all my rows with a ch 1, turning chain for ease.
Please check the top of this blog for easy video tutorials on all stitches used in today's pattern.     

For the basic unicorn ears, horn and curly wurly insane mane, for all three projects, I have followed the pattern at https://theknottyredhead.wordpress.com/2017/02/21/unicorn-mane-headband/

free crochet headband pattern, free crochet unicorn headband pattern

free crochet headband pattern, free crochet unicorn headband pattern

The last time I’d made this, I too used a plastic headband to hold the unicorn ears and horn.  This time, I’ve used a lighter metal headband for one of the projects.
I have covered the metal headband with white sc all through – not just to give it a neater finish but also to give the ears, horn and mane a space to be neatly attached onto.
free crochet headband pattern, free crochet unicorn headband pattern

free crochet headband pattern, free crochet unicorn headband pattern

For the 2nd headband, I’ve just attached the ears, horn and mane onto a satin ribbon.

free crochet headband pattern, free crochet unicorn headband pattern

free crochet headband pattern, free crochet unicorn headband pattern

For the 3rd headband, I’ve used the headband pattern from the monkey amigurumi & headband pattern I’d made before at

Just for another difference, thrown in different colours when working the mane – so that each child gets a unique combination – that is still mysterious, cute, colourful and all unicorn!

I’ve included this small foot note that I’d used for the earlier unicorn headband project – just in case you’ve missed that.. of course, I do think you may want to check that project as well – just click on the links at the right hand side of this blog and check the “Labels” to see all the projects listed.

For the mane : The designer has given a start count of 77 sts.  What I’d suggest is that you first work that number and see if the length works for you (with the yarn and hook you’re using, assuming you are not using the same materials as used by the designer). 
In case the length does not work for you, just go ahead and add as many stitches as you need and then work the 3 hdc as instructed, and you will still get a superbly curly wurly mane.  After all, there is no specified length – and with girls, longer is probably better and more fun ;)

Oh, I also preferred to work a fsc chain instead of plain chain.  I find that not only do you get a better stitch to work the hdc into, but also get a better end result – but then I am always partial to this start 

Finally one big Thank You to the Knotty Redhead for this lovely free pattern.  I had great fun whipping this headband up – hope you have as well.

If you're visiting me here for the first time, and have liked the experience, do add me to your mailing list (for your convenience) , and all my future free patterns will come straight to your mail box.  

I’d appreciate if you could credit my blog (and link the original pattern link) when you make your own creation.  Thanks.

Check out my awesome pins on Pinterest at https://in.pinterest.com/shyamanivas/


Join me on YouTube at http://youtube.com/shyamanivas

And on my Facebook page at https://www.facebook.com/Sweet-Nothings-Crochet/ for more patterns.

Do follow me on Twitter https://twitter.com/ShyamaNivas


Find me on Ravelry at ravelry.com/projects/shyamanivas/


Have a great day and see you soon. 


I have a few toys / amigurumi already made, and just in case you want a dekho at those free patterns … here you go 


and some home use / miscellaneous free patterns ...