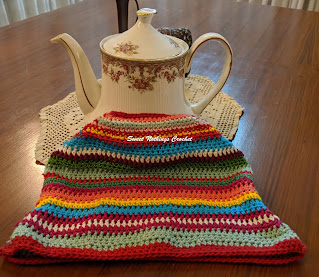
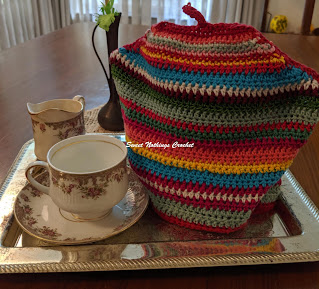
RAINBOW
TEA COZY
This
is a really special project for a good friend.
Very few people take the time to enjoy a cup of tea – a cup of tea or
coffee is just something to kick-start a day.
I was really happy to know that there are some who still take the time
out to sit down and enjoy a cuppa. This
brilliant tea cozy will just make that moment so much more fun.
Thank you for joining me.
In case you have just joined me, know that you can access all of my earlier creations by checking under ‘categories’ on the right hand side of this blog under “Labels”.
Then, for your convenience, follow me here or on Facebook, You Tube, Pinterest, Twitter or Instagram.
Oh, and may I add that the fastest way to find any of my blogs is via Pinterest.
When you click any of the links above, you'll go to that page, and to return here, just hit the back arrow on the left hand side of the page you are on.
All my blogs can be printed. Find the printer friendly (green) link at the bottom of this blog. You can also hit Control P (or Command P for Mac) on your keyboard, and the blog will go directly to the connected printer.
Remember that you only print if absolutely essential. Save paper – Save Our Earth.
Do remember to add my blog URL when you make and show off your creation.
(Just copy the link on the top of the search bar - that's the blog URL)
Cheers. Enjoy ☺
To purchase this or similar yarn online, click here to buy your yarns online via Amazon.
While you will still pay the same, I may get paid by Amazon as well.
This is a free blog - so do pay it forward for me. Cheers.
General yarn info : The yarn
used today is not specific to this pattern.
You can use any yarn with a suitable hook to make
this project to any size.
Difficulty level : Easy to Intermediate
Abbreviations used : (Using U.S
terminology)
lp(s)
: Loop(s) hdc : Half Double crochet
sc
: Single crochet sp : Space
sl-st
: Slip stitch ch : Chain
st(s)
: Stitch(es) hk : Hook
yo
: Yarn Over sk : Skip
Stitches used : Using US terminology
Single Crochet : Sc : yo, insert
hk into st ; yo (2 lps on hk); yo, draw through both lps. One sc made.
Check out the video at https://youtu.be/ghACqBpA-3k
Half Double Crochet : Hdc : yo, insert hk into st ; yo (3 lps on
hk) ;
yo,
draw through all 3 lps. One hdc
made.
Instruction information
Please note that I start all rows with a ch 1 turning chain
for ease.
Please
also check the top of this blog for neat video tutorials of all stitches used
in today’s pattern sheet.
The
beauty of today’s creation is that you can work it with any stitch you
desire.
I have used only sc and
hdc.
However, if you crochet tight, you
could even work with a dc.
This
pattern looks gorgeous mainly because of the yarn colors used.
You do not need to increase or decrease once
you start for the centre shaping.
You
could just start and then shape just for the top and end it all off.
I
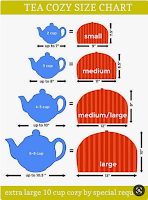
found a really interesting measurement chart that works for standard
teapots.
So first off measure your
teapot and see if it fits in one of these measurements.
We
work side to side making two identical halves for the front and back of our
teapot. We then neatly need to join the
sides and block for a neat finish.
Work
with any colors that you like. Make it
as colorful or multi colored as you desire.
I will not indicate color changes as that will ruin your creativity.
Here are a few video tutorials on working
with multiple color yarns.
How to change colors seamlessly
: Here’s an easy video tutorial to show you how to change from the
Main color to the Contrast or second color of yarn seamlessly.
How to carry your yarn when
using two colors : Here’s an easy video
tutorial to show you how to carry your yarn along when working with two
colours.
The
one thing that I did that I think made it easier for me to keep track of the
colors, is work both sides of my tea cozy at the same time. So if say I started with my fsc row with red,
I joined the next color for the tea cozy on Side 1, and then worked the red row
for Side 2. This meant that I was
working on both front and back at the same time.. so it was easy for me to
remember whatever I had done for the first side. Hope this helps.
Of
course, all of this is just for you to keep your creativity going – so you
could also make a note of it and work one side at a time J
Start with
as many fsc as needed for the length of your tea pot as per the measurement
given on the chart above. So for a
2-cup, we start with fsc measuring 9” ; for a 3-cup we work 11” across ; 12”
for a 4-5 cup teapot and for the largest 6-8 cup teapot, we start with a fsc
chain measuring 13”. Turn.
Row 1 : hdc
in the 1st fsc and in each fsc till the end. Turn.
Row 2 : hdc
in the 1st hdc and in each hdc till the end. Turn.
Row 3 : sc
in the 1st hdc and in each hdc till the end. Turn.
Row 4 : hdc
in the 1st sc and in each sc till the end. Turn.
Row 5 : Rep
Row 2.
Row 6 : Rep
Row 3.
Rep
Rows 4 – 6 till you are about 2” (or about 7 rows) from the height needed for
your tea cozy, ending with Row 6.
At
this point, I have used the 2-tog and 3-tog decrease stitches to shape the top
bit. Here are video tutorials for all
these stitches.
Single crochet 2-together : sc 2-tog :
Insert
hk into st, yo and pull up a lp (2 lps on hk) ; insert hk into next sc, yo and
pull up a lp (3 lps on hk); yo and draw through all 3 lps. One sc 2-tog complete. Visit this video tutorial at https://www.youtube.com/watch?v=whlsMemDHLc
Half double crochet 2-tog : hdc 2-tog : [yo, insert hk in st or ch-sp, yo and pull up a lp] (3 lps on hk) ;
insert hk in st or ch-sp, yo and pull up a lp (4 lps on hk) ; yo, draw through
all 4 lps on hk. One hdc 2-tog made.
Single crochet 3-tog : sc 3-tog : Here is an easy video tutorial at
Decrease Row 1 : hdc 3-tog over the 1st 3
sts ; hdc in each st till the last 3 sts ; hdc 3-tog over the last 3 sts.
Turn.
Decrease Row 2 : hdc 2-tog over the 1st 2
sts ; hdc in each st till the last 2 sts ; hdc 2-tog over the last 2 sts.
Turn.
Decrease Row 3 : sc 2-tog over the 1st 2
sts ; sc in each st till the last 2 sts ; sc 2-tog over the last 2 sts.
Turn.
Rep
Decrease Rows 1 – 3 once more.
Rep
Decrease Row 1 once more.
Fasten
off and weave in ends.
Important neatening note : Now before I ended and fastened off
that yarn after my last row, I have worked one row of sc all the way down the
sides of the tea cozy. As there is no
specific count for the number of rows, I just worked 1 sc in each st all the
way down, ensuring that it did not pucker.
I kept a note of how many stitches I worked down one side and matched
the stitches on the other side. This
helped me neatly find stitches to join.
That
said, it is not imperative that you neaten the edges and you can always join
the sides without it as well.
Joining and finishing : After you have finished both sides
of your tea cozy, use one of these finishing
Invisible join : Here’s a quick tutorial on how to join using the embroidery
needle and whipstitch to get an invisible join at https://youtu.be/a6XZQ6VzJFM
Now
before joining, please find your centre stitch on the top of your tea cozy IF
you wish to have that little ‘tab’ holder bit.
There are two ways to work this small tab.
1)
Join
the two halves till I reached that centre stitch. At that point work 6 fsc, turned and work sc
in each st back till the start. Once done,
continue down the till the end of the top and down the side, joining as you go.
2) The other
way to first join all the way to the end.
Then holding both front and back together, work 1 sc through both parts
(giving a edge finish) till you reached that centre marked stitch. Work 6 fsc at that centre point ; turn and
work sc in each sc till the start. Then continue
down the other side of your tea cozy, once again working through both halves of
the cozy at the same time. Fasten off
and weave in ends.
Blocking :
With the tea cozy a simple light wash, pat dry and iron out works. The tea cozy will take the shape of the tea
pot with use.
Enjoyed
this ?? I sure did.. Come back right here for more freebie patterns
Remember
to share this blog post when you share your photos with me on Facebook. I’d love to feature your photos on my FB
page. Cheers.
If
you're visiting me here for the first time, and have liked the experience, do
add me to your mailing list (for your convenience) , and all my future free
patterns will come straight to your mail box.
I’d
appreciate if you could credit my blog (and link the original pattern link)
when you make your own creation. Thanks.
Have
a great day and see you soon.


No comments:
Post a Comment
Thanks for taking the time to stop by. Do tell me what you think. Cheers