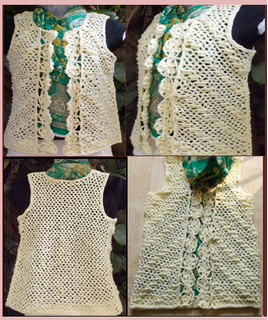
Materials used : Today I’ve used our Indian Red rose knitting cotton , ~ 200 gms, with a 3 mm crochet hook ; fabric glue to seal ends ; Mod Podge to stiffen motif
Note : Mod Podge will not work / stiffen acrylic. General yarn info : The yarn used today is not specific to this pattern.
You can use any yarn with a suitable hook to make this project to any size.
International yarns : Among the international yarns I have used, I’d suggest Aunt Lydia Cotton 10, Aunt Lydia Bamboo-Viscose 10, DMC Petra, Sullivans knitting cotton (Australia), Milford Soft, Hilaza Rustica Eclat , Alize cotton yarn and Alize bamboo yarn.
Skill level : Advanced skill level.
While each little motif is not a difficult pattern, the joining of motifs could be an Advanced skill level.
Gauge : 8” x 8” (from one pointed spoke end to the other spoke end fully extended)
Remember to pull the ch-sp and/or block it first before measuring – something I didn’t do at first. Gauge is not essential for this pattern.
Stitches used :
Abbreviations used :
lp(s) : Loop(s) sc : Single crochet
dc : Double crochet sp : Space
sl-st : Slip stitch ch : Chain
st(s) : Stitch(es) hk : Hook
dc 2-tog : Double crochet 2 together
dc 3-tog : Double crochet 3 together
trc : Treble / triple crochet
yo : Yarn Over
Instructions : (Using U.S terminology)
Please note that I start all my rows with a ch 1, turning chain for ease.
Please check the top of this blog for easy video tutorials on all stitches used in today's pattern.
Please read through all my notes before you pick up your hook, so you know just where we're heading in our pattern.
In my patterns I work with the principle of stitch count and body measurement. This means that you need to work the stitch count in pattern, till you get the measurement (length and/or width) that you need for your project.
Quick analysis of what we’re going to do here today. This is a superbly crafted set of motifs. So we’ll work our motifs and then join them on as we go along. You could also make all the motifs and then join them up at the end – but I always prefer the join-as-you-go method, so here’s how I am going to do this.
One quick note for joining and a neat finish for motifs : When starting with the magic circle, try and weave in that end as you work in your first round. We can usually get the whole tail bit in while working that first round, and then you could trim off that edge (if there’s any left) so that that’s one work less to do.
The other thing that I always do is to weave in the edge(s) when I join up my motifs – so once again at every joint, there’s a clean, woven-in edge, that looks so neat and finished.
So let’s get started with our Ice Crystal motif …
Single Crochet : Sc : yo, insert hk into st ; yo (2 lps on hk); yo, draw through both lps. One sc made. Check out the video at https://youtu.be/ghACqBpA-3k
First stitch for Single Crochet : This is how I like to start my row of sc. Check out the video at https://youtu.be/6pVYRfsf4_M
Start : with a magic circle and 18 sc in that magic circle.
Join with a sl-st to the 1st sc.
Pull lightly to close the circle.
Double Crochet : dc : yo, insert hk into st ; yo (3 lps on hk);
[yo, draw through 2 lps] twice. One dc made.
Chainless start for Double Crochet : I dislike the ch-2 / ch – 3 start, and this is what I do to start my row of dc.
Round 1 : dc in the 1st 3 sc ;
*ch 2, dc in the next 3 sc* ;
rep *to* 4 times ;
ch 2, join with a sl-st to the 1st dc.
Round 2 : sc in the 1st dc ;
*ch 4, sk next dc, sc in the next dc ;
2 sc in the next ch-2 sp ; sc in the next dc* ;
rep *to* till end and join with a sl-st to the 1st sc.
Round 3 : sl-st into the 1st ch-4 sp ;
5 dc in the same ch-4 sp ;
*ch 2, sk next 4 sc, 5 dc in the next ch-4 sp* ;
rep *to* till end ;
ch 2, and join with a sl-st to the 1st dc.
Round 4 : 2 dc in the 1st dc ;
2 dc in the next dc ;
*ch 2, sk next dc, 2 dc each in the next 2 dc ;
ch 3, 2 dc in the next dc* ;
rep *to* till end ;
ch 3, and join with a sl-st to the 1st dc.
Round 5 : sc in the 1st 4 dc ;
*ch 15, sc in the next 4 dc ;
3 sc in the next ch-3 sp ; sc in the next 4 dc* ;
rep *to* till last ch-3 sp ;
3 sc in that same last ch-sp and join with a sl-st to the 1st sc.
In the following round, we'll work a picot.
How to work a picot stitch : Traditionally for a ch-3 picot, you work (ch 3, sl-st in 3rd ch from hook). For a ch-5 picot, you will do (ch 5, sl-st in 5th ch from hook).
Round 6 : sc in the 1st sc ;
*sk next 3 sc , 9 dc in the next ch-15 sp ; Picot, 9 dc in the same ch-15 sp ;
sk next 3 sc ; sc in the next sc ;
sk next sc, dc in the next sc ; [Picot , dc in the same sc] ;
rep [to] 2 times ;
sk next sc, sc in the next sc* ;
rep *to* till end and join with a sl-st to the 1st sc.
Great job ! One motif done !
You will continue making motifs this way, but for each of the next motifs, we will use the “Join-as-you-go” method which will apply on Round 6 when you join 2 motifs.
Please read notes below before doing the next motif.
So here’s where you need to check a few things :
1. Check to see the size / gauge of this motif and then calculate how many motifs you would need for the front and back of your own creation. For this, (as I have said before, use my cheat method ..) I always like to keep a well-fitting garment of the person for whom this is intended as a gauge. Of course, one could also just calculate based on the width of this motif and the size of the person for whom this is intended and work accordingly.
2. We will be working from the waist up for our bolero, and then work continuously for the sleeves. We will then come back to the waist line and work a small frilly decorative bit – but that’s later.
3. All attachments between motifs will be via Picot. So when joining, you will work [ch 2, join with next motif , ch 2] in all spaces where there is a join needed between motifs. For all other picots, you will work as per pattern.
Read explanation below for motif joining
4. For each motif join, you will use the picot between the two 15-dcs sets and all the four picots in between these two sets.
5. Motif : I found that while joining the motifs , increasing the chain length of one set of motifs worked out better for me. The explanation here may be a little complicated, so bear with me. We have motifs in two sets of this crystal pattern. One is at the centre of the ch-15 sp, and here I have kept the regular ch-5 picot. The second is a set of four picots that is part of a 4-dc set between the ch-15 sps. Hopefully, you’re with me till here.
So, in this four picot set, I’ve made the chs 6 each (as against a ch 5) ; and then the joining for this set of motifs will be [ch 3, join with next motif , ch 3]. I found just this addition of one extra chain each end allowed my motifs to sit flatter. This is just an opinion. IF you find that you are OK with the ch-5 picots, please go ahead.
Attach your yarn in one of the 15-dc join spaces (i.e the ch-sp where you have joined two 15-dc sets).
Round 1 : ch 5, sc in the 1st ch-6 sp (which is that set of four ch-6 sps between two 15-dc sets) ;
*[ch 5, sc in the next ch-6 sp] ;
rep [to] 2 times ;
ch 5, sc in the next ch-sp that joins two 15-dc sets* ;
rep *to* all around.
Join with a sl-st to the 1st st.
Note : There will be some parts along this round where the instructions “may” not work because you will be looking for the sp that joins two 15-dc sets, and its just that one ch-6 sp in the middle of the 15 dc, but that’s not a problem – because that is the ch-sp you need to use.
Basically we’re going to have one round of ch-5 sps.
Round 2 : ch 5, sc in the 1st ch-5 sp ;
* ch 5, sc in the next ch-5 sp* ;
rep *to* all around.
Join with a sl-st to the 1st st.
Rounds 3 - 4 : Rep Round 2.
Ensure that you have a multiple of three ch-5 sps all around.
(which means you should have 15, 18, 21 ch-5 sps.. of course we need a lot more than 15 ch-5 sps , but you get what I mean)
Round 5 : 5 dc in the 1st ch-5 sp ;
*5 dc in the next ch-5 sp* ;
rep *to* all around.
Join with a sl-st to the 1st st.
In the following round, we will be doing our dcs in the space between dc’s, and not in the dcs.
Round 6 : sc in the 1st dc ;
*ch 15, sk next 1 5 dc, sc in the sp between dcs* ;
rep *to* all around.
Join with a sl-st.
Ensure that you have an odd number of ch-15 sps .
Round 7 : 11 dc in the next ch-15 sp ;
(dc ; ch 2, dc) in the next ch-15 sp ;
*ch 5, 11 dc in the next ch-15 sp ;
ch 5, rep (to) in the next ch-15 sp* ;
rep *to* all around ;
ch 5 and join with a sl-st.
Round 8 : 2 dc in the 1st dc ;
dc in the next 9 dc ; dc in the next dc ;
ch 5, (2 dc in the next dc ; 2 dc in the next ch-2 sp ;
2 dc in the next dc) ;
*ch 5, 2 dc in the next dc ; dc in the next 9 dc ;
2 dc in the next dc ;
ch 5, rep (to) once* ;
rep *to* all around ;
ch 5 and join with a sl-st.
Double crochet 2-tog : dc 2-tog : [yo, insert hk in st or ch-sp, yo and pull up a lp ; yo and draw through 2 lps] 2 times (3 lps on hk) ;
{yo, draw through 2 lps on hk} 2 times. One dc 2-tog made.
This video tutorial at https://youtu.be/1_oPlUfN5eg shows you how to use the dc 2-tog to decrease.
Sometimes we work the dc 2-tog in the same stitch, to use as a decorative stitch. Visit this video tutorial at https://youtu.be/lLUXOJ1sY9w
Round 9 : dc 2-tog over the 1st 2 dc ;
dc in the next 9 dc ; dc 2-tog over the next 2 dc ;
ch 5, (dc in the next dc ; [ch 1, dc in the next dc] ;
rep [to] 4 times) ;
*ch 5, dc 2-tog over the next 2 dc ;
dc in the next 9 dc ; dc 2-tog over the next 2 dc ;
ch 5, rep (to) once* ;
rep *to* all around ;
ch 5 and join with a sl-st.
Round 10 : dc 2-tog over the 1st 2 dc ;
dc in the next 7 dc ;
dc 2-tog over the next 2 dc ;
ch 5, (2 dc in the next dc ;
[ch 1, 2 dc in the next dc] ;
rep [to] 4 times) ;
*ch 5, dc 2-tog over the next 2 dc ;
dc in the next 7 dc ;
dc 2-tog over the next 2 dc ;
ch 5, rep (to) once* ;
rep *to* all around ;
ch 5 and join with a sl-st.
Round 11 : dc 2-tog over the 1st 2 dc ;
dc in the next 5 dc ;
dc 2-tog over the next 2 dc ;
ch 3, (2 dc in each of the next 2 dc ;
[ch 1, 2 dc in each of the next 2 dc] ;
rep [to] 4 times) ;
*ch 3, dc 2-tog over the next 2 dc ;
dc in the next 5 dc ; dc 2-tog over the next 2 dc ;
ch 3, rep (to) once* ;
rep *to* all around ;
ch 3 and join with a sl-st.
Round 12 : dc 2-tog over the 1st 2 dc ;
dc in the next 3 dc ; dc 2-tog over the next 2 dc ;
ch 3, [2 dc in the next dc ; dc in the next 2 dc ; 2 dc in the next dc] ;
(ch 1, rep [to] once) ;
*ch 3, dc 2-tog over the next 2 dc ;
dc in the next 3 dc ; dc 2-tog over the next 2 dc ;
ch 3, rep [to] once ;
rep (to) 5 times* ;
rep *to* all around ;
ch 3 and join with a sl-st.
Round 13 : dc in the 1st dc ;
dc 3-tog over the next 3 dc ; dc in the next dc ;
ch 3, dc in the next 6 dc ;
(ch 1, dc in the next 6 dc) ;
rep (to) 4 times ;
*ch 3, dc in the 1st dc ;
dc 3-tog over the next 3 dc ; dc in the next dc ;
ch 3, dc in the next 6 dc ;
(ch 1, dc in the next 6 dc) ;
rep (to) 4 times * ;
rep *to* all around ;
ch 3 and join with a sl-st.
Round 14 : dc 3-tog over the 1st 3 dc ;
ch 3, dc in the next 6 dc ;
(ch 1, dc in the next 6 dc) ;
rep (to) 4 times ;
*ch 3, dc 3-tog over the next 3 dc ;
ch 3, dc in the next 6 dc ;
rep (to) 5 times* ;
rep *to* all around ;
ch 3 and join with a sl-st.
Round 15 : sc in the 1st st ;
(ch 7, sk next 6 dc, sc in the next ch-1 sp) ;
*rep (to) 4 times ;
ch 7, sc on top of the trc 3-tog ;
rep (to) once* ;
rep *to* all around ;
ch 7 and join with a sl-st to the 1st st.
Last Round : sc in the 1st st ;
*7 sc in each ch-7 sp ; sc in each sc*;
rep *to* all around ;
join with a sl-st.
Fasten off and weave in ends.
Note : I decided to stop my rounds at Round 15 as it fits perfectly and I also love the way the border curls and furls at this point. Just adding this so you could also stop at any point.. also I have not done the last few rounds myself, just written out the pattern – so hope there are no errors there.


No comments:
Post a Comment
Thanks for taking the time to stop by. Do tell me what you think. Cheers