Welcome to Sweet Nothings Crochet for loads of free crochet patterns, video tutorials & awesome creations. If you want to learn, or just want to see some great free patterns, you're in the right place. All my blogs have video tutorials with loads of ideas thrown in for good measure. Thanks for dropping by and I hope you'll stay a while.
Friday, 9 August 2019
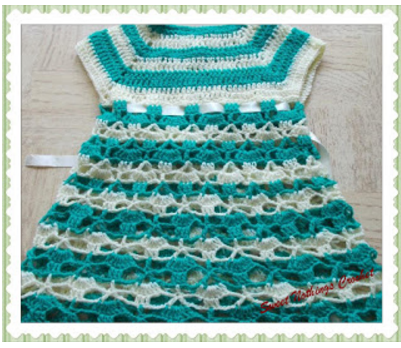
IN THE GARDEN SUNDRESS
The
last crochet pinafore that I made prompted this beautiful crochet sundress. My crochet pinafore dresses are here and here
This gorgeous dress has been on my “to-do” list for a while... the combination of
white with the green border and the large flowers has been tempting me and I’m
thrilled to be working on this creation today.This dress will truly bring out the creativity in you – there is so much
scope to make something so beautiful and I’m sure you’re gonna love it.Today’s sleeveless sundress comes with a
matching jacket and headband.
Be prepared for a long blog with loads of patterns and video tutorials.Thank you for joining me.
In case you have just joined me, know that you can access all of my earlier creations by checking under ‘categories’ on the right hand side of this blog under “Labels”.
How labels work : All patterns under a similar label can be found together so when you click on the label for say "crochet baby dress pattern", all my baby dress patterns are available - so scroll down to the very bottom and click on "Older Posts" to move onto the next post in the series. Before you reach that you have several other ways to find my blogs including blog links at the bottom of this blog For your convenience, follow me here or on Facebook, You Tube, Pinterest, Twitter or Instagram. Oh, and may I add that the fastest way to find any of my blogs is via Pinterest and if you are looking for more children wear then come here All my blogs can be printed. Find theprint friendly (green) link on the right of this blog. You can also hit Control P (or Command P for Mac) on your keyboard, and the blog will go directly to the connected printer. Remember that you only print if absolutely essential. Save paper – Save Our Earth.
Do remember to add my blog URL when you make and show off your creation.
Just copy the link on the search bar above - that's the blog URL.
To purchase this or similar yarn online, click the highlighted links below to buy your yarns online via Amazon. While you will still pay the same, I may get paid by Amazon as well. This is a free blog - so do pay it forward for me. Cheers.
Single Crochet : Sc : yo, insert hk into st ; yo (2 lps on hk); yo, draw through both lps. One sc made. Check out the video at https://youtu.be/ghACqBpA-3k
First stitch for Single Crochet : This is how I like to start my row of sc. Check out the video at https://youtu.be/6pVYRfsf4_M
How to picot : Traditionally for a ch-3 picot, you work (ch 3,
sl-st in 3rd ch from hook).For a ch-5 picot, you will do (ch 5, sl-st in 5th ch from
hook).
Please note that I start all my rows with a ch 1, turning chain for ease.
Please check the top of this blog for easy video tutorials on all stitches used in today's pattern.
Please read through all my notes before you pick up your hook, so you know just where we're heading in our pattern.
In my patterns I work with the principle of stitch count and body measurement. This means that you need to work the stitch count in pattern, till you get the measurement (length and/or width) that you need for your project.
Today’s
pattern is for a dress with a matching bolero / jacket as well as a headband.We first make the dress and jacket and then a
set of floral motifs, which we then go a little crazy attaching onto the dress,
jacket and headband.
Today’s
creation comes with a video tutorial.
This
creation is a beauty – and it has several possibilities.
I
have done it one way and I have given you several ideas on how you can do it
differently as well.
As
always, I request that you read through all instructions first before picking
your hook and yarn up.
I
also request that once you have read through and assimilated what I am helping
you create, you pick up your hook and yarn and try and work it.
Before
we start out, let me give you an idea of what we’re creating here today.
We
start our dress at the waist for the yoke /top part of the dress. Once we complete
the yoke, we finish off and put that side.We then head down to same start fsc row working the skirt portion towards
the hem of the dress.
So
for the yoke portion, we work on one side of the fsc, and when we finish that
portion off, we come back down to the same start fsc row and work the skirt
portion.
As
always for my work, I like to start with the foundation single crochet stitch.
I
know that when I did it for the first several times, I cribbed and struggled
with the fsc – but now that I have figured it out, this is my ‘go-to’ start
stitch.
I
urge you to also struggle and fidget and curse me till you get that stitch down
as its well worth the effort.
There
are several stitches that one can use for the chest / yoke portion.
Please
read through this pattern sheet to decide which one you want.
This
creativity applies for the lower portion of the dress as well.
We
work our yoke just till slightly above the armhole and depending on the depth you
wish for your neckline.We will then
fasten off and work a strap that goes all the way from the front to the back of
your yoke, attaching the two sections.
Start :
with as many fsc needed in multiples of 3 + 1 for half the round waist
of the child.Turn.
Our
“V”-st is (dc ; ch 1, dc) all in the same st or ch-sp.
Double Crochet : dc :yo, insert hk into st ; yo (3 lps on hk); [yo, draw through 2 lps] twice.One dc made.Check out the video at https://youtu.be/xdnjB27zpYo
Chainless start for Double Crochet : I dislike the ch-2 / ch – 3 start, and this is what I do to start my row of dc.
In
our case, we will work a dc 2-tog using a dc for the 1st leg and the
“V”-st for the 2nd leg.The video above shows you how to work it for this pattern.
What
does this mean?Each dc 2-tog is worked
over 2 dc, but in our case we are working it over a dc and a “V”-st.The “V”-st is made up of 2 dc and a ch-sp,
right?So we will use the 1st
dc of the “V”-st and the earlier dc of that row to work our dc 2-tog.Got it?
Decrease row : dc 2-tog over the 1st dc and 1st
“V”-st ;
“V”-st in the next “V”-st and in each “V”-st
till the last “V”-st and dc ;
dc
2-tog over the last “V”-st and dc.Turn.
Rep
the Decrease row once more to get a small curve.
In
case you are working this for a slightly older child, please repeat it twice.
The
best way to decide on the armhole curvature is by keeping a well-fitting dress
of the child as a draft to check.
Take
a look at the charts given for body sizing and work this only till the neckline
portion.We will attach straps for the
top of the dress later.
Now
for the tweaks
a)You can opt
to work 1 sc in each fsc all the way to the end for each row till you reach the
neckline – so a full-sc yoke
b)Similarly
you can work 1 hdc or 1 dc all the way in each fsc and work this for all the
rows till you reach the neckline – so a full hdc or full dc yoke
c)You can work
the Linen stitch which is sc/hdc/dc in the 1st st ; ch 1, sk next st
and sc/hdc/dc in the next st.Work the
Linen st for the whole yoke.
Whatever
stitch you choose, ensure that it is worked for the full yoke- from waist till the neckline and for both
front and back.
If
you choose any other stitch rather than the “V”-st then your decreases are
easier.Once again, I urge you to keep a
well fitting dress of the child as a draft for a neat and exact shaping and
measure.
To
start the decreases here, you will first sl-st past the 1st 5 sts
and then you will work a sc/hdc/dc 2-tog over the 1st 2 sts ; work
your stitches all the way till the last 6 sts, and then work a sc/hdc/dc 2-tog
over the next 2 sts (i.e. the 6th last and the 5th
last).
For
the next row, you will work a decrease over the 1st 2 and the last 2
sts once more before you continue on without any shaping or decreases.
Remember that we do
not need a button opening along the back as the dress has the large
neckline.However, you could opt
to add one button which would mean that you work the last two rows for the
back till the halfway point of the back and then work back to the armhole
side.
You
will then attach a button on one end and a button hole on the other end to
close
Once
done, join the sides, using one of the many links given above for joining.
We
will then work in rounds for the skirt portion of our dress.
PART 2 :Shoulder straps :
The
easiest way to get this right is to place a well fitting dress of the little
girl and use that as a draft.Mark where
you need the two shoulder straps for both front and back and both sides of the
yoke as well.
Now
there are two ways to make this strap.
1)You
can make the strap separately and then neatly attach onto the yoke or
2)Join the
yarn at the marked stitch and work the strap directly – and join it to the
other side of the yoke (i.e from back to front)
How
do you make the strap?
I’ve
just worked the “V”-st pattern all through for the length.Check both ideas below.
In
case you have worked a different pattern for the yoke, then use the same start
number of fsc, but work whatever stitch you have worked for the yoke all the
way for your straps.
Use
the same ideas given here for the two ways to make a shoulder strap.
Finally
attach and finish your shoulder strap and armhole in the same way.
Shoulder straps 1 : (Make two)
Start Row 1 : with 11 fsc.Turn.
Row 2 :
dc in the 1st fsc ; “V”-st in the next fsc ;
(sk
next 2 fsc, “V”-st in the next fsc) ;
rep
(to) 2 times ;
dc
in the last fsc.Turn.
Row 3 :
dc in the 1st dc ; “V”-st in the next “V”-st till the last dc ;
dc
in the last dc.Turn.
Rep Row 3 till you have the length needed for your shoulder strap.
Fasten
off leaving a tail for attachment.
Check
where you wish to attach your straps, from the end of your yoke.
Mark
the stitch on your yoke for both front and back and then neatly attach your
shoulder straps on both sides of your yoke.
Shoulder straps 2 : (Make two)
For
this method, we will work the same pattern, but start by attaching our yarn to
the stitch where we want the strap.
I
joined my yarn at the right hand side corner of my work and then worked till
the pattern for one side.As I am
working the “V”-st, the right and wrong side of work are not that obvious, so
you could just turn your work around for the left side and work again from the
end of work.
You
will work a rep of Row 2 of the strap 1 pattern above.
You
will work only two straps (one each for the two sides) till you have the length
needed.Fasten off leaving a tail for
attachment.Mark the point of attachment
along the back, and neatly attach shoulder straps.
Shoulder strap / armhole finishing : I usually
give all finishing tips at the end, but as this is a longer pattern, I thought
I’d give it as we go.
As
we have worked our straps from the end and have a small armhole shaping, we
will be working this border all the way from the armhole point along the end of
the shoulder strap and all the way back to the armhole point – so this is an
armhole finish as well.
The
first row that you work will need to be the exact round waist measure and needs
to be in multiples of the stitch count given.The pattern gives you a nice easy flared skirt portion for your dress.
But
if you want it really flared, you will need to skip less stitches when
you are working just the first “V”-st round.The pattern states that you sk 2 sts in
between each “V”-st, so for a more frilly end result, skip just 1 st.
Do
note that the amount of yarn you will swallow up will be more, and I do not
have a calculation for that – but as these are regular colours, one assumes
that you can get them without a problem if needed.. so go ahead, create and
make something dashingly beautiful.
Our
“V”-st is (dc ; ch 1, dc) all in the same st or ch-sp.
Round 1 :
“V”-st in the 1st fsc ;
(sk
next 2 fsc, “V”-st in the next fsc) ;
rep
(to) till the end and join with a sl-st to the 1st st.
We
will now work a Small Shell stitch which is (2 dc ; ch 1, 2 dc) all in the same
st or ch-sp
We
will also be working all our shell sts in the ch-1 sp of the earlier shell st
(or “V”-st for Row 2)
Round 2 :
Shell st in the 1st “V”-st and in each “V”-st all around.
Join
with a sl-st to the 1st st.
Rounds 3 - 4 : Rep Round 2.
We
will now work a Medium Shell stitch which is (3 dc ; ch 1, 3 dc) all in the
same st or ch-sp
Round 5 :
Medium Shell st in the 1st Shell st and in each Shell st all
around.
Join
with a sl-st to the 1st st.
Rep
Round 5 till you have the length needed for your skirt.
Please
read Note below
In
case you are making this dress for an older child, you could work in a Large
Shell stitch which is (4 dc ; ch 1, 4 dc) all in the same st or ch-sp.
Note :
The last few rounds need to be in green so that you get a great background for
the flowers.
So
for the last 3” or so, I’ve worked in green.
That
said, you could work the whole dress in one colour and the flowers will still
stand out.
For
yarn approximation, I worked just over 3 balls in white for the yoke and dress
and then used one ball of green for the last few rows.As I said before, I’ve made my dress for a
3-yr old.
PART 4 : Jacket :
Our
stitch count is in multiples of 3 + 1
Make
two front pieces and one back piece.After making the three pieces, attach the sides, leaving the armhole
opening ; attach the shoulder bits and then we will work a small sleeve.Finally we will finish the front opening and
add on the flowers.
I
am going to give you several ideas for the jacket.Do read through my detailed notes and decide
which suits you best.
Back :(Make
one)
Start :
with as many fsc needed in multiples of 3 + 1 for half the round waist
of the child.Turn.
Our
“V”-st is (dc ; ch 1, dc) all in the same st or ch-sp.
Row 1 :
dc in the 1st fsc ;
(sk
next 2 fsc, “V”-st in the next fsc ; sk 2 fsc 3 dc in the next fsc) ;
rep
(to) till the last 3 fsc ;
sk
next 2 fsc, dc in the last fsc.Turn.
In
the following rows, we will be working a set of 3 dc in each “V”-st and working
a “V”-st in the middle (i.e. 2nd dc) of the earlier 3-dc set.This way we “move” the “V”-sts and 3-dc sets
each row.Easy enough, right?
Now
you can opt to work the same pattern as you have for the yoke – with a “V”-st
in each “V”-st too.I just did this
because I could ;)
Row 2 :
dc in the 1st dc ;
(3
dc in the next “V”-st ; sk next dc, “V”-st in the next dc) ;
rep
(to) till end ;
dc
in the last dc.Turn.
Row 3 :
dc in the 1st dc ;
(sk
next dc, “V”-st in the next dc ; 3 dc in the next “V”-st) ;
rep
(to) till end ;
dc
in the last dc.Turn.
Rep
Rows 2 & 3 till you reach the shoulders.This will give you two rectangles for the front of your jacket and one
rectangle for the back.Join the two
fronts to the back along the sides and shoulders
Now
in case you want to shape for armhole, then do what we did for armhole shaping
of the yoke.
Similarly
if you want to shape a neckline on the two jacket front pieces, then you will
repeat the armhole shaping idea, but working with the jacket lapel (so the
opposite side from armhole and sides of jacket)
The
simplest and easiest neckline shaping would be a square – and for this, you
just decide how deep you want your neckline, place a marker and when you are
working from armhole towards the centre of neck, stop at the marker and then
continue working from armhole to this marked stitch all the way till you reach
the shoulders.This way you will have a
straight line from the ‘neck depth’ all the way to the shoulder.
When
deciding on where you are placing this marker, pay attention to the shoulder
width and ensure that the line leads straight (or almost straight) up to
the shoulders.
In
case you want a narrow shoulder but not that narrow a strap leading to it, then
you will decrease with a slight “V”-shape.This means that the marker that marks the neck depth is not straight in
line with the shoulder width and then you will decrease this end as well till
you reach the shoulder and get the width needed for that point.
At
the end, we will finish off this end (just as we did the armhole), so it will
all neatly match up.
PART 5 : Flowers & leaves
For
the flowers there are several patterns out there and you will find many
patterns on my blog as well.Here are
some more for you.
Just
make the flower motifs and then attach them neatly onto the base green portion
of the dress.
Flower pattern 1 :
I
am not going to indicate color changes – do allow your creativity to take you
someplace wild.This flower has 8
rounds.You can make it a smaller flower
by working till Round 4 or 6 and you’ll have a new flower for your sundress
Start Round 1 : with a magic circle and work 9 sc in it.
Join
with a sl-st to the 1st st.
Round 2 :
work 2 sc in the 1st sc and in each sc all around.
Join
with a sl-st to the 1st st.
Note :
If you want a larger centre bit, work hdc instead of sc.
Round 3 :
sc in the 1st sc ;
(ch
3, sk next 2 sc, sc in the next sc) ;
rep
(to) all around.
Join
with a sl-st to the 1st st.
Half Double Crochet : Hdc :yo, insert hk into st ; yo (3 lps on hk) ;
(hdc
; dc ; trc ; dc ; hdc all in the ch-3 sp ; sl-st in the next sc) ;
rep
(to) all around.
Join
with a sl-st to the 1st st.
Round 5 :
hdc in the 1st st ;
(ch
5, sk next 2 hdc, dc and trc, hdc in the next sc) ;
rep
(to) all around.
Join
with a sl-st to the 1st st.
Round 6 :
sc into the 1st hdc ;
(sc
; 2 hdc ; 3 dc ; 2 hdc ;
sc all in the ch-5 sp ; sc in the next hdc) ;
rep
(to) all around.
Join
with a sl-st to the 1st st.
Round 7 :
hdc in the 1st sc ;
(ch
7, sk next sc, 2 hdc, 3 dc, 2 hdc, 1 sc and hdc in the next sc) ;
rep
(to) all around.
Join
with a sl-st to the 1st st.
Round 8 :
sc into the 1st hdc ;
(sc
; 2 hdc ; 2 dc ; 3 trc ; 2 dc ; 2 hdc ;
sc all in the ch-7 sp ; sc in the next
hdc) ;
rep
(to) all around.
Join
with a sl-st to the 1st st.
Flower pattern 2 :
Once
again, go creative with your color changes.
This
flower has 7 rounds.
You
can make it a smaller flower by working till Round 3 or 5
Start Round 1 : with a magic circle and work 8 sc in it.
Join
with a sl-st to the 1st st.
Round 2 :
work 1 dc in the 1st sc ;
(ch
1, dc in the next sc) ;
rep
(to) all around.
ch
1 and join with a sl-st to the 1st st.
Round 3 :
work 1 sc in the 1st dc ;
(hdc,
3 dc, hdc all in the next ch-1 sp ; sc on the next dc) ;
rep
(to) all around.
In
the following round, we will once again work a round of ch-sps, but we will
work them from under Round 3, and around the post of Round 2 (all the
dc’s from Round 2)
Round 4 :
work 1 sc around the post of 1st dc from Round 2 ;
(ch
3, dc around the post of the next dc from Round 2) ;
rep
(to) all around.
ch
1 and join with a sl-st to the 1st st.
In
the following round, we will work all our sts in the ch-3 sps just made
Round 5 :
sl-st into the 1st ch-3 sp ;
(sc,
hdc, 5 dc, hdc, sc all in the next ch-3 sp ; sc on the next dc) ;
rep
(to) all around and join with a sl-st to the 1st st.
In
the following round, we will once again work a round of ch-sps, but we will
work them from under Round 5, and around the post of the stitch between
two petals from Round 4
Round 6 :
work 1 sc around the post of 1st st from Round 4 ;
(ch
3, dc around the post of the next st from Round 4) ;
rep
(to) all around.
ch
1 and join with a sl-st to the 1st st.
In
the following round, we will work all our sts in the ch-3 sps just made
Round 7 :
sl-st into the 1st ch-5 sp ;
(sc,
2 hdc, 5 dc, 2 hdc, sc all in the next ch-5 sp ; sc on the next dc) ;
rep
(to) all around and join with a sl-st to the 1st st.
Flower pattern 3 :
Start Round 1 : with a magic circle and work 6 sc in it.
Join
with a sl-st to the 1st st.
Double crochet 2-tog : dc 2-tog : [yo, insert hk in st or ch-sp, yo and pull up a lp ; yo and draw through 2 lps] 2 times (3 lps on hk) ;
{yo, draw through 2 lps on hk} 2 times. One dc 2-tog made.
Sometimes we work the dc 2-tog in the same stitch, to use as a decorative stitch. Visit this video tutorial at https://youtu.be/lLUXOJ1sY9w
Round 2 :
ch 3 + dc 2-tog + ch 3 all in the 1st st ; sl-st into the same 1st
st ;
(sl-st
into the next st ; ch 3 + dc 2-tog + ch 3 all in the next st ; sl-st into the
same st) ; rep (to) all around.
Join
with a sl-st to the 1st st.
If
you want to make this a larger flower, start with more sts.
Leaf pattern :
Start Row 1 : with 7 ch.
Turn and work a sl-st in the 3rd ch from hk ; sc in the next
ch ; hdc in the next 2 ch ; 5 dc in the last ch ;
(we’re
now working on the other side of the leaf) ;
hdc
in the next 2 sts ; sc in the next st ; sl-st in the next st.
Fasten
off and leave a tail for attachment.
PART 6 : Headband
For
the headband, I’ve decided to use the same Medium Shell stitch which is (3 dc ;
ch 1, 3 dc) all in the same st or ch-sp.
I
am going to start and end with a small rubber band for my headband.When choosing a rubber band, ensure that it
is the one that is wrapped with fabric so that it does not snag the hair of
your lil girl.
I
am making a slender headband and I am going to add some flowers on it.
Now
as we are using the elastic rubber band, I have worked the 7 sc around the
elastic rubber band for my start row.
Row 1 :
dc in the 1st st ; sk the next 2 sts,
(3 dc ; ch 1, 3 dc) all in the
next st ; sk the next st , dc in the last st.Turn.
Row 2 :
dc in the 1st dc ; (3 dc ; ch 1, 3 dc) all in the next ch-1 sp ; dc
in the last dc.Turn.
Rep
Row 2 till you have the length needed for your headband.
For
the last row, to join to the headband, join with 7 sc.
Fasten
off and weave in ends.
Add
flowers as needed to embellish the headband.
I had a really fun creative day and I do hope you do too.
If you're visiting me here for the first time, and have liked the experience, do add me to your mailing list (for your convenience) , and all my future free patterns will come straight to your mail box.
I’d appreciate if you could credit my blog (and link the original pattern link) when you make your own creation. Thanks.


No comments:
Post a Comment
Thanks for taking the time to stop by. Do tell me what you think. Cheers