Thank you for joining me.
In case you have just joined me, know that you can access all of my earlier creations by checking under ‘categories’ on the right hand side of this blog under “Labels”. Then, for your convenience, follow me here or on Facebook, You Tube, Pinterest, Twitter or Instagram.
Check out all my social media handles at the bottom of this blog
Oh, and may I add that the fastest way to find any of my blogs is via Pinterest.
All my blogs can be printed. Find the printer friendly (green) link on the right side of this blog. You can also hit Control P (or Command P for Mac) on your keyboard, and the blog will go directly to the connected printer.
Remember that you only print if absolutely essential. Save paper – Save Our Earth.
Do remember to add my blog URL when you make and show off your creation.
Just copy the link on the search bar above - that's the blog URL.
To purchase this or similar yarn online, click here to buy your yarns online via Amazon. While you will still pay the same, I may get paid by Amazon as well.
This is a free blog - so do pay it forward for me. Cheers.
with a 4 mm (US 6 , G) crochet hook. ~ 1.6 skeins , 160 gms
Skirt : 2 shells (rows) x 1 shell (across) = 1”
Starting slip knot : https://youtu.be/lJcqsVcs8cw
Whipstitch to join : https://youtu.be/wZ-9LNzftMA
Invisible join : https://youtu.be/a6XZQ6VzJFM
Single crochet to join : https://youtu.be/6FXoW_47_dI
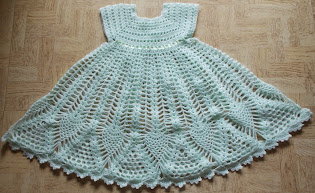
This is not my pattern. These are just my detailed notes as I work on my own creation. I have used this link for the pattern and chart here
Come along..
dc in 1st fsc ; dc in the next 7 fsc ; 2 dc in the next fsc ;
dc in each fsc till end. Turn. (8 sts increased)
ch 2, dc in ch-sp ;
ch-1, dc in next dc ; ch 2* ;
dc in the next 13 fsc ; 2 dc in next fsc* ;
ch 2, dc in ch-sp ;
The back is split 8 + 8 to accommodate for the buttons.
Easy enough, right?
So whatever size you are working on, get the yoke size from the chart and work on that first.
So go ahead and make the yoke for the size needed now.
Our stitch count for the skirt is in multiples of 8
ch 1, sk next dc , dc in next dc*;
From now on , we will work a Shell st in the ch-sp of the earlier Shell st, and a dc in each dc.
Round 2 : dc in the 1st dc ;
ch 1, dc in next dc* ;
and join with a sl-st to the 1st st.
If you would like more flare for your dress, increase the chain space between dc and Shell st.
It does not matter how many rounds you work with a ch-1 sp ; ch-2 sp and ch-3 sp. Just space it out a bit, and have fun.
Ensure though that on your last round, you have ch-3 sps in between.
So yes, I know what you are wondering.. If you are working a different length OR you have a different gauge, how will you calculate how many rows of shell stitch before you start on your pineapple? Right?
Why do I need to calculate gauge? So that you know how many pineapple patterns you need for the length you want.
Confused still - let's get numbers in.
Round 3 : dc in the 1st dc ;
7 dc in the ch-2 sp ;
ch 3, dc in the next dc*;
and join with a sl-st to the next st.
(ch 1, dc in the next dc) ;
and join with a sl-st to the next st.
and join with a sl-st to the next st.
and join with a sl-st to the next st.
and join with a sl-st to the next st.
ch 5, Shell st in the next Shell st*;
and join with a sl-st to the next st.
and join with a sl-st to the next st.
Round 10 : Shell st in 1st Shell st ;
and join with a sl-st to the next st.
Round 11 : Shell st in 1st Shell st ;
and join with a sl-st to the next st.
Round 12 : Shell st in 1st Shell st ;
and join with a sl-st to the next st.
and join with a sl-st to the next st.
So I figured the lovely border is a 3-step combination.
2 dc in last dc. Turn. (7 dc)
You will now sl-st into the ch-2 sp of the next Shell st and work the same 3 rows in that Shell st.
Pass a ribbon through the ch-sps of the last row of yoke, attach buttons, and weave in ends.
I suggest a light lining of light satin, light chiffon or net for the skirt portion to enhance beauty of dress.
I plan on writing a similar explanation for all non-English patterns I encounter, and would love clarification of errors/typos.


No comments:
Post a Comment
Thanks for taking the time to stop by. Do tell me what you think. Cheers