Welcome to Sweet Nothings Crochet for loads of free crochet patterns, video tutorials & awesome creations. If you want to learn, or just want to see some great free patterns, you're in the right place. All my blogs have video tutorials with loads of ideas thrown in for good measure. Thanks for dropping by and I hope you'll stay a while.
Wednesday, 7 June 2017
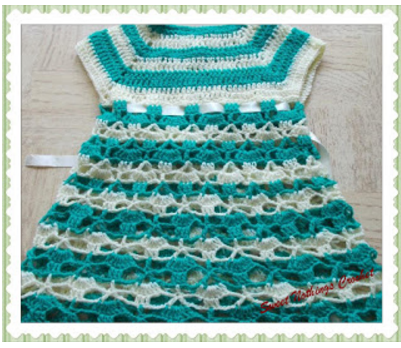
CHANDU’s SHELLED BABY DRESS 2
This is the second of two crochet shelled baby dresses that are being
made for a really special friend’s twin grand-daughters. I have a vision in my mind and I am *hoping*
that these dresses do that vision justice. The lovely simple yoke with the shells along the skirt portion of the dress make this an awesome pattern. I've then added on puffed sleeves to complete this cute crochet dress.
Thank you for joining me. There are two more similar shelled crochet dress patterns here and here. I’m glad that you’re back here with me as we
explore this new creation together.
In case you have just joined me, know that you can access all of my earlier creations by checking under ‘categories’ on the right hand side of this blog under “Labels”.
How labels work : All patterns under a similar label can be found together so when you click on the label for say "crochet baby dress pattern", all my baby dress patterns are available - so scroll down to the very bottom and click on "Older Posts" to move onto the next post in the series. Before you reach that you have several other ways to find my blogs including blog links at the bottom of this blog For your convenience, follow me here or on Facebook, You Tube, Pinterest, Twitter or Instagram. Oh, and may I add that the fastest way to find any of my blogs is via Pinterest and if you are looking for more children wear then come here All my blogs can be printed. Find theprint friendly (green) link on the right of this blog. You can also hit Control P (or Command P for Mac) on your keyboard, and the blog will go directly to the connected printer.
Remember that you only print if absolutely essential. Save paper – Save Our Earth.
Do remember to add my blog URL when you make and show off your creation.
Just copy the link on the search bar above - that's the blog URL.
To purchase this or similar yarn online, click the highlighted links below to buy your yarns online via Amazon. While you will still pay the same, I may get paid by Amazon as well. This is a free blog - so do pay it forward for me. Cheers.
Here is a sizing chart for general neck sizinghere or here
Here is a sizing chart for general body sizinghere, here or here
Abbreviations used :
ch : Chain sp(s) : Space(s)
dc : Double crochet hk : Hook
st(s) : Stitch(es) sl-st : slip stitch
sk : Skip sp : space
rep : repeat
fsc : Foundation single crochet
Instructions
Please note that I start all my rows with a ch 1, turning chain for ease.
Please check the top of this blog for easy video tutorials on all stitches used in today's pattern.
Please read through all my notes before you pick up your hook, so you know just where we're heading in our pattern.
In my patterns I work with the principle of stitch count and body measurement. This means that you need to work the stitch count in pattern, till you get the measurement (length and/or width) that you need for your project.
This is not my original pattern. I found this photograph and a convenient chart on the internet. As I work on this pattern, with my tweaks, I’ve written down my notes that I share with you.
Quick analysis of what we’re going to do here
today.
With
this stunningly simple pattern, we’re going to work a raglan like yoke from the
neck down to the chest/ waist.
We will then check the stitch count for the
skirt portion of the dress and , and work the shell pattern to complete this
project.
Remember that you need to work a back placket
opening for the child, and I suggest that you keep it open all the way to the
start row for a younger child.
Start : with fsc using one the charts given for the neckline above
depending on the age /size of child you are making this dress for.
As I have you captive here, let
me throw in a few thoughts.
I have been often asked how I
figure out the size using different yarn.
I don’t.. I also do a little bit of trial and error. The charts have been set out and I have found
that the charts that I share here do work (for me) – but what one should
remember is that the age of the child (though important) is not as important as
the size.
So once you get the chest size
(for example) but thanks to the yarn you are using or say the hook size, and
you find that you have not got the length needed - *Do Not Worry* .. this is
where your creativity comes in.. you just continue on till you get the length.
If the chart given for a 0-6m
does not work for your 0-6m child, that is not a worry either.. there are so
many charts on that link.. just work one size up or down to fit the child.
Sadly, when I am asked a
question about how you can get it to fit, this is all I can say – as I do not
know the size you are looking at /for and even if you do give me those details,
I can only give you ideas – you would have to physically pick up that yarn and
hook and work at it.
So let’s get that hook n yarn
going.. shall we?
From the following row on, we
will be working on different sizes – so here’s what I suggest. You take a look at the chart and first mark
out the stitch for the four corners. I
will now give you instructions on what you will do from one marker to the next.
I suggest that we work from the
centre back, past the armholes to the front and then around the 2nd
armhole to the centre back again in one continuous row.
Double Crochet : dc :yo, insert hk into st ; yo (3 lps on hk);
Row 1 : dc in the 1st fsc and in each fsc till the 1st
marker ;
(2 dc ; ch 2, 2 dc) all in the
same 1st marked stitch ;
*dc in each fsc till the next
marker ;
rep (to) in the marked stitch* ;
rep *to* till end. Turn.
You can now remove the
markers.
Our corners are the ch-2 sps
that we have just created.
We will work
the next 2-dc sets in that ch-2 sp in each row.
Row 2 : dc in the 1st dc and in each dc till the 1st
ch-2 sp;
(2 dc ; ch 2, 2 dc) all in the
same 1st ch-2 sp ;
*dc in each fsc till the next
ch-2 sp ;
rep (to) in the same ch-2 sp* ;
rep *to* till end. Turn.
Rep Row 2 till you have the
shoulder width / chest width / armhole measurements as per the chart or as per
the child measurements.
Once you have got the above
measurements, we will join the two corners under the armhole to then (a) work
in rounds and (b) increase the length of the yoke till the waist level… or the
level you wish to start the skirt portion from.
So to join the front and back
yoke, you will work all the way in dc till the 1st ch-2 corner sp,
skip all the next stitches till the next ch-2 corner sp and join the
1st and 2nd corner sps. You will then work all the way till the 3rd
ch-2 corner sp and once again join the 3rd and 4th
corner sps. In this way, you have a
front and back along with two armholes created all in one go.
You will now continue
increasing the front length if desired, till you have the length needed before
you start the skirt portion.
So how long do you work? Easy – once
again, do refer to the charts given above for lengths of skirts as well as
regular lengths of yoke etc and make a creative decision.
PART 2 : Skirt portion of dress
For the skirt we will work in
one piece, so ensure that you join the two parts of the yoke back in the last
row of work.
Our stitch count is multiples
of 6.
So when you are ready to start
on your skirt, ensure that you have the stitch count right.
How do you do this? Count the stitches that you have all around for the start row of your skirt.
In case you do not have the right number, just run a round of sc and add sufficient stitches to get the stitch count.
As I have said in my blogs before, depending on how much flare you wish for
your skirt, increase the number of stitches (still keeping the stitch count multiples right)
so that you get a better flare.
For this pattern too, I’d
suggest that while you work the pattern, work with the few ideas I’ve written
below.
I would also like to add that
though I have indicated number of row repeats, I would suggest that you
work it your own way with these ideas in mind :
a)Work a few rows and see how many inches you get (in length)
per row – i.e work out your gauge
b)Decide how long you want your skirt part and the whole dress
from shoulder down
c)Working with your gauge, figure out how many rows you can
repeat with the pattern. So say I have
indicated 2 rows per increase, you could work more rows if you are not getting
as much as a length increase as needed
d)With this pattern, as with many of my earlier patterns, I
urge you to be creative and explore the pattern a bit.
In this part of the pattern, we
also use the fpdc or front post double crochet.
May I also suggest that you
start at the back of the dress for a neat finish.
For a quick view of what we're about to work on, here's a video tutorial
From the very first stitch, we
will start with a post stitch – fpdc.
To
get the stitch right, I suggest we start with a ch-1, which does not count as a
stitch, but just to get the fpdc right.
Front Post Double Crochet : fpdc : Post stitches are stitches worked around the post of a stitch of the row below.
How to work the fpdc : yo, hk into sp between posts of st from row below – going from back of stitch, around st and into the front of the st ; yo, pull yarn through the sps (3 lps on hk), (yo & pull through 2 lps) twice. One fpdc complete
sk next 2 dc, (2 dc in the next dc ; ch 2, 2 dc in the same dc) ;
*sk next 2 dc, fpdc around the next
dc ;
sk next 2 dc, rep (to) once* ; w
rep *to* all around
and join with a sl-st
to the 1st st.
From this round on, we will
always be working a fpdc around the fpdc of the earlier round, and we will work
the other set of stitches in the ch-sp of the earlier set of stitches, skipping
all the dc in between. Got it?
Rounds 2 - 6 : sl-st into the 1st ch-2 sp ,
(2 dc in the next
ch-2 sp ; ch 2, 2 dc in the same ch-2 sp);
*fpdc around the next fpdc ;
rep
(to) once in the next ch-2 sp* ;
rep *to* all around
and join
with a sl-st to the 1st st.
Round 7 : dc in the 1st 2 dc ;
(2 dc in the next ch-2 sp;
ch 2, 2 dc in the same ch-2 sp) ;
dc in the next 2 dc ;
*fpdc around the next fpdc ; dc in
the next 2 dc ;
rep (to) once in the next ch-2 sp ;
dc in the next 2 dc* ;
rep *to* all around
and join
with a sl-st to the 1st st.
Round 8 : sk the 1st 2 dc ;
[dc in the next 2 dc ;
(2 dc
in the next ch-2 sp; ch 2, 2 dc in the same ch-2 sp) ;
dc in the next 2 dc] ;
*sk next 2 dc, fpdc around the next
fpdc ;
rep [to] once* ;
rep *to* all around
and join
with a sl-st to the 1st st.
Interesting tweak : Though I have not done this myself (as I am working on a
tiny little baby dress), I think that you can actually increase the flare of
your dress for an older / taller girl by just increasing 2 sts from Round 8.
So just for kicks, here’s the
Optional Increase Round for you.
Go
ahead, try it out and lemme know how this works out for you.
Optional Increase Round
1 : dc in the 1st 2 dc ;
[dc in the next 2 dc ; (2
dc in the next ch-2 sp;
ch 2, 2 dc in the same ch-2 sp) ; dc in the next 4 dc]
;
*dc in the next 2 dc, fpdc around the next fpdc ;
rep [to] once* ;
rep *to* all around
and join
with a sl-st to the 1st st.
Optional Next Round : sk the 1st 2 dc ; [dc in the next 4 dc ;
(2 dc
in the next ch-2 sp; ch 2, 2 dc in the same ch-2 sp) ;
dc in the next 4 dc] ;
*sk next 2 dc, fpdc around the next
fpdc ;
rep [to] once* ;
rep *to* all around
and join
with a sl-st to the 1st st.
So go ahead and work your
pattern rounds till you have the length you need for your dress.
For our last round, you can
decide to work a picot in the middle of your shell pattern. This is optional and you can well
decide to just leave it as a ch-3 sp as well.
How to work a picot stitch : Traditionally for a ch-3 picot, you work (ch 3, sl-st in 3rd ch from hook). For a ch-5 picot, you will do (ch 5, sl-st in 5th ch from hook).
We will work a ch-3 picot which is (ch 3, sl-st into the 3rd ch from
hk).
Assuming that we are all only
working till Round 8, I will write instructions accordingly, for
convenience. In case you have worked the
Optional rows, then you will still do the same picot in the ch-sp, just work 2
more dc on each side.
Last Round : sk the 1st 2 dc ;
[dc in the next 2 dc ;
(2 dc
in the next ch-2 sp; picot, 2 dc in the same
ch-2 sp) ;
dc in the next 2 dc] ;
*sk next 2 dc, fpdc around the next
fpdc ;
rep [to] once* ;
rep *to* all around
and join
with a sl-st to the 1st st.
Fasten off and weave in ends.
Final touch : You can add a small rose and a satin ribbon.
The satin ribbon is of course, store bought..
and for the small rose, check out this link and you’ll get not only the rose
but also some fun stuff for hair.. and which little girl doesn’t like stuff for
hair.. so have fun. Check here
PART 3 : Sleeves
For the sleeves, I’ve decided
to make them over sized and puffed.
For
this, first run a round of sc all around the armhole edge.
Remember as usual, that you will work one sc
in each st, and 2 sc per horizontal bar of dc.
Ensure that you have an even number of sc when you finish.
Once again, depending on how
puffy and full you want your sleeve, work the distance between your first round
of stitches.
The closer you work this 1st
round, the more puffy it will be.. so this means that if you sk 3 sc, you will
get it less puffy , and if you sk just 1 sc, it will be more puffy. Got it?
Round 1 :(2 dc ; ch 1, 2 dc)
in the 1st sc ;
*sk next 2 sc, rep (to) in the
next sc* ;
rep *to* all around and join
with a sl-st to the 1st st.
Rounds 2 - 4 :sl-st into the 1st
ch-1 sp ;
(2 dc ; ch 1, 2 dc) in the 1st ch-1 sp ;
rep (to) in the next ch-1 sp
and in each ch-1 sp all around ;
and join with a sl-st to the 1st
st.
In our following decrease row,
we will work an sc in the ch-sp and one sc in the sp between 2 sts, avoiding
all the dc stitches all around.
Round 5 : (Decrease row) :
sl-st into the 1st ch-1 sp ; sc in the 1st ch-1 sp ;
*sk the next 2 dc, sc in the sp between the next 2 sts ;
sk the next 2 dc, sc
in the next ch-1 sp*
rep *to* all around ;
and join with a sl-st to the 1st
st.
Note : Check to see if you think the round arm will fit the baby or
will be too loose, and work a further decrease row accordingly.
Single crochet 2-together : sc 2-tog :
Insert hk into st, yo and pull up a lp (2 lps on hk) ; insert hk into next sc, yo and pull up a lp (3 lps on hk); yo and draw through all 3 lps. One sc 2-tog complete. Visit this video tutorial at https://youtu.be/whlsMemDHLc
Round 6 : (Decrease row) :
sc 2-tog over the 1st 2 sc ;
*sc 2 tog over the next 2 sc* ;
rep *to* all around and join with a sl-st to the 1st st.
Note : Check to see if you think the round arm will fit the
baby.
If you think this is too tight,
then go back and change the decrease a bit… work a sc 2-tog over every
alternate set of stitches and see if that works for you.
Half Double Crochet : Hdc : yo, insert hk into st ; yo (3 lps on hk) ;
Chainless start for Half Double Crochet : I dislike the ch-2 start, and this is what I do to start my row of hdc. Check out the video at https://youtu.be/lWXpl1KdbZ8
Round 7 :hdc in the 1st
sc and in each sc all around and join with a sl-st to the 1st st.
Round 8 :hdc in the 1st
hdc and in each hdc all around and join with a sl-st to the 1st st.
Fasten off and weave in
ends.
Repeat for the 2nd
armhole as well.
And that’s done.. yet another
project brilliantly executed !
Enjoyed this ?? I sure did..come back right here
for more freebie patterns
If you're visiting me here for the first time, and have liked the experience, do add me to your mailing list (for your convenience) , and all my future free patterns will come straight to your mail box.
I’d appreciate if you could credit my blog (and link the original pattern link) when you make your own creation. Thanks.


No comments:
Post a Comment
Thanks for taking the time to stop by. Do tell me what you think. Cheers