Size made : Chest : 18” ; Length 15” for a 0-3 month old
You can make this to any size you want, not just for a 3 month old.
The amount of yarn used in this project is just so you get an estimate of how much I used for the size that I made.
Difficulty level : Intermediate Skill level
The stitches used are regular ordinary ones – the combinations used are complicated. That said, the only “complication” lies in the joining of the yoke, and if you’ve made this square / rectangular yoke before, then this is totally easy-peasy for you.
Stitches used : Using U.S. terminology
How to work a picot stitch : Traditionally for a ch-3 picot, you work (ch 3, sl-st in 3rd ch from hook). For a ch-5 picot, you will do (ch 5, sl-st in 5th ch from hook).
Here is a sizing chart for general body sizing here or here
Abbreviations used : Using U.S. terminology
dc : Double crochet sp(s) : Space(s)
st(s) : Stitch(es) hk : Hook
lp : Loop(s) yo : Yarn Over
sk : Skip sc : Single crochet
ch : Chain
trc : Treble / Triple crochet
fsc : Foundation single crochet
Instructions Using U.S. terminology
Please note that I start all my rows with a ch 1, turning chain for ease.
Please check the top of this blog for easy video tutorials on all stitches used in today's pattern.
Please read through all my notes before you pick up your hook, so you know just where we're heading in our pattern.
In my patterns I work with the principle of stitch count and body measurement. This means that you need to work the stitch count in pattern, till you get the measurement (length and/or width) that you need for your project.
I do not claim this to be my pattern , but here are my pattern notes as I make my own original project
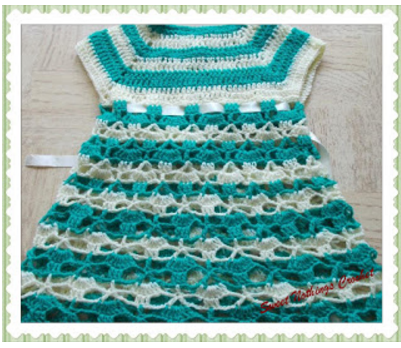
So before we set off on our new creative journey, let’s take a quick look at what we’re creating here today.
The picture below is just for an idea on what we're creating.
The figures given therein, may not be your measurements, so I suggest you just keep them as a guide, and not work exactly by them.
We start with the yoke, which is worked like a square.
Two parts of this square yoke will be the armhole sections, and the other two parts will make the front and back (chest) of the yoke.
As usual, here are your choices.
You need to decide if you are using a button placket around the back, and if you are, you need to figure out how long that placket is going to be.
If you are working it for the full length of the yoke, then you will work back and forth in rows for the full length of the yoke.
If however, you want only a single button around the back, then you will work back and forth for the first few rows, join up and then work in rounds.
I always suggest that for younger children you keep a longer neck opening.
Now there is a link for a set of charts depending on age of child and I’d suggest we use that as a reference to start on our yoke.
Once we complete the yoke, we will then work the skirt portion of the dress off two sides of this yoke, (and the other two sides will be the armhole).
Now for the yoke, depending on what size chest you’re working with, please follow the really easy link for chest sizes (square yoke) below.
You will then calculate the pattern repeats given for the skirt (checking stitch count for pattern repeat), and work accordingly.
PART I : YOKE
Double Crochet : dc : yo, insert hk into st ; yo (3 lps on hk);
[yo, draw through 2 lps] twice. One dc made.
Chainless start for Double Crochet : I dislike the ch-2 / ch – 3 start, and this is what I do to start my row of dc.
Row 1 : dc in the 1st fsc and each fsc till the 1st corner marker ;
(ch 2, dc in the next dc) ;
*dc in the next fsc and each fsc till the next corner marker ;
rep (to) once* ;
rep *to* 2 times ;
dc in each fsc till the end. Turn.
From this row on, we really do not need our corner markers, as the ch-2 sps are our corners.
Now let’s understand where our armholes are coming in.
We started at the centre back, and then came to our 1st corner.
The section between that 1st and 2nd corner will form the first armhole section.
The next armhole section is between the 3rd and last corner.
So obviously, the section between our 2nd and 3rd markers is the front chest of the dress. Got it?
Row 2 : dc in the 1st dc and in each dc till the 1st ch-2 sp ;
*(dc in the ch-2 sp ; ch 2, dc in the same ch-2 sp) ;
dc in each dc till the next ch-2 sp* ;
rep *to* the last ch-2 sp ;
rep (to) in the last ch-2 sp ;
dc in each dc till end. Turn.
Now remember that we’re probably working on different baby girl dress sizes here.
The button hole that you want at the back will differ, so ensure that you work back and forth in rows till you are satisfied with the opening you have, and then you will just join up at the last st and work in rounds.
You could work back and forth in rows all through the yoke and join only at the last row too, giving you a nice long button placket as well, but you’re well aware of that too.
When you decide you’ve had a long enough button hole opening, please join with a sl-st and you will now work in rounds here on.
Rep Row 2 till your yoke is of the length you require.
So how do you know when your yoke is the length required?
1. Fold your yoke in half at the neckline, such that you have both halves of your yoke together. You now have a shoulder strap and then the yoke falling neatly down, such that you can measure it.
2. Measure the yoke down from the shoulder blades (straps) to the bottom of the yoke. This is the length of your yoke
3. The above measurement is also the round armhole measurement
4. I would suggest that you check round armhole measurement as the measure you need, ensuring that you are also getting the round chest measure at the same time.
5. Your Round Chest or Across Front measure is the measurement from the right hand side to the left hand side of your work. You will double (or multiply by 2) this Across Front measure to check if you have the round chest measurement for the child you’re making this dress for
6. As I always say, the best way to ensure you’re doing this just right (especially if you’re doing it for the first time), is to keep a well fitting garment of the child you are making this dress for as a template to work off.
Now once you’re done with your yoke, I’d suggest we work in rounds, if you have not already started working in rounds before this.
On the last round, we will need to create our armhole, so let’s get that last round written down, shall we?
Last Yoke Round : dc in the 1st dc and in each dc till the 1st ch-sp ;
sk all sts between the 1st and 2nd ch-sp (which now forms the 1st armhole) ;
and dc in the next dc (which will be your front yoke) ;
dc in each dc all the way to your 3rd ch-sp (which is the end of your front yoke) ;
sk all sts between the 3rd and 4th ch-sp (which will be the next armhole) ;
dc in each dc till end.
Now before you head off.. count your stitches as we need multiples of 10 for the skirt portion.
Please also read skirt instructions before you work any further.
We will now work in rounds here on.
If you are deciding to change colours, please re-attach new coloured yarn.
Though it does not matter where you start your new colour from, I always find that it is neatest if you join it at the centre back.
PLEASE read through till * below BEFORE you attach your yarn, whether you’re changing your yarn color or not.
Our stitch count for the skirt section is in multiples 10, so ensure you have it in these multiples, or tweak it such that you get a multiple of 10
* Now here’s where this gets a little tricky, and this is mainly because we have this pretty big number as a stitch count / pattern repeat.
So here’s what I suggest before you join your yarn.
1. Count your stitches from one side to the other and ensure that you have multiples of 10.
2. For the skirt portion, you remember our chat a little earlier, about how we’re going to section off our armholes. So check that little note (above) again, and mark off your armholes.
3. If you are running short of just a few sts for the skirt, then you could always add them as a small chain or extra dc’s under the armhole i.e in that ch-sp just before you join your armholes. So this means that in your last row, calculate how many stitches you are running short of, and add them as a chain under the armhole, between the two ch-sps that are the armholes.
Now this is basically an “A”-line dress, and personally I feel that dresses of this shape look lovely on slightly older kids.
I was not sure how it would work on a little baby girl – and decide that I am right, and that I want more of a ‘flared’ effect. So I just added some flare.
So, if you too if you want this pattern to flare out even more, then you need to go right back to Round 1 of the skirt, and add extra sts there, ensuring that you keep the stitch count (multiples), of course.
I have decided to add a second color for every alternate pattern row – but the original pattern, done all in the same colour looks swell too.
Right, you have your work cut out for you.
Re-attach your yarn as suggested, and let’s carry on.
SKIRT INSTRUCTIONS :
Round 1 : dc in the 1st 2 sts ;
*{ch 1, sk next 3 sts, dc in the next st ;
ch 3, dc in the same dc} ;
(ch 1, sk next 3 sts, dc in the next 3 sts)* ;
rep *to* all around ;
ch 1, sk next 3 sts, dc in the next st ;
and join with a sl-st to the 1st st.
Round 2 : dc in the 1st dc ;
*ch 1, 7 dc in the next ch-3 sp ;
ch 1, sk next 2 dc, dc in the next dc* ;
rep *to* all around ;
and join with a sl-st to the 1st dc.


No comments:
Post a Comment
Thanks for taking the time to stop by. Do tell me what you think. Cheers