Today's lovely crochet baby dress is my original creation and will truly bring out the creativity in you – there is so much scope to
make something so beautiful and I’m sure you’re gonna love it. Thank you for joining me.
In case you have just joined me, know that you can access all of my earlier creations by checking under ‘categories’ on the right hand side of this blog under “Labels”.
How labels work : All patterns under a similar label can be found together so when you click on the label for say "crochet baby dress pattern", all my baby dress patterns are available - so scroll down to the very bottom and click on "Older Posts" to move onto the next post in the series. Before you reach that you have several other ways to find my blogs including blog links at the bottom of this blog
For your convenience, follow me here or on Facebook, You Tube, Pinterest, Twitter or Instagram.
Oh, and may I add that the fastest way to find any of my blogs is via Pinterest and if you are looking for more children wear then come here
All my blogs can be printed. Find the print friendly (green) link on the right of this blog. You can also hit Control P (or Command P for Mac) on your keyboard, and the blog will go directly to the connected printer.
Remember that you only print if absolutely essential. Save paper – Save Our Earth.
Do remember to add my blog URL when you make and show off your creation.
Just copy the link on the search bar above - that's the blog URL.
To purchase this or similar yarn online, click the highlighted links below to buy your yarns online via Amazon. While you will still pay the same, I may get paid by Amazon as well. This is a free blog - so do pay it forward for me. Cheers.
Thanks for joining me once again as we work on and discover this new pattern together.
General yarn info : The yarn used today is not specific to this pattern.
You can use any yarn with a suitable hook to make this project to any size.
International yarns : Among the international yarns I have used in this thickness, I’d suggest Aunt Lydia Cotton 10, Aunt Lydia Bamboo-Viscose 10, DMC Petra, Sullivans knitting cotton (Australia), Milford Soft, Hilaza Rustica Eclat , Alize cotton yarn and Alize bamboo yarn , Lily Sugar n' Cream cotton yarn, Caron Simply Soft , Bernat Softee chunky.
Skill level : Advanced
Stitches used :
Here is a sizing chart for general neck sizing here or here
Here is a sizing chart for general sizing here or here and here
Abbreviations used : (Using U.S
terminology)
lp(s)
: Loop(s) sc : Single crochet
dc
: Double crochet sp : Space
sl-st
: Slip stitch ch
: Chain
st(s)
: Stitch(es) hk
: Hook
yo
: Yarn Over sk : Skip
Instructions : (Using U.S terminology)
Please note that I start all my rows with a ch 1, turning chain for ease.
Please check the top of this blog for easy video tutorials on all stitches used in today's pattern.
Please read through all my notes before you pick up your hook, so you know just where we're heading in our pattern.
In my patterns I work with the principle of stitch count and body measurement. This means that you need to work the stitch count in pattern, till you get the measurement (length and/or width) that you need for your project.
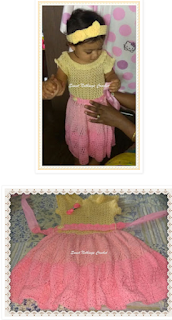
The
Rose dress is made in two parts.
The
top part is worked in crochet and for the lower part I have used tissue (tulle).
Please
note that this is a slightly complicated pattern and needs advanced skill level
if you decide to shape armholes and neckline.
You can make this dress to any size using any yarn with a suitable hook.
Please go through the full pattern before you start.
Ensure that you have the stitch count right , for the age / size of the child you are making this for.
Yes, you can make this as a top for an adult as well.
Finally please check the top of this blog for video tutorials of all the stitches used in this pattern. Note that I start all my rows / rounds with a ch-1 turning chain for ease.
and now.. on with the pattern
If you are working two rectangles, then it’s way easier.
First
you need to decide what age and size you are working this for.
You need the following body measurements
a) Round waist
b) Shoulder to
waist measurement
c) Full length
from shoulder to knee (or as long as you want it)
d) Shoulder
width (for strap)
e) Neckline
(measured from shoulder to as low as you want it)
f) Round
armhole
Today’s
pattern is a bottom up creation – which means we start at the waist and
then work our way to the armhole and shoulders.
You
can opt to work two rectangles with this pattern, without shaping armhole or
neckline. That will give you a small
sleeve that will flop over the shoulders and you will have a scooped out
boat-like neckline.
You
can then decide if you want to attach on sleeves.
You
can also work this pattern with a armhole shaping and then make it sleeveless –
or once again work in sleeves… and of course, you have the option of shaping
the neckline as well.
So as you can see, there are several possibilities here – come along.. let’s
get started.
As
always, I work on stitch count and if you ensure that you get the stitch count
in the multiples given for the round waist measurement, you can get this
pattern made in any size, using any yarn with a suitable hook.
Please
note
that I do not give a start number for your stitches.
You need to calculate that depending
on the round waist measurement of the person you are making this for. Easy enough, right?
Now when working the pattern, you could well work two similar parts for front and back, even if shaping armhole and neckline. If you want an opening along the back, then you will need to work two halves for the back.
May I suggest that you work the pattern in one piece (for back) till say the armhole shaping part, and then divide to make the opening along the back.
Frankly, if you keep the neckline similarly low for front and back, with the stretch of yarn and this pattern stretch, you do not need a back opening.
I worked in an opening, and feel it was way too much work.
Of course, I did get to add some cute buttons that this lil girl absolutely loves, so it worked out for me.
stitch detail and chart for the stitch
Our
stitch count is in multiples of 9 + 2
Start : with fsc in multiples of 9 + 2 for half the
round waist measurement. Turn
Row 1 : dc
in the 1st fsc ;
ch 1, sk
next fsc, sc in the next fsc ;
*sk next
2 fsc, 5 dc in the next fsc ;
sk next 2
fsc, sc in the next fsc ;
ch 3, sk
next 2 fsc, sc in the next fsc* ;
rep *to*
till the last 2 fsc ;
ch 1, dc
in the last fsc. Turn.
Double Crochet : dc : yo, insert hk into st ; yo (3 lps on hk);
[yo, draw through 2 lps] twice. One dc made.
Chainless start for Double Crochet : I dislike the ch-2 / ch – 3 start, and this is what I do to start my row of dc.
Single Crochet : Sc : yo, insert hk into st ; yo (2 lps on hk); yo, draw through both lps. One sc made. Check out the video at https://youtu.be/ghACqBpA-3k
Row 2 : sc
in the 1st dc ;
*dc in
the next 2 dc ;
ch 3, sc
in the next dc ;
ch 3, dc
in the next 2 dc ; sc in the next ch-3 sp* ;
rep *to*
till the last dc ;
sc in the
last dc. Turn.
Row 3 : 3
dc in the 1st sc ;
* sk next
2 dc, sc in the next ch-3 sp ;
ch 3, sc
in the next ch-3 sp ;
sk next 2
dc, 5 dc in the next sc* ;
rep *to*
till the last sc ;
3 dc in
the last sc. Turn.
Row 4 : sc
in the 1st dc ; ch 3, dc in the next 2 dc ;
*sc in
the next ch-3 sp ; dc in the next 2 dc ;
ch 3, sc
in the next dc ;
ch 3, dc
in the next 2 dc* ;
rep *to*
till the last dc ;
ch 3, sc
in the last dc. Turn.
Row 5 : dc in the 1st sc ; ch 1, sc in the 1st
ch-3 sp ;
*sk next
2 dc , 5 dc in the next sc ; sc in the next ch-3 sp ;
ch 3, sc
in the next ch-3 sp* ;
rep *to*
till the last ch-3 sp ;
ch 1, dc
in the last sc. Turn.
And
that’s our pattern.. Four lines of pattern to create this beautiful diamond
like pattern. Gorgeous, isn’t it?
Rep Rows 2 - 5 all the way till the armhole.
In case
you are shaping the armhole, end with Row 5.
In case
you are not shaping armhole, and are working a rectangle, work all the way till
you are at the shoulders, ending with Row 5.
Now
here’s where you can work this pattern in different ways.
A) You can work it as a rectangle
for both front and back and then attach the shoulders, leaving a neck opening,
which will give you a neat boat-like neck
B) The rectangle then gets joined
along the two sides, leaving an armhole opening
C) You can make this into a crop top
by shaping the armholes or making the rectangle pattern idea
D) Even for a tutu dress yoke / top,
you can work the rectangle – and work it only till the neckline – and then add
in the tulle for the shoulder straps.. that’ll be so cool
E) You can make this into a top for an adult as well - just work the stitch count right and make it as long as you wish to fit an adult.
f) F) What I have done is make the yoke bit and then attach on organza tulle for the skirt portion. I have added three layers of tulle in different shades of pink and one layer of satin in pink right at the bottom. This not only gives the skirt a great flare but also keeps it light and colourful
f
ARMHOLE SHAPING :
As you’ve
ended with Row 5, the next row rep is Row 2, right?
So we
will work Row 2, with a small change.
Decrease Row 2 : sl-st till the 1st ch-3 sp ;
sc in
same ch-3 sp ;
*dc in
the next 2 dc ;
ch 3, sc
in the next dc ;
ch 3, dc
in the next 2 dc ; sc in the next ch-3 sp* ;
rep *to*
till the last ch-3 sp ;
sc in the
last ch-3 sp.
Turn,
leaving remainder stitches unworked.
Continue
working Rows 3, 4 and 5 once.
Rep Rows 2 – 5 till you reach the neckline.
Neckline shaping :
You need
to work just one pattern repeat for each shoulder strap and I have worked it
just from each end.
That will
automatically give you a neckline and you will have worked straps at the same
time.
FINISHING :
Whether
you have worked the shaped armhole pattern or just two rectangles, the
finishing is the same.
Use one
of the joining techniques to join the sides and shoulders.
I’d
suggest you run one round of sc all around the armhole opening (shaped or not)
and neckline to get a neat finish.
Remember
the ‘rule’ that you work 1 sc in each sc or hdc and 2 sc in each dc especially
when working along the horizontal bar (or post) of the stitch.
You can
also work in a picot stitch if you so desire.
I did not as I feel that this pattern is really beautiful in itself.
How to work a picot stitch : Traditionally for a ch-3 picot, you
work (ch 3, sl-st in 3rd ch from hook). For a ch-5 picot, you will do (ch 5, sl-st in
5th ch from hook). Here’s a
great video. https://youtu.be/8s3zVaBcn4s
Yet another sleeve / armhole idea :
So once
you have run your one round of sc all around the armhole, you could (as I have)
work in a tiny little sleeve.
If you so
decide, then ensure that you work in sc in multiples of 9
Then work
the pattern in once again, just working in a round this time, and joining with
a sl-st at the end.
Once you have
finished the crochet yoke bit, go ahead and frill / gather up your tulle /
tissue and attach it to the lower half of your yoke. I can guarantee your little baby girl will
enjoy this dress a lot.
I had a really fun creative day and
I do hope you do too.
Do come back right here for more
freebie patterns
Remember
to share this blog post when you share your photos with me on Facebook. I’d love to feature your photos on my FB
page. Cheers.
If
you're visiting me here for the first time, and have liked the experience, do
add me to your mailing list (for your convenience) , and all my future free
patterns will come straight to your mail box.
I’d
appreciate if you could credit my blog with my original pattern when you make
your own creation. Thanks.
Have
a great day and see you soon.
I
have a few similar creations already made, and just
in case you want a dekho at those free patterns … here you go
I have a few dresses already made, and just in case you want a dekho at those free patterns … here you go
and here are a few skirt patterns that you can use your belt for..
Here are some of my tops
Here are some of my bolero / jacket / vest creations. Have fun with these free patterns too
Here is a list of my earlier miscellaneous home use projects. Enjoy


Wonderful blog post. Beautiful creation and last but not least super model❤❤👍👍
ReplyDelete