Wednesday 10 June 2015

LOVELY SHELLED GIRL’S DRESS

modeled photo of the Lovely shelled girls dressPhoto of the Lovely shelled girls dress

photo of the Lovely Shelled girls dress splayed outModeled photo of the cute Lovely Shelled girls dress
LOVELY SHELLED GIRL’S DRESS
After a spate of ladies clothes, here’s something really cute for a little lady.  

Thank you for joining me.

In case you have just joined me, know that you can access all of my earlier creations by checking under ‘categories’ on the right hand side of this blog under “Labels”.  Then, for your convenience, follow me here or on Facebook, You Tube, Pinterest, Twitter or Instagram.

Check out all my social media handles at the bottom of this blog

Oh, and may I add that the fastest way to find any of my blogs is via Pinterest.


All my blogs can be printed.  Find the printer friendly (green) link on the right side & bottom of this blog.  You can also hit Control P (or Command P for Mac) on your keyboard, and the blog will go directly to the connected printer.

Remember that you only print if absolutely essential.  Save paper – Save Our Earth. 


Do remember to add my blog URL when you make and show off your creation. 

Just copy the link on the search bar above - that's the blog URL.


To purchase this or similar yarn online, click the highlighted links below to buy your yarns online via Amazon.  While you will still pay the same, I may get paid by Amazon as well. 

This is a free blog - so do pay it forward for me.  Cheers.


Do check my long Pinterest “to-do” list for little girl’s dresses at https://in.pinterest.com/shyamanivas/girls-dresses-to-make/
Thanks for joining me once again as we work on and discover this new pattern together. 

Materials used : Today I’ve used ~ about 120gms of our lovely Indian Oswal 3-ply acrylic yarn with a 3.25 mm crochet hook ; embroidery needle sewing needle ; fabric glue to seal ends ; crochet stitch markers ; buttonspress buttons ; satin ribbon ; headband ; tic-tac clips ; rubber band ; hair comb or barrette  ; beads n more
For Indians You could use Anchor , Red rose , 4-ply knitting cotton , or unbranded knitting cotton or White Rose or bamboo knitting cotton , Milk cotton ; Silk yarns as well as Vardhaman acrylic yarns ; Baby soft acrylic yarn , Ganga Spectrum as well
General yarn info : The yarn used today is not specific to this pattern.
You can use any yarn with a suitable hook to make this project to any size.
International yarns :  Among the international yarns I have used in this thickness, I’d suggest Aunt Lydia Cotton 10, Aunt Lydia Bamboo-Viscose 10, DMC Petra, Sullivans knitting cotton (Australia), Milford Soft, Hilaza Rustica Eclat , Alize cotton yarn and Alize bamboo yarn , Lily Sugar n' Cream cotton yarn, Caron Simply Soft , Bernat Softee chunky.

Difficulty level : Intermediate to Advanced

Abbreviations used :
ch-sp : chain space     ch : chain                          
rep : Repeat                sp : space     
dc : Double crochet                                                           
dc 3-tog : Double crochet 3-together
fsc : Foundation single crochet     

Stitches used :
How to hold your yarn in crochet : https://youtu.be/FwOlCbGdbqY
Starting slip knot :  https://youtu.be/lJcqsVcs8cw
Starting slip knot 1 or the Sloppy Slip knot :  https://youtu.be/YfC7KmGpifs
Foundation double crochet (fdc) : This is a unique way of starting a project directly with a row of double crochet stitches.  Here is an easy video tutorial https://youtu.be/hjNUYVvyU9k

Instructions : Using U.S terminology
Please note that I start all my rows with a ch 1, turning chain for ease.
Please check the top of this blog for easy video tutorials on all stitches used in today's pattern.
Please read through all my notes before you pick up your hook, so you know just where we're heading in our pattern.
In my patterns I work with the principle of stitch count and body measurement.  This means that you need to work the stitch count in pattern, till you get the measurement (length and/or width) that you need for your project. 

Quick analysis of what we’re going to do here today.  
We start this lovely dress from the yoke and work in rounds.  
We will then divide for armhole, and continue working the skirt portion of our dress, once again, in rounds.  I’d suggest that you work the skirt portion depending on the length you wish and the gauge of the yarn – and not necessarily on the number of repeats shown in the picture or this write up.
The designer has worked the pattern in two colours – I just preferred a single colour for this lovely creation – so now you can see which one works best for you.
Right.. so let’s get started.

PART 1 : YOKE :
I’m attaching page links for sizing of the yoke, one of the major deciding factors on which size you’re making.  Using this, you can make this dress for almost any sized child.  
Note : Now if you decide to add a small opening along the back, then you will work the first few rows back and forth without joining at the end.  Once you feel you have an opening that is large enough, join and start working in rounds.

Foundation Single Crochet : fsc : https://youtu.be/mcT85fwh4mA 
Start with fsc and with the number of stitches you need (for round neck) for the person intended.  Check the yoke chart links given above.

Double Crochet : dc : yo, insert hk into st ; yo (3 lps on hk);
[yo, draw through 2 lps] twice.  One dc made. 
Check out the video at https://youtu.be/xdnjB27zpYo
Chainless start for Double Crochet : I dislike the ch-2 / ch – 3 start, and this is what I do to start my row of dc.
Check out the video at https://youtu.be/wskv3iTjRx0
What is a chain stitch ?  https://youtu.be/pXx5ukBjKkY
What is a crochet slip stitch : https://youtu.be/weB3QNbA8Iw

Row / Round 1 : dc in the 1st fsc ; 
(ch 1, dc in the next 3 fsc) ; 
rep (to) 4 times ; 
*ch 3, dc in next 3 dc ; 
rep (to) 5 times* ; 
rep *to* 2 times ; 
ch 3, dc in last 2 dc.  
Join with sl-st to the 1st dc.
Read note above re joining at end

Row / Round 2 : sl-st into the 1st ch-1 sp ; 
3 dc in the same ch-1 sp ; 
(ch 1, sk next 3 dc, 3 dc in next ch-1 sp) ; 
rep (to) 3 times till corner ; 
3 dc in the corner ch-3 sp ; 
*ch 3, 3 dc in the corner ch-3 sp ; 
rep (to) 6 times ; 
ch 3, 3 dc in corner ch-3 sp* ; 
rep *to* 2 times ;
ch 3, 3 dc in last corner ch-3 sp ; 
ch 1 and join with an sl-st to the 1st st.

Row / Rounds 3 - 6 : Rep Round 2, adding one 3 dc set in each end of the corners. 
Please follow chart below.  
If making this dress for a larger size, please continue yoke increases according to length needed for yoke (and not just for 6 rounds).

Before you work that last round, please read the note below for the body of the dress.  So keep this note in mind and try to get the stitch count if possible.

Note : Our stitch count for the first round of the body/skirt portion of dress is in multiples of 8

Now we will fold the yoke down ; the side sections of the yoke will become the armhole and the front and back are clearly now defined.  
Now count the number of stitches you have, and ensure that you will be able to get them neatly divided by the repeat count.  

Depending on how much of a flare or gathered a dress you desire, increase stitches evenly within the front and back sections of the dress, and add a chain length from the ch-3 sps that define the two armhole ends.

So in the last round of the yoke, we will add a chain length (for bottom of armhole) from the two corner ch-3 sps each end ; and in the following round (i.e first round of the body part), we will be adding (if needed) stitches along the front and back of the yoke to give you a fuller bodied dress. 
photo of the yoke portion for the Lovely Shelled girls dress
Calculations : Yes this is always the foxing bit of our pattern – so here’s what I’ve done.  I’ve worked one st in every dc, and then 3 sts in the ch-1 sps ; and 2 sts each in the corner ch-3 sps.  
I then worked out how many pattern repeats I wanted for the body section, and accordingly worked out the number of stitches I’d need for the armhole section.  Hope this works for you too. 
The reason I am keeping this general is so that one can work any sized dress using this one general pattern. 

Right then, once done with that, we’ll carry on with the body of our dress

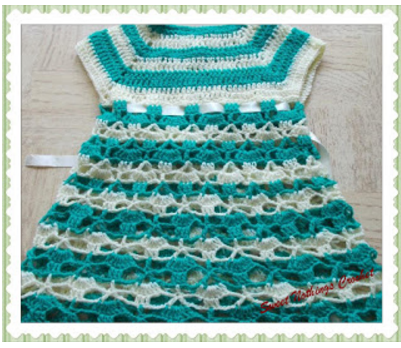
PART 2 : BODY / SKIRT PORTION OF DRESS :
In the chart below, the first round has 192 sts, and then to add body,  the designer has added 48 more to make it 240 sts.  
I feel our first addition of 3 sts per ch-1 sp will give us a full enough body, and am working the pattern now according this, without further increases.

Round 1 : dc in the 1st 3 dc ; 
*ch 3, sk next dc, sc in the next dc ; 
ch 2, sk next dc, sc in the next dc ; 
ch 3, sk next dc, dc in the next 3 dc* ; 
rep *to* all around (including in the ch-section under armhole) 
and join with sl-st to the 1st st.

Round 2 : 2 dc in the 1st dc ; 
dc in the next dc ; 2 dc in the next dc ; 
*ch 3 , sk ch-3 sp, sc in the next ch-2 sp ; 
ch 3, sk next ch-3 sp, (2 dc in the next dc ; 
dc in the next dc ; 2 dc in the next dc)* ; 
rep *to* all around 
and join with sl-st to the 1st st.

Round 3 : dc in the 1st 3 dc ; 
*ch 5 , dc in the same 3rd dc (of that 5 dc set) and next 2 dc ; 
sk both ch-sps and sc, dc in the next 3 dc* ; 
rep *to* all around 
and join with sl-st to the 1st st.

Round 4 : sc in the 1st dc ; 
*ch 1 , sk next 2 dc,  dc in the ch-5 sp ; 
(ch 1, dc in the same ch-5 sp) ; 
rep (to) 4 times ; 
ch 1, sk next 2 dc, sc in the next 2 dc* ; 
rep *to* all around 
and join with sl-st to the 1st st.

dc 3-tog : Double crochet 3-tog : [yo, insert hk in st or ch-sp, yo and pull up a lp ; yo and draw through 2 lps] 3 times (4 lps on hk) ; yo, draw through all lps on hk.  One dc 3-tog made.
Here is an easy video tutorial at https://youtu.be/qlnqXDB3OUM

Round 5 : sl-st into the 1st ch-1 sp ; 
dc 3-tog in the same ch-1 sp ; 
*(ch 2, dc 3-tog in the next ch-1 sp) ; 
rep (to) 3 times ;  
sk next 2 sc and ch-1 sp,  dc-3 tog in the next ch-1 sp* ; 
rep *to* all around 
and join with sl-st to the 1st st.

Round 6 : sl-st into the 1st ch-2 sp ; 
dc in the same ch-2 sp ; 
*ch 2, sk next dc-3 tog, dc in the next ch-2 sp* ; 
rep *to* all around 
and join with sl-st to the 1st st.
photo of the pattern for the skirt portion of the Lovely Shelled Girls dress
Round 7 : dc in the 1st dc ; 
*2 dc in the next ch-2 sp ; dc in the next dc* ; 
rep *to* all around 
and join with sl-st to the 1st st.

Round 8 : sc in the 1st dc ; 
*ch 3, sk next 3 dc ; sc in the next 2 dc ; 
ch 3, sk next 3 dc , sc in the next dc* ; 
rep *to* all around 
and join with sl-st to the 1st st.

Round 9 : sc in the 1st ch-3 sp ; 
ch 3, sc in the same ch-3 sp ;  
*ch 3, sk next 2 sc ; 3 dc in the next ch-3 sp ; 
ch 3, sk next sc , sc in the next ch-3 sp ; ch 3, sc in the same ch-3 sp* ; 
rep *to* all around 
and for that last ch 3, join with dc to the 1st st. 
This ensures that you are just where you need to be.
In case you find this too hard, please work ch 3 and join to the last st.  
Then you will need to sl-st to get to where you need to be.

Round 10 : 2 dc in the 1st ch-sp ; 
ch 3, sc in the same ch-3 sp ;  
*ch 3, sc in the next ch-3 sp ; 
ch 3, ( 2 dc in the next dc ; dc in the next dc ; 2 dc in the next dc)* ; 
rep *to* all around till the last dc-set ; 
2 dc in the next dc ; 
dc in the last dc 
and join with a sl-st to the 1st st.

Round 11 : dc in the 1st 2 dc ; 
*sk both ch-sps and sc, dc in the next 3 dc ; 
ch 5 , dc in the same 3rd dc (of that 5 dc set) and next 2 dc * ; 
rep *to* all around till last dc-set ; 
dc in the next 3 dc ; 
ch 5 , dc in the same 3rd dc (of that 5 dc set) and next dc 
and join with sl-st to the 1st st.

Round 12 : sl-st in the 1st dc ; sc in the next 2 dc ; 
*ch 1 , sk next 2 dc,  dc in the ch-5 sp ; 
(ch 1, dc in the same ch-5 sp) ; 
rep (to) 4 times ; 
ch 1, sk next 2 dc, sc in the next 2 dc* ; 
rep *to* all around 
and join with sl-st to the 1st st.

Round 13 : sl-st into the 1st ch-1 sp ; dc 3-tog in the same ch-1 sp ; 
*(ch 2, dc 3-tog in the next ch-1 sp) ; 
rep (to) 3 times ;  
sk next 2 sc and ch-1 sp,  dc-3 tog in the next ch-1 sp* ; 
rep *to* all around 
and join with sl-st to the 1st st.

Using rep Rounds 6 – 13 as basic idea, work till you get the dress length you wish. There will be minor changes in where you start the round, but as we’ve worked 13 rounds, you’ll know.
Of course, you also have the chart below to follow up with.
photo of the border of the shelled girls dress, https://shyamanivas.blogspot.com/2015/06/lovely-shelled-girls-dress.html
PART 3 : FINISHING :  Just for a difference, I added a round of picot around the dress border. 

How to work a picot stitch : Traditionally for a ch-3 picot, you work (ch 3, sl-st in 3rd ch from hook).  For a ch-5 picot, you will do (ch 5, sl-st in 5th ch from hook). 
Here’s a great video https://youtu.be/8s3zVaBcn4s
Enjoyed this ?? I sure did.. Come back right here for more freebie patterns

Remember to share this blog post when you share your photos with me on Facebook.  I’d love to feature your photos on my FB page.  Cheers.

If you're visiting me here for the first time, and have liked the experience, do add me to your mailing list (for your convenience) , and all my future free patterns will come straight to your mail box.  

I’d appreciate if you could credit my blog (and link the original pattern link) when you make your own creation.  Thanks.

Check out my awesome pins on Pinterest at https://in.pinterest.com/shyamanivas/


Join me on YouTube at http://youtube.com/shyamanivas

And on my Facebook page at https://www.facebook.com/Sweet-Nothings-Crochet/ for more patterns.

Do follow me on Twitter https://twitter.com/ShyamaNivas


Find me on Ravelry at ravelry.com/projects/shyamanivas/

Have a great day and see you soon. 
  
I have a few dresses already made, and just in case you want a dekho at those free patterns … here you go  


and here are a few skirt patterns that you can use your belt for..


Here are some of my tops


Here are some of my bolero / jacket / vest creations.  Have fun with these free patterns too


Here is a list of my earlier miscellaneous home use projects.  Enjoy