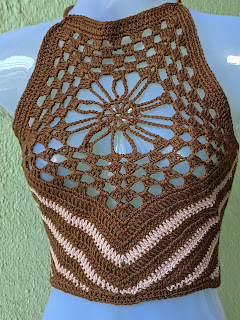
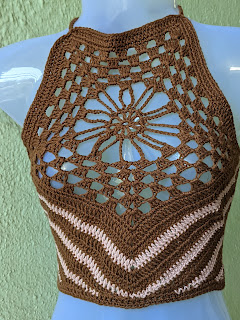
Thank you for joining me.
In case you have just joined me, know that you can access all of my earlier creations by checking under ‘categories’ on the right hand side of this blog under “Labels”. Then, for your convenience, follow me here or on Facebook, You Tube, Pinterest, Twitter or Instagram.
Check out all my social media handles at the bottom of this blog
Oh, and may I add that the fastest way to find any of my blogs is via Pinterest.
All my blogs can be printed. Find the printer friendly (green) link on the right hand side and at the bottom of this blog. You can also hit Control P (or Command P for Mac) on your keyboard, and the blog will go directly to the connected printer.
Remember that you only print if absolutely essential. Save paper – Save Our Earth.
Do remember to add my blog URL when you make and show off your creation.
Just copy the link on the search bar above - that's the blog URL.
To purchase this or similar yarn online, click here to buy your yarns online via Amazon. While you will still pay the same, I may get paid by Amazon as well.
This is a free blog - so do pay it forward for me. Cheers.
Single Crochet : Sc : yo, insert hk into st ; yo (2 lps on hk); yo, draw through both lps. One sc made. Check out the video at https://youtu.be/ghACqBpA-3kFirst stitch for Single Crochet : This is how I like to start my row of sc. Check out the video at https://youtu.be/6pVYRfsf4_M
Single crochet 2-together : sc 2-tog :
Insert hk into st, yo and pull up a lp (2 lps on hk) ; insert hk into next sc, yo and pull up a lp (3 lps on hk); yo and draw through all 3 lps. One sc 2-tog complete. Visit this video tutorial at https://youtu.be/whlsMemDHLc
Half double crochet 2-tog : hdc 2-tog : [yo, insert hk in st or ch-sp, yo and pull up a lp] (3 lps on hk) ; insert hk in st or ch-sp, yo and pull up a lp (4 lps on hk) ; yo, draw through all 4 lps on hk. One hdc 2-tog made.
Check the video tutorial at https://youtu.be/jdaXTr7Lcig
Double crochet 2-tog : dc 2-tog : [yo, insert hk in st or ch-sp, yo and pull up a lp ; yo and draw through 2 lps] 2 times (3 lps on hk) ;
{yo, draw through 2 lps on hk} 2 times. One dc 2-tog made.
This video tutorial at https://youtu.be/1_oPlUfN5eg shows you how to use the dc 2-tog to decrease.
Single crochet 2-together : sc 2-tog :
Insert hk into st, yo and pull up a lp (2 lps on hk) ; insert hk into next sc, yo and pull up a lp (3 lps on hk); yo and draw through all 3 lps. One sc 2-tog complete. Visit this video tutorial at https://youtu.be/whlsMemDHLc
Half double crochet 2-tog : hdc 2-tog : [yo, insert hk in st or ch-sp, yo and pull up a lp] (3 lps on hk) ; insert hk in st or ch-sp, yo and pull up a lp (4 lps on hk) ; yo, draw through all 4 lps on hk. One hdc 2-tog made.
Check the video tutorial at https://youtu.be/jdaXTr7Lcig
Double crochet 2-tog : dc 2-tog : [yo, insert hk in st or ch-sp, yo and pull up a lp ; yo and draw through 2 lps] 2 times (3 lps on hk) ;
{yo, draw through 2 lps on hk} 2 times. One dc 2-tog made.
This video tutorial at https://youtu.be/1_oPlUfN5eg shows you how to use the dc 2-tog to decrease.Re-attach your yarn at one of the side corner ch-sps.
Double crochet 2-tog : dc 2-tog : [yo, insert hk in st or ch-sp, yo and pull up a lp ; yo and draw through 2 lps] 2 times (3 lps on hk) ;
{yo, draw through 2 lps on hk} 2 times. One dc 2-tog made.
This video tutorial at https://youtu.be/1_oPlUfN5eg shows you how to use the dc 2-tog to decrease.How to make shoulder and back ties : https://youtu.be/K5N771OXLu4
2) Work a side piece and then add buttons
If you decide on Idea #2, then do not cut yarn after you reach the corner bottom.
You will then work side to side along hat side flat edge for the back.
You can work either one long flat piece that goes all the way around the back (so half round bust/chest measurement) and then have your buttons along one side ;
OR you work 2 half pieces (so 1/4th round bust / chest measurement) that go halfway around the back and attach along the centre of the back (along the spine)
Use any stitch that works for you - so sc / hdc or dc.
You will work 2 sts along the horizontal bars of each dc along the side to start.
you will then work 1 st in each st all the way up and down till you get the measurement you need for this section.
Let's add another feature or twist, shall we?
Why? because we can 😁
Instead of working all he way up and down for the side section you can decide to make that section narrow(er).
In case you so decide, you will work all he way till the bottom edge of your top, but along the armhole edge, you will work a dc 2-tog, at the start and end of every row to decrease. If you want a quicker decrease, work 2 sets of dc 2-tog.
Now you can work this till you have a slender section (basically one that can cover a bra strap) OR you can go till you have just one st and then work a tie at that end.
If you make a strap, you may want to make a set of loops for your buttons
How to make a loop for your button : https://youtu.be/oocVo-ZNIcM
For a final finishing you may want to add one row / round of sc all around the edges of your work.
You could also add one row / round of crab stitch or reverse single crochet for a neat pebbled finish
Crab Stitch or Reverse Single Crochet stitch : https://youtu.be/cG3crwyHPnk


No comments:
Post a Comment
Thanks for taking the time to stop by. Do tell me what you think. Cheers