MOBIUS
HEADBAND
This
is actually a really simple project even though the name sounds complicated. This is a beautiful unending headband – just the
perfect project for the end of the year and start of a new one. Wish you and your loved ones a Happy New year and a fantastic 2020!
This is an easy one row repeat pattern with a twist!
Thanks
for joining me. Come along, let’s create
something beautiful
In case you have just joined me, know that you can access all of my earlier creations by checking under ‘categories’ on the right hand side of this blog under “Labels”. Then, for your convenience, follow me here or on Facebook, You Tube, Pinterest, Twitter or Instagram.
Check out all my social media handles at the bottom of this blog
Oh, and may I add that the fastest way to find any of my blogs is via Pinterest.
All my blogs can be printed. Find the printer friendly (green) link at the bottom of this blog. You can also hit Control P (or Command P for Mac) on your keyboard, and the blog will go directly to the connected printer.
Remember that you only print if absolutely essential. Save paper – Save Our Earth.
Do remember to add my blog URL when you make and show off your creation.
Just copy the link on the search bar above - that's the blog URL.
To purchase this or similar yarn online, click here to buy your yarns online via Amazon. While you will still pay the same, I may get paid by Amazon as well.
This is a free blog - so do pay it forward for me. Cheers.
Materials used : Today
I’ve used some (Indian) Vardhman Grandeur yarn , as well as some Vardhman Swiss Mohair premium knitting yarn with a 4.5 mm crochet hook ; and then some
multi colored Oswal baby soft sock yarn
with a 3.5 mm crochet hook
General yarn info : The yarn used today is not specific to this pattern.
You can use any yarn with a suitable hook to make this project to any size.
International yarns : Among the international yarns I have used in this thickness, I’d suggest Aunt Lydia Cotton 10, Aunt Lydia Bamboo-Viscose 10, DMC Petra, Sullivans knitting cotton (Australia), Milford Soft, Hilaza Rustica Eclat , Alize cotton yarn and Alize bamboo yarn.
Difficulty level : Intermediate.
Stitches used :
Foundation half double crochet (fhdc) : This is an
easy way to start a row of hdc without the starting chain row.
Half Double Crochet : Hdc : yo, insert hk into st ; yo (3 lps on
hk) ;
yo,
draw through all 3 lps. One hdc
made.
Chainless start for Half Double Crochet :
I
dislike the ch-2 start, and this is what I do to start my row of hdc. Check out
the video at https://youtu.be/lWXpl1KdbZ8
Here is a sizing chart for general head sizing :
Invisible join : Here’s a quick tutorial on how to join using the embroidery needle and whipstitch to get an invisible join at https://youtu.be/a6XZQ6VzJFM
Abbreviations used :
sc : single crochet hdc
: Half Double crochet
ch : chain ch-sp
: chain space
sp : space rep
: Repeat
hk : hook lp (s) : loop(s)
yo : yarn over sl-st : slip stitch
fhdc
: Foundation half double crochet
Instructions using U.S terminology
Please note that I start all my
rounds with a ch 1 turning chain for ease.
Please check the top of this blog
for video tutorials of all the stitches used in today’s pattern.
This pattern sounds complicated, but
you’re just worked round and round in rows.
To have a good finish, I have worked in spirals – which just means that
you do not join at the end of each row / round
What
do you need before you start ? Just the round head measurement of the person
this is intended for. Easy huh?
Please
remember that each yarn has a stretch – so stretch it slightly before you
measure. Please also note that this
mobius pattern gives your headband a diagonal stretch, so you could safely work
1.5” less than the actual round measure and then check once you have done the
first two rounds.
Please
leave about 4” of yarn before you start to join at the very end.
Start with
as many fhdc as you need for the round head measurement of the person this is
intended for.
Now
before you join this long fhdc strip, give it one twist.
What
does this mean? Twist the starting bit of your strip such that the bottom now
is the top. This means that when you
work the next row / round, you will be working on the bottom of the row for a
bit.
Just
try this and that frown on your forehead will clear up.
Now
before we continue on let me explain what we have done.
We have made a mobius strip – which is a
continuous strip (like a Number 8) that has no start or end. This first row is the only row in which we
will ‘join’.
Henceforth we will work in
spirals so that your head band has no end or start.
Just
to get an even number of rows / rounds, please place a marker on this last / 1st
st. The starting 4” of yarn will be used
to cover the start little ‘hole’ between 1st and last sts.
As
this is a mobius strip, you will (almost unknowingly) be working for half the
headband along the top of the stitch and then along the bottom of the
stitch.
All this means is that you need
to be extra neat as today’s project has no top or bottom.
All Rows :
hdc in the 1st st and in each st till end.
Do
not join
(when you come to the marker) but continue working in hdc all through till you
have the width you want for the headband.
And
that’s it ! Our pattern done !
1. Hat circumference = measure around the head just above ears and subtract one inch for a nicely fitted finished hat.
2. Crown width = (this is a flat circular top of the hat) you need to divide hat circumference by 3.14 (pi).
3. Hat height = Head circumference / 10 x 4.
So you need to measure circumference of the head (round head measurement) and keep checking the outer circumference of your work.
There is another trick for measuring circumference (without running your measure tape all around the edge of your circle as you are working).
This works for a cap that you are working top down, from the crown of the head.
It works by dividing your round head measure by pi (3.14).
So say your head measurement is 22, divide 22 by 3.14 = 7.
Remember when calculating diameter, you must account for the stretch of your yarn too.
So once the ‘flat portion’ for the crown (or the first few rounds while you are still increasing) of your cap is 7” diameter, you can stop increases and start increasing just the length (without increasing stitches for the round)
You
will see the twist pretty prominently after you complete a few rows.
For another twist : If you are working with a solid
color (one color) then to accentuate the twist you could work one row of sc all
around the edge.
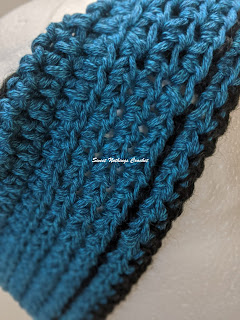
To
further accentuate the mobius effect, I wove in black yarn after completing the
headband.
How
did I weave it in? I chose to hold the
black yarn under the headband and slipped my crochet hook under each
stitch and worked a chain stitch over the headband (quite like a cobbler sews a
shoe). However, you can achieve this effect using an embroidery needle and
working an embroidery chain stitch across each stitch. This will have a chain
stitch on one side and flat line on the other.
Do note that your end and start yarns need to be woven in really neatly.
Isn’t
this just too beautiful and not that hard a pattern?
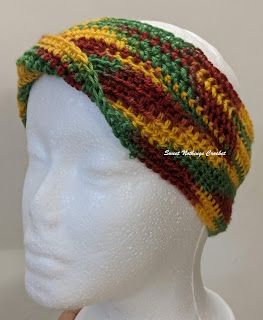
Now make this same project using multi colored yarn and sit back in awe as the yarn weaves yet more magic.
For this multicolored version, I used some (Indian) Oswal multicolored sock yarn with a 3.5 mm crochet hook.
Enjoyed
this ?? I sure did.. Come back right here for more freebie patterns
Remember
to share this blog post when you share your photos with me on Facebook. I’d love to feature your photos on my FB
page. Cheers.
If you're visiting me here for the first time, and have liked the experience, do add me to your mailing list (for your convenience) , and all my future free patterns will come straight to your mail box.
I’d appreciate if you could credit my blog (and link the original pattern link) when you make your own creation. Thanks.
Have a great day and see you soon.
Here are some of my other creations.


No comments:
Post a Comment
Thanks for taking the time to stop by. Do tell me what you think. Cheers