Welcome to Sweet Nothings Crochet for loads of free crochet patterns, video tutorials & awesome creations. If you want to learn, or just want to see some great free patterns, you're in the right place. All my blogs have video tutorials with loads of ideas thrown in for good measure. Thanks for dropping by and I hope you'll stay a while.
Wednesday, 23 November 2016
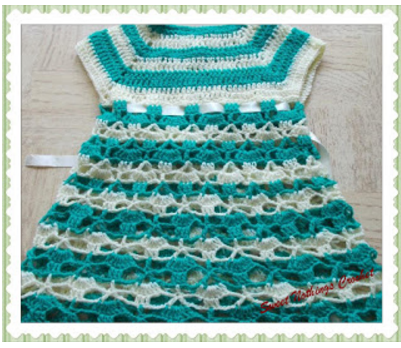
AMAIRA’s SHELLED PONCHO
Ponchos were quite the thing when we were young and now crochet ponchos are coming into fashion again. I love this intermediate skill level crochet shelled pattern for this poncho and the cute little collar just makes it so much cuter. I love it when I get a request to make a new
design and all I’m given is a colour – and then told “go ahead and make
something new and beautiful”. Here’s
what’s new and beautiful with this creation that I’m making for a 18 – 24 m baby
girl. Thank you for joining me on this
new journey of creation. Please rememberthat
as usual, I have lots of ideas and tweaks thrown in, so do read through all my "wordsy" explanations. After all, I am
taking the trouble of thinking all this through :)
And as we’re making requests, may I request you
to link my blog when you make your project. I feel horrid saying this, but there are many
who have used the patterns freely given here, and not given any credit to the
blog that has given them this pattern.
Come on guys.. it ain’t that much work to give credit and link the blog
now, is it? Thank you for joining me.
In case you have just joined me, know that you can access all of my earlier creations by checking under ‘categories’ on the right hand side of this blog under “Labels”.
How labels work : All patterns under a similar label can be found together so when you click on the label for say "crochet baby dress pattern", all my baby dress patterns are available - so scroll down to the very bottom and click on "Older Posts" to move onto the next post in the series. Before you reach that you have several other ways to find my blogs including blog links at the bottom of this blog For your convenience, follow me here or on Facebook, You Tube, Pinterest, Twitter or Instagram. Oh, and may I add that the fastest way to find any of my blogs is via Pinterest and if you are looking for more children wear then come here All my blogs can be printed. Find theprint friendly (green) link on the right of this blog. You can also hit Control P (or Command P for Mac) on your keyboard, and the blog will go directly to the connected printer. Remember that you only print if absolutely essential. Save paper – Save Our Earth.
Do remember to add my blog URL when you make and show off your creation.
Just copy the link on the search bar above - that's the blog URL.
To purchase this or similar yarn online, click here to buy your yarns online via Amazon. While you will still pay the same, I may get paid by Amazon as well.
This is a free blog - so do pay it forward for me. Cheers.
Inspired by a photo with its attached graph /
chart from this pin, here are my pattern notes as I work in my own project.
Materials used : Today I have
used about 2 skeins of
our lovely Indian Oswal Cashmilon 4-ply acrylic yarn with a 3.5 mm crochet hook
International yarns : Among the international yarns I have used in this thickness, I’d suggest Aunt Lydia Cotton 10, Aunt Lydia Bamboo-Viscose 10, DMC Petra, Sullivans knitting cotton (Australia), Milford Soft, Hilaza Rustica Eclat , Alize cotton yarn and Alize bamboo yarn.
Size made :
For a 18 - 24 month old
Difficulty level
: Intermediate to Advanced Skill level.
The stitches used in this pattern are simple and
the pattern is repetitive. However,
there is calculation involved, and there are decisions and judgments that you
will need to take/make.
Invisible join : Here’s a quick tutorial on how to join using the embroidery needle and whipstitch to get an invisible join at https://youtu.be/a6XZQ6VzJFM
Here is a sizing chart for general neck sizinghere and here
Here is a sizing chart for general body sizinghere, here or here
Abbreviations used : Using U.S terminology
ch : Chain sp(s) : Space(s)
dc : Double crochet hk : Hook
st(s) : Stitch(es) sl-st : slip stitch
sk : Skip sp : space
rep : repeat
fsc : Foundation single crochet
InstructionsUsing U.S terminology
Please note that I start all my rows with a ch 1, turning chain for ease.
Please check the top of this blog for easy video tutorials on all stitches used in today's pattern.
Please read through all my notes before you pick up your hook, so you know just where we're heading in our pattern.
In my patterns I work with the principle of stitch count and body measurement. This means that you need to work the stitch count in pattern, till you get the measurement (length and/or width) that you need for your project.
So before we set off on our new creative
journey, let’s take a quick look at what we’re creating here today.
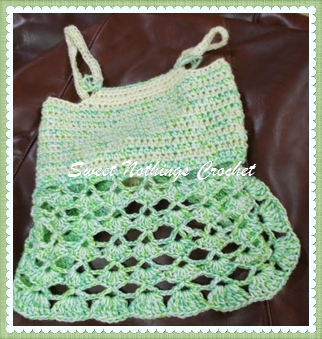
There was this lovely photograph that inspired me to start on
this creation, and I was lucky to find some charts, which I am using as a
baseline for my work here.
the photograph that inspired me
Now there is a link for a set of sizing /
measurement charts depending on age of child and I’d suggest we use that as a
reference. I always suggest that if
you’re making this specifically for someone you know, try and get a well-fitted
dress / outfit of that child.
The pattern for this cape has a chart, but I am
making a few changes in the end product.
I am going to make it a one-piece poncho without a front opening.
Please note that the first few rows are worked
back and forth and I have then joined and worked in a round.
IF you decide to work in rounds from the
start, please join with a sl-st at the end from the start.
Row 2 : dc in the 1st fsc ; ch 2, sc in
the next fsc ;
*ch 5, sk next 2 fsc, sc in the next fsc* ;
rep *to* till last 2 fsc ;
ch 2, sk next fsc, dc
in the last fsc. Turn.
Note : IF you’re
working in the round, please start with a sc and the *to* pattern from
the start. At the end of the round, join
with a sl-st to the 1st sc.
In the following round for you then, you will start with a sc in that 1st
dc, and continue with the same pattern.
Single Crochet : Sc :yo, insert hk into st ; yo (2 lps on hk); yo, draw through both lps. One sc made. Check out the video at https://youtu.be/ghACqBpA-3k
First stitch for Single Crochet : This is how I like to start my row of sc. Check out the video at https://youtu.be/6pVYRfsf4_M
Row 3 : sc in the 1st dc ;
*(ch 5, sc in
the next ch-5 sp) ;
5 dc in the next ch-5 sp ;
sc in the next ch-5 sp ;
rep
(to) once* ;
rep *to* till end. Turn.
Row 4 : dc in the 1st sc ; ch 2, sc in the
1st ch-5 sp ;
*dc in the next dc ;
(ch 1, dc in the next dc) ;
rep
(to) 3 times ;
sc in the next ch-5 sp ; ch 5, sc in the next ch-5 sp* ;
rep*to*
till end ;
ch 2, dc in the last sc. Turn.
In the following row, we’ll use our dc
3-tog (double crochet 3-together).
rep (to) 2 times ; ch 2, sc in the next ch-5 sp* ;
rep*to* till end ;
ch
2, sc in the last dc. Join with a sl-st to the 1st st.
Now if you’ve been working in rows, you have a
ch-2 sp at the start and end of Row 5.
So you will sl-st into that 1st ch-2 sp to start, and you
will end with the last ch-2 sp, ignoring or skipping the dc in between.
Round 6 : sl-st past the 1st ch-2 sp and sc
on top of the 1st dc 3-tog ;
*(ch 5, sc on top of the next dc 3-tog)
;
rep (to) 2 times ;
ch 5, sk next sc, sc on top of the next dc 3-tog* ;
rep*to* till end ;
ch 2, dc and join to the last sc.
You are now in the centre of that last ch-5 sp,
just where you need to be.
Now from this round on, we will usually be
ending in a ch-5 sp.
You have two
options.
You can work that last ch-sp and then join with a sl-st to the 1st
st OR you can join as we have before with a ch 2, dc and join to the 1st
st.
As I usually like to keep things simple, and I
*think* that working a repeat till the end is the simplest, this is how I am
going to write this out. You choose
whatever ends suits you.
Round 7 : sc in the 1st ch-sp ;
*(ch 5, sc
in the next ch-5 sp) ; 6 dc in the next ch-5 sp ;
sc in the next ch-5 sp ;
rep
(to) once* ;
rep *to* till end and join with a sl-st to the 1st st.
Row 8 : sl-st and sc in the 1st ch-5 sp ;
*dc
in the next dc ;
(ch 1, dc in the next dc) ;
rep (to) 4 times ;
sc in the next
ch-5 sp ;
ch 5, sc in the next ch-5 sp* ;
rep*to* till end and join with a
sl-st to the 1st st.
Row 9 : sl-st in the 1st ch-1 sp ; dc
3-tog in the same 1st ch-1 sp ;
*(ch 3, sk dc, dc 3-tog in
the next ch-1 sp) ;
rep (to) 3 times ;
[ch 2, sc in the next ch-5 sp] ;
ch 2,
sk next dc, dc 3-tog in the next ch-1 sp* ;
rep*to* till end ;
ch 2, sc in the
last dc.
Join with a sl-st to the 1st st.
Round 10 : sl-st and sc in the 1st ch-3 sp ;
*(ch 5, sc in the next ch-3 sp) ;
rep (to) 2
times ;
ch 5, sk next sc, sc in the next ch-3 sp* ;
rep*to* till end ;
ch 5,
and join to the last sc.
I am sure you have understood what we’re doing
here, and we’ve just completed one full pattern repeat. So there’s just a small tweak to increase,
and after I take you through one more pattern repeat, we’ll discuss our pattern.
Round 11 : sl-st and sc in the 1st ch-sp ;
*7
dc in the next ch-5 sp ; sc in the next ch-5 sp ;
(ch 5, sc in the next ch-5
sp) ;
rep (to) once* ;
rep *to* till end and join with a sl-st to the 1st
st.
Round 12 : *dc in the next dc ;
(ch 1, dc in the next dc)
;
rep (to) 5 times ;
sc in the next ch-5 sp ;
ch 5, sc in the next ch-5 sp* ;
rep*to* till end and join with a sl-st to the 1st st.
Round 13 : sl-st in the 1st ch-1 sp ; dc
3-tog in the same 1st ch-1 sp ;
*(ch 3, sk dc, dc 3-tog in
the next ch-1 sp) ;
rep (to) 4 times ;
[ch 2, sc in the next ch-5 sp] ;
ch 2,
sk next dc, dc 3-tog in the next ch-1 sp* ;
rep*to* till end ;
ch 2, sc in the
last dc.
Join with a sl-st to the 1st st.
Round 14 : sc on top of the 1st dc 3-tog ;
*(ch 5, sc on top of the next dc 3-tog) ;
rep (to) 4 times ;
ch 5, sk next sc,
sc on top of the next dc 3-tog* ;
rep*to* till end ;
ch 5, and join to the last
sc.
Good job.
Put your work down and check the circumference or size of the
lower part of your poncho. IF you think
this is good enough, then continue without further increase and rep
Rounds 11 – 14 till you reach about 2” less than the child’s arm length
IF you want a frillier or a wider circumference,
Rep Rounds 7 – 10 first adding one more dc in Round 7 (i.e working 8 dc
in the ch-5 sp, which will also mean that each of your re (to) in the following
rounds will increase by 1).
At the end of the increase (Round 10), check
circumference again, and then IF needed, increase again, by rep Rounds 11 – 14,
once again adding one more dc in
Round 11 (i.e working 9 dc in the ch-5 sp, which will also mean that each
of your re (to) in the following rounds will increase by 1). This will all depend on how wide you want
it.
Once you are happy with how wide the base
of your work is stop increases and work with the repeats of the last
set of four rounds you have worked.
So say you are happy with the width/circumference you have after working
9 dc in each ch-5 sp and that 4-round repeat, then you will continue working
this pattern of 4-rounds all the way till your project is about 2” less than
the child’s arm length, or the length you need for the poncho.
Collar idea :
For the collar, I've worked the same pattern, but from the fsc around the neck. All you do is re-attach your yarn back at the front placket and then work all around with the pattern.
The only differences are that you start with a dc and you work side to side, and in just doing that you get a neat collar. Work with the pattern for as many rows as you wish for the collar length desired.
To keep the collar neat and work steadily, I checked at the end of every few rows to see if I was comfortable with the length and shaping.
I have put in a small button at the top of the cape, and have also threaded in a satin ribbon around the neckline.
Have a fun creative time.
Enjoyed this ?? I sure did.. come back right
here for more freebie patterns
If you're visiting me here for the first time, and have liked the experience, do add me to your mailing list (for your convenience) , and all my future free patterns will come straight to your mail box.
I’d appreciate if you could credit my blog (and link the original pattern link) when you make your own creation. Thanks.
Looking through all your beautiful designs, i am Very impressed!!! You are one talented lady!!!! Thank you so much for sharing so freely. That is really kind of you!! I am making your top design & i absolutely will give you credit#!! I'm an unpublished designer & people have no idea how hard we work to perfect our designs...sad.Thank you again!! You have s Blessed day!!!!!
Thank you so much Sandy. I appreciate every word you wrote :) <3 I hope you have made your poncho and I hope you remember to share your modeled photos with me. I would love to showcase it on my Facebook page (with your permission) so do send it on to me there. I apologise for the delayed response. Thanks and have a creative day.
Hola, estoy haciendo el poncho pero no entiendo como hago para que no quede cerrado, no tiene espacio para pasar los brazos ni esta abierto como en la foto.. seguí los pasos y estoy tejiendo en circulo cerrado. Ayuda por favor!
Hola, El patrón de esta capa tiene un gráfico, pero voy a realizar algunos cambios en el producto final. Lo voy a hacer un poncho de una pieza sin abertura frontal. Imagínelo como una falda que va alrededor del cuello. Entonces los brazos quedan libres debajo del poncho. Hasta la Fila 4 estamos trabajando de lado a lado y hay una abertura frontal, luego nos unimos. Si no se une, y trabaja de lado a lado todo el tiempo, se abrirá de frente. O Si puede leer gráficos, puede hacerlo con la apertura de todo el camino hacia abajo. Espero que esto ayude


Looking through all your beautiful designs, i am Very impressed!!! You are one talented lady!!!! Thank you so much for sharing so freely. That is really kind of you!! I am making your top design & i absolutely will give you credit#!! I'm an unpublished designer & people have no idea how hard we work to perfect our designs...sad.Thank you again!! You have s Blessed day!!!!!
ReplyDeleteThank you so much Sandy. I appreciate every word you wrote :) <3
ReplyDeleteI hope you have made your poncho and I hope you remember to share your modeled photos with me. I would love to showcase it on my Facebook page (with your permission) so do send it on to me there. I apologise for the delayed response. Thanks and have a creative day.
Hola, estoy haciendo el poncho pero no entiendo como hago para que no quede cerrado, no tiene espacio para pasar los brazos ni esta abierto como en la foto.. seguí los pasos y estoy tejiendo en circulo cerrado. Ayuda por favor!
ReplyDeleteHola, El patrón de esta capa tiene un gráfico, pero voy a realizar algunos cambios en el producto final. Lo voy a hacer un poncho de una pieza sin abertura frontal. Imagínelo como una falda que va alrededor del cuello. Entonces los brazos quedan libres debajo del poncho. Hasta la Fila 4 estamos trabajando de lado a lado y hay una abertura frontal, luego nos unimos. Si no se une, y trabaja de lado a lado todo el tiempo, se abrirá de frente. O Si puede leer gráficos, puede hacerlo con la apertura de todo el camino hacia abajo. Espero que esto ayude
Delete