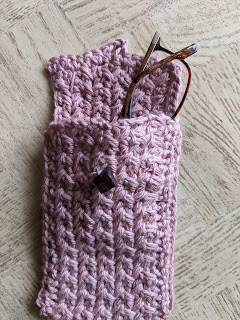
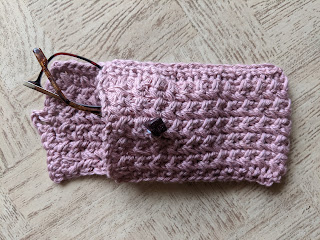
A spectacle case is a much-needed daily item and a crocheted spectacle case is a gift of love. Today's crochet spectacle case is worked as a long rectangle and then folded to get this finished effect. Using the same idea one can do a whole spectacle of things.. haha love that pun. This pattern is awesome - a really simple pattern that creates this lovely woven effect. I'll add that it looks way cooler than I'm able to photograph it. So you just gotta take my word for it and try this pattern out yourself.
In case you have just joined me, know that you can access all of my earlier creations by checking under ‘categories’ on the right hand side of this blog under “Labels”.
How labels work : All patterns under a similar label can be found together so when you click on the label for say "crochet baby dress pattern", all my baby dress patterns are available - so scroll down to the very bottom and click on "Older Posts" to move onto the next post in the series. Before you reach that you have several other ways to find my blogs including blog links at the bottom of this blog
For your convenience, follow me here or on Facebook, You Tube, Pinterest, Twitter or Instagram.
Oh, and may I add that the fastest way to find any of my blogs is via Pinterest and if you are looking for more bags then come here
All my blogs can be printed. Find the print friendly (green) link on the right of this blog. You can also hit Control P (or Command P for Mac) on your keyboard, and the blog will go directly to the connected printer.
Remember that you only print if absolutely essential. Save paper – Save Our Earth.
Do remember to add my blog URL when you make and show off your creation.
Just copy the link on the search bar on the top of your screen - that's the blog URL.
To purchase this or similar yarn online, click here to buy your yarns online via Amazon. While you will still pay the same, I may get paid by Amazon as well.
This is a free blog - so do pay it forward for me. Cheers.
General yarn info : The yarn used today is not specific to this pattern.
You can use any yarn with a suitable hook to make this project to any size.
International yarns : Among the international yarns I have used, I’d suggest Aunt Lydia Cotton 10, Aunt Lydia Bamboo-Viscose 10, DMC Petra, Sullivans knitting cotton (Australia), Milford Soft, Hilaza Rustica Eclat , Alize cotton yarn and Alize bamboo yarn. Skill level : Intermediate
There is a photo & video tutorial with the pattern sheet.
Stitches used :
Single Crochet : Sc : yo, insert hk into st ; yo (2 lps on hk); yo, draw through both lps. One sc made. Check out the video at https://youtu.be/ghACqBpA-3k
First stitch for Single Crochet : This is how I like to start my row of sc. Check out the video at https://youtu.be/6pVYRfsf4_M
Half Double Crochet : Hdc : yo, insert hk into st ; yo (3 lps on hk) ;
yo, draw through all 3 lps. One hdc made.
Check out the video at https://youtu.be/sDiELJdB2Dg
Chainless start for Half Double Crochet : I dislike the ch-2 start, and this is what I do to start my row of hdc. Check out the video at https://youtu.be/lWXpl1KdbZ8 Pattern Instructions : (Using U.S terminology)
There is no stitch count for this pattern. Use an even number of stitches for the first starting row. It is also a very convenient one row pattern.
I started with fsc or foundation single crochet and started with a length that I needed for my spectacle case.
So how did I know how many stitches I need? I just made my first fsc row, folded it and saw if my spectacles would easily fit in, and ensured it was an even number.
With this pattern, we work a rectangle starting from one side and working along the width to the other side. The width suggested is about 3.5 - 3.75".
The length suggested is about 6 - 7" with a flap of about 2".
So this means that we start with a fsc row that is about 7 x 2 + 2" = 16" approx.
The pattern actually gives the number of stitches to start with as well as a gauge - so if that works for you, great! It did not work for me - so I had to figure out another way - and this is why I have given you the calculations.
I also tried to work the sc with the Spike Stitch - as I felt the hdc Spike Stitch was too bulky with the yarn I've used.
Finally do take a look at the convenient video given as its easier to understand where to place that first set of spike stitches - once you get it going, you're gonna run and make quite a few of these cases.
Get the free crochet pattern here
This pattern can be used in several different ways. I can see myself making a coin purse, a small purse to carry keys and a bit of money when I go out on my walk.. and maybe a small clutch purse too.
All I'd do is decide the length and breadth of my creation and work with a start in even numbers.
What did I do differently?
I am also thinking of tweaking the pattern a bit and maybe adding 2 rows of plain sc between the Spike Row stitches .. what do you think?
Finishing :
Once you have completed the basic bag, you could use the links below to work the finishing.
a) How to line the bag : here b) How to attach a zipper : here
Enjoyed this ?? I sure did..come back right here for more freebie patterns
If you're visiting me here for the first time, and have liked the experience, do add me to your mailing list (for your convenience) , and all my future free patterns will come straight to your mail box.
I’d appreciate if you could credit my blog (and link the original pattern link) when you make your own creation. Thanks.
Have a great day and see you soon.
If you'd like to check out some of my other bag patterns, here goes


No comments:
Post a Comment
Thanks for taking the time to stop by. Do tell me what you think. Cheers