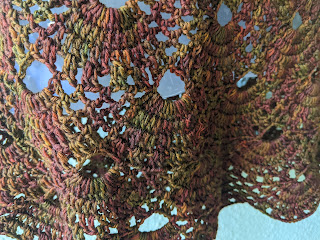
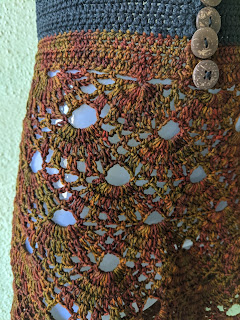
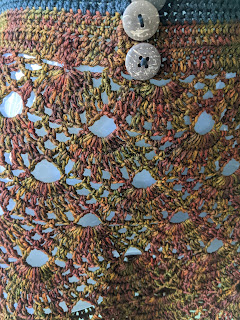
This is a really beautiful pattern. Small shells that alternate and fan out into a really delicate lace pattern. In today's blog I have given you ideas on how to make this into a top, poncho or skirt, using the same pattern. How cool am I, eh? 😄
As always with my blog, I give you loads of ideas, and encourage you to think a wee bit. Please read through to the end to get all the spice sprinkled through 🥰
In case you have just joined me, know that you can access all of my earlier creations by checking under ‘categories’ on the right hand side of this blog under “Labels”. Then, for your convenience, follow me here or on Facebook, You Tube, Pinterest, Twitter or Instagram.
Check out all my social media handles at the bottom of this blog
Oh, and may I add that the fastest way to find any of my blogs is via Pinterest.
All my blogs can be printed. Find the printer friendly (green) link on the right hand side of this blog. You can also hit Control P (or Command P for Mac) on your keyboard, and the blog will go directly to the connected printer.
Remember that you only print if absolutely essential. Save paper – Save Our Earth.
Do remember to add my blog URL when you make and show off your creation.
Just copy the link on the search bar above - that's the blog URL.
To purchase this or similar yarn online, click here to buy your yarns online via Amazon. While you will still pay the same, I may get paid by Amazon as well.
This is a free blog - so do pay it forward for me. Cheers.
Here is a sizing chart for general neck sizing
https://in.pinterest.com/pin/470063279838234527/ OR
https://in.pinterest.com/pin/470063279842061521/
Here is a sizing chart for general sizing https://in.pinterest.com/pin/470063279837597366/
OR https://in.pinterest.com/pin/470063279837560772/
And https://in.pinterest.com/pin/470063279838533503/
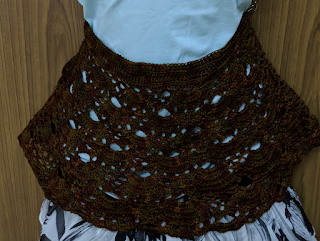
This brilliant pattern can be made into several things… a top, a poncho or a skirt.
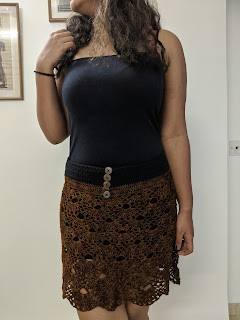
With this basic pattern, I’m going to give you ideas to work on all.. how fun is that, right? I've made a skirt with this pattern, but here you go with so many other ideas as well.
Let’s look at how we can make this a top.
First you need to decide what size you are working this for. You need the following body measurements
1) Round waist and round bust – use the larger measure
2) Shoulder to waist measurement for length of top
3) Shoulder width (for strap)
With today’s pattern you can work a bottom up or top down creation – which means we start at the waist and then work our way to the armhole and shoulders or you can work the other way around as well.
As these instructions are for skirt / poncho (worked in rounds) or top, they will read both Row / Round
As always, I work on stitch count and if you ensure that you get the stitch count in the multiples given for the round waist measurement, you can get this pattern made in any size, using any yarn with a suitable hook.
Please note that I do not give a start number for your stitches.
You need to calculate that depending on the round waist measurement of the person you are making this for. Easy enough, right?
Our stitch count is in multiples of 17
For the top :
The instructions are to work two rectangles with this pattern, without shaping armhole or neckline. That will give you a small sleeve that will flop over the shoulders and you will have a scooped out boat-like neckline.
I did not make a top using this pattern, so have no photos for this - but trust me, this is a wonderful pattern for a top too
We will make two identical rectangles for our top.
Start : with fsc in multiples of 17 + 1 for half round chest or half round waist.
Turn.
How to keep your chain flat without twisting :
https://www.youtube.com/watch?v=kwoGTvFbxbg
Row / Round 1 : sc in the 1st fsc ;
(ch 5, sk 3 fsc, sc in the next fsc) ;
rep (to) till end. Turn.
Row / Round 2 : sl-st into the 1st ch-5 sp ;
sc in the same 1st ch-5 sp ;
*9 dc in the next ch-5 sp ; sc in the next ch-5 sp ;
(ch 5, sc in the next ch-5 sp) ;
rep (to) once* ;
rep *to* till end. Turn.
Row / Round 3 : sl-st into the 1st ch-5 sp ;
sc in the same 1st ch-5 sp ;
*(ch 1, dc in the next dc) ;
rep (to) 8 times ;
ch 1, sc in the next ch-5 sp ;
[ch 5, sc in the next ch-5 sp]* ;
rep *to* till end. Turn.
Row / Row / Round 4 : sc in the 1st ch-5 sp ;
*ch 1, (dc in the next ch-1 sp ; dc in the next dc) ;
[ch 2, sk next ch-1 sp and next dc, rep (to) once] ;
rep [to] 3 times ;
ch 1, sc in the next ch-5 sp* ;
rep *to* till end. Turn.
Row / Round 5 : sl-st into the 1st ch-2 sp, past the ch-1 sp and 2 dc ;
sc in that same ch-2 sp ;
*(ch 5, sc in the next ch-2 sp) ;
rep (to) 2 times ;
[ch 5, sk next 4 dc, 2 ch-1 sps and 2 sc, sc in the next ch-2 sp]* ;
rep *to* till end. Turn.
The following round is a rep of Row / Round 2, but we’re moving the 9-dc set, as you’ll see.
Row / Round 6 : sl-st into the 1st ch-5 sp, sc in that same ch-5 sp ;
*9 dc in the next ch-5 sp ; sc in the next ch-5 sp ;
(ch 5, sc in the next ch-5 sp) ; rep (to) once* ;
rep *to* till end. Turn.
Do you see how we’ve shifted the 9-dc set to the middle of the earlier set? Cool huh?
Now as you guessed, we’re working a rep of Round 3 with a small difference
Row / Round 7 : sl-st into the 1st ch-5 sp ; sc in the same 1st ch-5 sp ;
ch 5, sc in the next ch-5 sp ;
*(ch 1, dc in the next dc) ;
rep (to) 8 times ;
ch 1, sc in the next ch-5 sp ; [ch 5, sc in the next ch-5 sp]* ;
rep *to* till end. Turn.
Row / Round 8 : sl-st into the 1st ch-5 sp ; sc in the 1st ch-5 sp ;
*ch 1, (dc in the next ch-1 sp ; dc in the next dc) ;
[ch 2, sk next ch-1 sp and next dc, rep (to) once] ;
rep [to] 3 times ;
ch 1, sc in the next ch-5 sp* ;
rep *to* till end. Turn.
Row / Round 9 : sl-st into the 1st ch-2 sp, sc in that same ch-2 sp ;
*(ch 5, sc in the next ch-2 sp) ; rep (to) 2 times ;
[ch 5, sk next 4 dc, 2 ch-1 sps and 2 sc, sc in the next ch-2 sp]* ;
rep *to* till end. Turn.
Our pattern rep is Rounds 2 – 9.
Continue with the pattern till you reach the shoulder level.
Make two identical rectangles.
Once done, attach the two sides all the way to armhole, leaving an armhole opening. Then attach the shoulders, leaving a neckline opening ; and you have yourself a lovely top.
Whipstitch to join : https://youtu.be/wZ-9LNzftMA
Invisible join : https://youtu.be/a6XZQ6VzJFM
Single crochet to join : https://youtu.be/6FXoW_47_dI
How do I make this into a crop top?
Easy. The only difference is the length of the top. A crop top is about 14 - 16" (depending on round bust measurement) - so work 2 rectangles of the size you need using this pattern, and then join as instructed for the 'regular' top
If you are making this into a top or poncho, you may want a round of picot stitches
How to work a picot stitch : Traditionally for a ch-3 picot, you work (ch 3, sl-st in 3rd ch from hook). For a ch-5 picot, you will do (ch 5, sl-st in 5th ch from hook).
Here’s a great video https://youtu.be/8s3zVaBcn4s
Easiest I-cord : https://youtu.be/e_AQ9m0QeZI
Skirt or Poncho ideas
If like me, you wish to make this into a skirt or poncho, then you will work with fsc in multiples of 17 for round waist measure for skirt or a round neck measurement for poncho. Join with a sl-st to the 1st st.
You will work the pattern as given, working in rounds and just joining at the end with a sl-st every round.
I ran out of yarn before I got the length I needed. So rather than junk or rip out the full gorgeous skirt, I’ve decided to work on a small fitted belt (in black) for the top of the skirt – easily adding in the additional few inches I need. Using a regular black belt on top will just enhance the whole creation, what do you say?
I had a really fun creative day and I do hope you do too.
If you're visiting me here for the first time, and have liked the experience, do add me to your mailing list (for your convenience) , and all my future free patterns will come straight to your mail box.
I’d appreciate if you could credit / add my blog link (and link the original pattern link) when you make your own creation. Thanks.
Have a great day and see you soon. 😊👋🏼






No comments:
Post a Comment
Thanks for taking the time to stop by. Do tell me what you think. Cheers