EXQUISITE
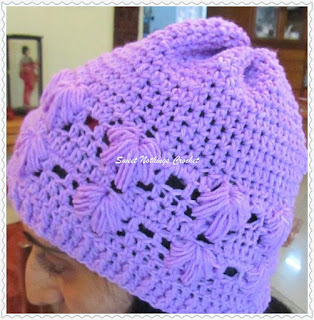
FLOWER BEANIE
#Blogaday 45/365
This
is a cap / beanie that has been shared several times on Facebook and has been
on my “To-do” list for just about ever!
I am thrilled to have an opportunity to use the lovely photo tutorial
and write the pattern out for it.
Thank you for joining me.
In case you have just joined me, know that you can access all of my earlier creations by checking under ‘categories’ on the right hand side of this blog under “Labels”. Then, for your convenience, follow me here or on Facebook, You Tube, Pinterest, Twitter or Instagram.
Check out all my social media handles at the bottom of this blog
Oh, and may I add that the fastest way to find any of my blogs is via Pinterest.
All my blogs can be printed. Find the printer friendly (green) link at the bottom of this blog. You can also hit Control P (or Command P for Mac) on your keyboard, and the blog will go directly to the connected printer.
Remember that you only print if absolutely essential. Save paper – Save Our Earth.
Do remember to add my blog URL when you make and show off your creation.
Just copy the link on the search bar above - that's the blog URL.
To purchase this or similar yarn online, click here to buy your yarns online via Amazon. While you will still pay the same, I may get paid by Amazon as well.
This is a free blog - so do pay it forward for me. Cheers.
As
with all my patterns, I try to make it as easy as possible, with as many links
to videos for stitches as well as diagrams. I'm planning on making a pair of fingerless gloves to match this beanie.. so keep an eye out for my blog.
I
do not know if this pattern has been written up before. I only know that I got
the photo tutorial for this floral pattern from the internet and have used it
to make my cap. These are my notes as I
work on my project.
Materials used : Today I’ve used about 75 gms of our lovely 4 ply KDR Baby Love
acrylic yarn with a 4 mm crochet hook
In general : Use any yarn with a suitable hook to make these projects.
International yarns : Among the international yarns I have used , I’d suggest Aunt Lydia Cotton 10, Aunt Lydia Bamboo-Viscose 10, DMC Petra, Sullivans knitting cotton (Australia), Milford Soft, Hilaza Rustica Eclat , Alize cotton yarn and Alize bamboo yarn.
Skill level : Intermediate to advanced
Size made : The cap is
21” adult
Stitches used :
Half Double Crochet : Hdc : yo, insert hk into st ; yo (3 lps on hk) ;
yo, draw through all 3 lps. One hdc made.
Chainless start for Half Double Crochet : I dislike the ch-2 start, and this is what I do to start my row of hdc. Check out the video at
https://youtu.be/lWXpl1KdbZ8
Abbreviations used : (Using U.S terminology)
lp(s) : Loop(s) sc : Single crochet
dc : Double crochet ch : Chain
sp : Space sl-st : Slip stitch
st(s) : Stitch(es) hk : Hook
yo : Yarn Over
dc 2-tog : Double crochet 2-together
Instructions : (Using U.S terminology)
Please note that I start all my rows with a ch 1, turning chain for ease.
Please check the top of this blog for easy video tutorials on all stitches used in today's pattern. For your convenience there video tutorials through the blog too
Please read through all my notes before you pick up your hook, so you know just where we're heading in our pattern.
In my patterns I work with the principle of stitch count and body measurement.
This means that you need to work the stitch count in pattern, till you get the measurement (length and/or width) that you need for your project.

Before we head off into the slightly complicated
pattern, I’d like to explain what we’re planning on doing here.
The floral pattern is really soft and makes for a really lovely start, but do
remember as we’re pulling a whole load of yarns up, it may be a bit of a tangle
– so I’d suggest that we only work one round of the flowers.
That said, go ahead and create and be different.
For the cap, I have been inspired by this lovely
pattern I saw on Facebook, which has a superb photo tutorial, but no written
pattern.
Our stitch
count for this pattern is 8. We will start at the brim of the
cap, and work our way up to the crown of the cap.
Foundation double crochet (fdc) : This is a unique way of starting a project directly with a row of double crochet stitches. Here is an easy video tutorial https://youtu.be/hjNUYVvyU9k
Start with fdc in
multiples of 8 (for round forehead measure) and keeping the fdc chain carefully
flat, join to the 1st stitch to make a round.
We now have a neat dc row all ready to start.
Check out this video on how to keep your chain flat
without twisting when working with a longer chain length
Front Post Double Crochet : fpdc : Post stitches are stitches worked around the post of a stitch of the row below.
How to work the fpdc : yo, hk into sp between posts of st from row below – going from back of stitch, around st and into the front of the st ; yo, pull yarn through the sps (3 lps on hk), (yo & pull through 2 lps) twice. One fpdc complete
In the following round, we will use our post stitch
(fpdc) in every alternate stitch.
Round 1 : dc in the 1st
fdc ;
*fpdc around the next fdc ; dc in the next fdc* ;
rep *to* all around and join with a sl-st to the 1st
dc.
Round 2 : dc in the 1st
dc ;
*fpdc around the next fpdc ; dc in the next dc* ;
rep *to* all around and join with a sl-st to the 1st
dc.
Round 3 : hdc in the 1st
dc ; hdc in the next 6 dc ;
*ch 1, sk next dc , hdc in the next 7 dc* ;
rep *to* all around and join with a sl-st to the 1st
dc.
Round 4 : hdc in the 1st
hdc ;
(ch 1, sk next hdc, hdc in the next hdc) ; hdc in the next 2 hdc ;
*rep (to) once ;
ch 1, sk next ch-1 sp, hdc in the
next hdc ;
rep (to) once ; hdc in the next 2 hdc* ;
rep *to* all around and
join with a sl-st to the 1st hdc.
Round 5 : hdc in the 1st
hdc ;
(ch 1, sk next ch-1 sp, sc in the next hdc) ;
[ch 1, sk next hdc, hdc in
the next hdc] ;
*rep (to) 3 times ; rep [to] once* ;
rep *to* all
around and join with a sl-st to the 1st hdc.
So this is the pattern of holes you should have.
They have been coloured to show you which
ones we will be using and in which order.
Look at the pattern we’re going to create. We need to work five sets of petals in a “V”
formation and gather them all up together.
So first let’s see which ch-1 sps we will use. Here are my diagrams for it.
So 1st ch-1 sp has 3 sts ; then you work 3
sts in the ch-1 sp below it ; then 3 sts in
the next ch-1 sp (to the left and one row below), and we’re then mirroring to
complete the flower.
What is the stitch that we use for our flower
petals? So here’s where it gets mighty
complicated.
We will use a dc 3-tog BUT we will work a dc 3-tog continuously in all 5 ch-1 sps, which means that
we will have a whole load of loops to go through when we finish off (30 in
total, if not more.. I haven’t counted!)
So you will work a 3 dc-tog in the 1st
ch-1 sp ; continue on to the next ch-1 sp and work 3 dc-tog in that one, so on
till you have got all the loops for all 5 ch-1 sps on your hook, and then you will
finally yarn over, and draw through all
the loops bunching it all up as one neat flower.
The second
complication : We will use the 1st and last ch-1 sps
twice. Once to work in the dc 3-tog and once to work in a st.
The third
complication : You will need to be in the brown square for the 1st
set of dc 3-tog. So if you are not at that sp, please sl-st till you reach
this ch-1 sp
The final
complication : You will need to decide if you are working all
your flower petals rounds in the same color as the cap or changing
colours. If you decide to change
colours, you will do it starting Round 6.
Ok.. now that I’ve given you a visual of all of this,
let’s work it.
Before you work Round 6, may I request you to read
the Notes just after Round 7. Thanks.
Round 6 : (Flower petal
round) : [dc 3-tog in 1st ch-1 sp ; dc 3-tog in the ch-1 sp just
below ; dc 3-tog in the ch-1 sp below and to the left ; dc 3-tog in the ch-1 sp
to the left and above ; dc 3-tog in the ch-1 sp just above ; yarn over and pull
through all loops to complete one flower petal] ;
ch 1, and hdc in the last ch-1 sp used for the flower petal ; 3 hdc in the next
ch-1 sp (yellow square on the diagram) ; hdc in the next ch-1 sp ;
{ ch 1, dc 3-tog in same ch-1 sp (as the last sc) ;
dc 3-tog in the ch-1 sp just below ;
dc 3-tog in the ch-1 sp below and to the left ;
dc 3-tog in the ch-1 sp to the left and above ;
dc 3-tog in
the ch-1 sp just above ;
yarn over and pull through all loops to complete one
flower petal ;
ch 1, and hdc in the last ch-1 sp used for the flower petal ;
3 hdc in the next ch-1 sp (yellow square on the
diagram) ;
hdc in the next ch-1 sp } ; rep {to} all around and join with a sl-st to the 1st
st.
One petal round complete.
Yes, a lot of work, but isn’t it just fab!
Ok, back to work.
For the next 3 rounds, we will once again form the
base for the next set of petals. So we
will work 7 sts between two flower petals, but skip the petal tops.
Round 7 : hdc in the 1st
ch-1 sp ;
(hdc in the next 5 hdc ; hdc in the next ch-1 sp ;
ch
1, sk top of flower petal, hdc in the next ch-1 sp) ;
rep (to) all around and join with a sl-st to the 1st
st.
At the end of this row, you will have (once again) 7
hdc followed by one ch-1 sp all around, which is the base row for the next set
of flower petals.
STOP and please read these Notes :
1. We have completed
one pattern repeat. Rep Rounds 3 – 7
till your project reaches the length you need.
2. We will be working
in rounds, so we will end up with a cylinder which we will join at the top to
make our cap.
3. If you decide to
change colours, you will change for the second set of colours after you
complete the base for the 2nd set of flower petals. Which means that you will change when you
reach Round 6, the flower petal round.
You will then use the contrast or second set of colours all the way
through till you reach Round 6 again for the next set of petals.
4. As you can see from
the pattern, the longest dc 3-tog comes right on top of the top of the earlier
flower, so all you need to do is follow the pattern as you have worked the 1st
time around, and all your ch-sps will align up.
5. Finally, if you are
using a thicker yarn, you could well work a dc 2-tog for each flower petal
(instead of a dc 3-tog) , or use double threads and still work a dc 2-tog
(which is what the designer seems to have done). I have worked a dc 3-tog with my lavender
4-ply yarn, and am going to double up a 3-ply yarn in darker purple and work a
dc 2-tog for the contrast flowers, just to see if this works.
Once your project is the length needed, fasten off
and leave a tail to attach.
So
once again, here is an idea.
You
can either work the flower pattern all the way to the top, or you could work
just a few rounds for the bottom and then work plain sc /hdc / dc to the top /
crown of the cap.
Even
if you decide to work the pattern all the way to the top, you will still need a
plain part on the top, before you join up.
So
you will end on the flower round (Round 7), and on the following round, here’s
what I have done
Next round :
hdc in the 1st ch-1 sp ;
(hdc in the next 5 hdc, hdc in the next
ch-1 sp ; hdc in the next hdc) ;
rep (to) all around and join with a sl-st to
the 1st hdc.
From
this round on, work 1 hdc in each hdc all around and join with a sl-st to the 1st
hdc.
Continue
working all the way to the crown (i.e the length of your cap) and then we will
finish off our beanie.
There
are several ways to attach the top of your cap, and here are two ideas that I
have used successfully.
Top finishing A : (Same for beret or slouchy)
1. Fold your
‘cylindrical’ project in half, mark the halfway (mid) point ; then fold again
in half and mark the quarter points.
2. Pass your
embroidery needle first through the halfway or mid-point ; then through
the 1st quarter point and finally through the 2nd
quarter point. You will have a ‘star’
shaped top now.
1. Pass your
embroidery needle through the mid-point of the opening closest to you,
then the mid-point exactly opposite that ; followed by the next mid-point
of the opening closest to you, then the mid-point exactly opposite that.
2. Continue
slowly reducing the opening till you’ve sealed it totally. Push your embroidery needle through to the ‘under-side’
of your work. Fasten off.
Weave
in ends. Block as per yarn instructions.
Top finishing B : (same for beret or slouchy)
1. Using your
embroidery needle, do a loose ‘running stitch’ through the top end of your
slouchy, all the way around. (A “running
stitch” is one where you go through the fabric from top to bottom, leaving a
little space, pass your needle from bottom to top, continuing to go through
“running through your fabric” till you reach the end)
2. Pull lightly
till the top bunches up neatly.
3. Sew in the
ends around the top. Push your
embroidery needle through to the ‘under-side’ of your work. Fasten off.
4. Weave in
ends. Block as per yarn instructions.
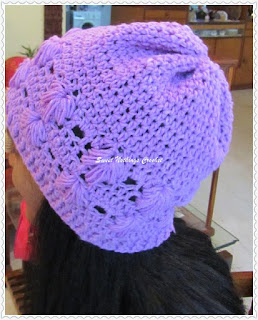
and a little photobombing - to show you the top (crown) ..
and more to show you a totally satisfied client... who swears this is her *most fave cap evvvah* !
Enjoyed
this ?? I sure did.. come back right here for more freebie patterns
If you're visiting me here for the first time, and have liked the experience, do add me to your mailing list (for your convenience) , and all my future free patterns will come straight to your mail box.
I’d appreciate if you could credit my blog (and link the original pattern link) when you make your own creation. Thanks.
Have a great day and see you soon.
Here are some of my other headwear creations. Have fun with these patterns too
I have a few gloves
that I’ve made before, so here are those pattern links for you.


No comments:
Post a Comment
Thanks for taking the time to stop by. Do tell me what you think. Cheers