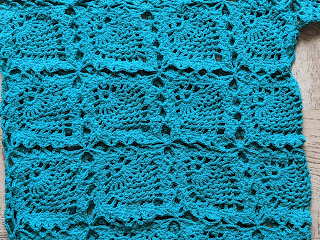
Perspective .. It's everything isn't it? When we crocheters see this pattern, we'll think pineapple - when my client saw it she saw leaves.. and called this a Leaf Top.
With this pattern there are so many ideas and possibilities - including making this into a crop top. Remember to read all the way till the end of this blog to get all these ideas. Come along..let’s get this cool Leaf top done.
In case you have just joined me, know that you can access all of my earlier creations by checking under ‘categories’ on the right hand side of this blog under “Labels”. Then, for your convenience, follow me here or on Facebook, You Tube, Pinterest, Twitter or Instagram.
Check out all my social media handles at the bottom of this blog
Oh, and may I add that the fastest way to find any of my blogs is via Pinterest.
All my blogs can be printed. Find the printer friendly (green) link on the right hand side of this blog. You can also hit Control P (or Command P for Mac) on your keyboard, and the blog will go directly to the connected printer.
Remember that you only print if absolutely essential. Save paper – Save Our Earth.
Do remember to add my blog URL when you make and show off your creation.
Just copy the link on the search bar above - that's the blog URL.
To purchase this or similar yarn online, click here to buy your yarns online via Amazon. While you will still pay the same, I may get paid by Amazon as well.
This is a free blog - so do pay it forward for me. Cheers.
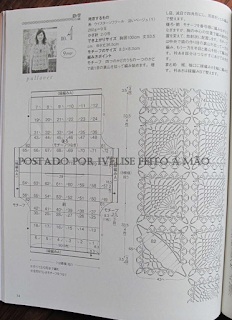
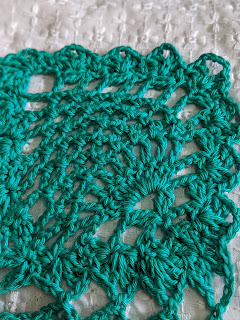
Today’s pattern is made using the granny squares and its a beautiful leaf like pattern made with pineapples. The square starts at a corner instead of the centre.
Before we jump into making our squares, let's get a few calculations out of the way.
a) We need round bust, round waist and round hip measurements.
As always, please use the largest measurement for your calculations
b) We also need round armhole and sleeve length if you are making sleeves
c) We need depth of neckline for front & back if you are going to keep them at different lengths / heights
d) Finally as always I suggest you keep a well fitting top that you can use as a draft
We start making the first square and measure the length (well its a square so length or breadth works). That will help us decide how many squares we need to get the half round bust/waist or hip measure.
The length of top is slightly simpler as we just keep working and adding squares till we get the length needed.
Easy enough. Let's start.
Magic circle : https://youtu.be/ISC39yOqWro
Start Row 1 : with a magic circle and work (2 dc ; ch 2, 2 dc) in it.
Pull lightly to close but do not join. Turn
Row 2 : 2 dc in the 1st dc ;
ch 3, dc in the next ch-2 sp ;
ch 3, sk next dc, 2 dc in the last dc. Turn
Double crochet 2-tog : dc 2-tog : [yo, insert hk in st or ch-sp, yo and pull up a lp ; yo and draw through 2 lps] 2 times (3 lps on hk) ;
{yo, draw through 2 lps on hk} 2 times. One dc 2-tog made.
Sometimes we work the dc 2-tog in the same stitch, to use as a decorative stitch. Visit this video tutorial at https://youtu.be/lLUXOJ1sY9w
Row 3 : 2 dc in the 1st dc ;
(ch 3, dc 2-tog in the next dc ;
ch 5, dc 2-tog in the same dc) ;
ch 3, sk next dc, 2 dc in the last dc. Turn
Row 4 : 2 dc in the 1st dc ;
(ch 3, sk dc 2-tog, 9 dc in the ch-5 sp) ;
ch 3, sk next dc, 2 dc in the last dc. Turn
Row 5 : 2 dc in the 1st dc ;
ch 2, sk next dc, dc in the dc ;
(ch 1, dc in the next dc) ;
rep (to) 7 times ;
ch 2, sk next dc, 2 dc in the last dc. Turn
Single Crochet : Sc : yo, insert hk into st ; yo (2 lps on hk); yo, draw through both lps. One sc made. Check out the video at https://youtu.be/ghACqBpA-3k
Row 6 : 2 dc in the 1st dc ;
ch 4, sk next dc, sc in the ch-1 sp ;
(ch 3, sc in the next ch-1 sp) ;
rep (to) 6 times ;
ch 4, sk next dc, 2 dc in the last dc. Turn
Row 7 : 2 dc in the 1st dc ;
ch 4, sc in the ch-3 sp ;
(ch 3, sc in the next ch-3 sp) ;
rep (to) 5 times ;
ch 4, sk next dc, 2 dc in the last dc. Turn
In the following rows we'll decrease to finish our square
Double crochet 2-tog : dc 2-tog : This video tutorial at https://youtu.be/1_oPlUfN5eg shows you how to use the dc 2-tog to decrease.
Note : You may want to place a marker in the 1st and last sts (dc 2-tog) after completion for ease of marking these corners
Row 8 : dc 2-tog over the 1st 2 dc ;
ch 4, sc in the ch-3 sp ;
(ch 3, sc in the next ch-3 sp) ;
rep (to) 4 times ;
ch 4, dc 2-tog over the last 2 dc. Turn
Row 9 : 2 dc in the 1st dc ;
ch 3, sc in the ch-3 sp ;
(ch 3, sc in the next ch-3 sp) ;
rep (to) 3 times ;
ch 3, sk next dc, 2 dc in the last dc. Turn
Row 10 : 2 dc in the 1st dc ;
ch 3, sk next ch-3 sp, sc in the ch-3 sp ;
(ch 3, sc in the next ch-3 sp) ;
rep (to) 2 times ;
ch 3, sk next dc, 2 dc in the last dc. Turn
Row 11 : 2 dc in the 1st dc ;
ch 3, sk next ch-3 sp, sc in the ch-3 sp ;
(ch 3, sc in the next ch-3 sp) ;
rep (to) once ;
ch 3, sk next dc, 2 dc in the last dc. Turn
Row 12 : 2 dc in the 1st dc ;
ch 3, sk next ch-3 sp, sc in the ch-3 sp ;
(ch 3, sc in the next ch-3 sp) ;
ch 3, sk next dc, 2 dc in the last dc. Turn
Row 13 : 2 dc in the 1st dc ;
ch 3, sk next ch-3 sp, sc in the ch-3 sp ;
ch 3, sk next dc, 2 dc in the last dc. Turn
Row 14 : 2 dc in the 1st dc ;
sk next sc & 2 dc, 2 dc in the last dc. Turn
Now without a break, we will work all around our square with a lacy border
we will work around along the horizontal bars of the dc.
Turn and sl-st into the centre of the 1st st (i.e. the centre of the 4 dc you just worked - remember as we have worked on this set , we will skip it when I say next dc)
Round 15 : (2 dc ; ch 7, 2 dc) all in the 1st dc ;
{[2 dc ; ch 3, 2 dc all on the horizontal bar of the next dc] ;
sc in the horizontal bar of the next dc } ;
*rep {to} 2 times ;
rep (to) in the corner st which is the point where you start your dc 2-tog decrease ;
sc in the horizontal bar of the next dc ;
rep {to} once* ;
rep *to* all around and join with a sl-st to the 1st st
This completes one square.
While you could follow the chart to see how many squares you need, I'd also suggest you measure the square to see that the chart works for you.
To join squares use one of the methods given below
I'd suggest you use the Join-as-you-go joining method https://youtu.be/zN3ECWTYXBk and here is how I'd suggest you work
We will join at all points - so you have two corner ch-7 sps and three centre ch-3 sps along each side.
For the corner ch-7 sp join : Work ch 3 ; join to the next motif ; ch 3 and continue to work back on the motif you are working on.
For the corner ch-3 sp join : Work ch 1 ; join to the next motif ; ch 1 and continue to work back on the motif you are working on.
This gives a neat finish and you are joining the motifs continuously as well
If you decide to change direction of leaf while attaching, ensure that you have it facing the way you want before you start attachment.. It's that simple 😊
You could also decide to work all the motifs and then use one of these methods to join
Whipstitch to join : https://youtu.be/wZ-9LNzftMA
Invisible join : https://youtu.be/a6XZQ6VzJFM
Single crochet to join : https://youtu.be/6FXoW_47_dI
Border pattern :
You could choose to work this pattern around the neckline, armhole as well as base of top if you wish OR you could leave it with a row of sc for a neat finish.
If working a sc finish, then remember to work 2 sc along each horizontal bar of dc all around.
You could also end with a row of Crab Stitch or Reverse Single Crochet stitch : https://youtu.be/cG3crwyHPnk
How to work a picot stitch : Traditionally for a ch-3 picot, you work (ch 3, sl-st in 3rd ch from hook). For a ch-5 picot, you will do (ch 5, sl-st in 5th ch from hook).
Sleeve ideas
For my sleeves, I've worked the same motif pattern and joined it to the armhole opening. In my case I needed only 3 squares for the sleeve round. I attached 2 squares from shoulder down and for the third, I ensured that when I had joined my sides, I had half a square on both front and back, which I then joined to the 3rd square of my sleeve.
How to make this into a crop top :
The difference between a regular top and a crop top is the length of the top.
So first you decide the length of the crop top. Then work two squares that are length from shoulder to length of crop top. For this just go ahead and keep making and attaching the square motifs till you have the length you need from shoulder to base of top.
Then using one of the joining methods given (again, I'd suggest using the Join-as-you-go method) join the two sides leaving an armhole opening, and join the shoulders, leaving a neck opening.
This pattern will work with a loose as well, and finish, where the neckline is a largish opening - and the smallish sleeves will lightly and gently flop over the shoulder blades.
Try it and let me know what you think.
If you're visiting me here for the first time, and have liked the experience, do add me to your mailing list (for your convenience) , and all my future free patterns will come straight to your mail box.
It is sad that though my blogs are very popular and being used by so many, not many think of giving credit when you post your projects on social media.
There is a lot of work that goes into writing one of these patterns, so do pay it forward – good karma and all that blah 😄


