Saturday, 18 July 2015

PENCIL BOXES


photo of two crochet pencil boxes - one shaped like a pencil with a point and one a 'new unsharpened pencil'yet another set of photos photo of my two crochet pencil boxes - one shaped like a pencil with a point and one a 'new unsharpened pencil'

PENCIL BOXES

A pencil shaped pencil box/ holder.. now come on, tell me you can resist this ?? 
Absolutely ideal as a gift, a great item to make and sell at fairs, I am sure this one is going to be a hit.
This is not just a D-I-Y (Do-It-Yourself) but also a great R-R-R (Reuse, Recyle, Refuse) project.

This is for two really cute twins who so willingly modelled my Lego backpacks for me. 

Thank you for joining me.

In case you have just joined me, know that you can access all of my earlier creations by checking under ‘categories’ on the right hand side of this blog under “Labels”.  Then, for your convenience, follow me here or on Facebook, You Tube, Pinterest, Twitter or Instagram.

Check out all my social media handles at the bottom of this blog

Oh, and may I add that the fastest way to find any of my blogs is via Pinterest.


All my blogs can be printed.  Find the printer friendly (green) link at the bottom of this blog.  You can also hit Control P (or Command P for Mac) on your keyboard, and the blog will go directly to the connected printer.

Remember that you only print if absolutely essential.  Save paper – Save Our Earth. 


Do remember to add my blog URL when you make and show off your creation. 

Just copy the link on the search bar above - that's the blog URL.


To purchase this or similar yarn online, click here to buy your yarns online via Amazon.  While you will still pay the same, I may get paid by Amazon as well. 

This is a free blog - so do pay it forward for me.  Cheers.


I am sure there are many patterns of this sort in the net, but I am making a pair of pencils to match a famous Indian pencil brand – Natraj Pencils.. pencils many of us Indians have grown up using.  It is a hexagonal pencil so thought that was a difference.  
The second pencil box looks like an un-sharpened pencil – I think had I done it in the Natraj pencil colours, it would have looked really wow ! But I was also stash busting.. so am not terribly disappointed with the end result – just a note (to self) to try it sometime in the red n black too 

Materials used : Today I’ve used our lovely polyester purse yarn, with a 3.5 mm crochet hook, the inner cardboard tubing of a kitchen roll or toilet roll.

General materials info The polyester purse yarn is only available in India - but it is not essential to use only this yarn for this project.  The range of colours in our Polyester yarn are superb, and I love the colours I’ve used for this creation.  This yarn is a Sport / DK yarn.
You can use any yarn with a suitable hook and make this project to any size.

For my first pencil case, I’ve used only the inner cardboard tubing of a kitchen roll holder and then used a button to close the top of the pencil.
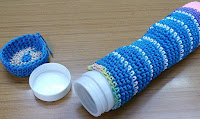
For the second pencil case, I’ve used a small plastic screw on bottle (wide-mouth - picture at the bottom of this blog), so this pencil case screws on!

Size : My pencil cases are about 2” diameter and about 8” long.

Skill level : Intermediate.
If you do not know how to work post stitches, there is an easy video to help you along.

Stitches used :  (Using U.S terminology)
Starting slip knot : Here’s how you start with a slip knot.  https://youtu.be/lJcqsVcs8cw

Starting slip knot 1 or the Sloppy Slip knot : This is a neat new way to start your work without a slip knot.  https://youtu.be/YfC7KmGpifs

What is a chain stitch ? Here is an easy video tutorial https://www.youtube.com/watch?v=pXx5ukBjKkY


Abbreviations used :  (Using U.S terminology)
lp(s) : Loop(s)                         sc : Single crochet
dc : Double crochet                sp : Space                                           
sl-st : Slip stitch                      ch : Chain
st(s) : Stitch(es)                      hk : Hook
yo : Yarn Over                        rep : repeat                          
sc-blo : Single crochet back loop only


Instructions
Please note that I start all my rows with a ch 1, turning chain for ease.
Please check the top of this blog for easy video tutorials on all stitches used in today's pattern.
Please read through all my notes before you pick up your hook, so you know just where we're heading in our pattern.
In my patterns I work with the principle of stitch count and body measurement.  This means that you need to work the stitch count in pattern, till you get the measurement (length and/or width) that you need for your project.  

Before we set off on our cute pencil cases, let’s quickly see what we’re going to do here today. 
We’re going to start at the base of our pencil case and work towards the top point of the pencil.  Now just to keep this easy and hold its shape, without lining and all that trouble, I thought of using the inner cardboard tube of an empty toilet roll. 
You could also use a kitchen roll which is probably better, as it’s longer.

I’m also going to avoid a zipper and make the top flap with a button.
Easy? Let’s get on with it then

PENCIL BOX 1 – Natraj Pencil Box

 photo of the red and black striped hexagonal pencil box standing up

Part 1 :  Bottom of the pencil :
For our pencil case here today, I am going to use red and black alternating colours, and a stripe of white across the bottom of our pencil. 

How to change colors seamlessly : Here’s an easy video tutorial to show you how to change from the Main color to the Contrast or second color of yarn seamlessly.  View it at https://youtu.be/fRzSBja9jno

How to carry your yarn when using two colors : Here’s an easy video tutorial to show you how to carry your yarn along when working with two colours. 

Magic circle : To refresh your skill, please view this easy video https://youtu.be/ISC39yOqWro

What is a slip stitch : Here is a neat video tutorial at https://youtu.be/weB3QNbA8Iw

Start (Using red) with a magic circle and 6 sc in the circle.  
Join with a sl-st to the 1st st.
Pull the circle to a close.

Round 1 : (Using red) Increase round : 
2 sc in the 1st sc and in each sc all around.  
Join with a sl-st to the 1st sc.

Round 2 : (Using red) Increase round : 
2 sc in the 1st  sc ; sc in the next sc ; 
*2 sc in the next sc ; sc in the next sc* ; 
rep *to* all around.  
Join with a sl-st to the 1st sc.

Round 3 : (Using red) Increase round : 
2 sc in the 1st  sc ; sc in the next 2 sc ; 
*2 sc in the next sc ; sc in the next 2 sc ; 
rep *to* all around.  
Join with a sl-st to the 1st sc.

Round 4 : (Using red) Increase round : 
2 sc in the 1st  sc ; sc in the 3 sc ; 
*2 sc in the next sc ; sc in the next 3 sc ; 
rep *to* all around.  
Join with a sl-st to the 1st sc.

Continue increases this way, adding 6 sts with each round, till you have a base diameter of the size you want for your pencil case, or one that just fits the toilet / kitchen roll diameter.
Once you’re happy with the base diameter, we will do one round of sc in back loops only (sc-blo) 

This is an optional round.  
All our sc-blo round does is that it gives us is a neat edge at the base of our pencil case, but it is not necessary for our pattern. 
You could just do an sc in each sc all around as well.

Now here’s the small difference we’re making with our pencil case. 
I want to make this a hexagonal one – so if  you want to make one like this as well, please place markers in the 6 points where you’ve increased in  your last round, and then carry on with the next round.
Please remember to move your markers with every row.
Well, you will need to move them initially, but then you’ll get the hang of it, and probably don’t need to fuss about it.. but that’s later..
Remember that your markers will need to have the exact same number of stitches between them and we’re working in multiples of six.

Single crochet back loop only (sc-blo) : Here is an easy video tutorial
Part 2 :  Body of pencil
Next Round : (Using red) :
sc-blo in the 1st  sc ; 
sc-blo in each sc till end.  
Join with a sl-st to the 1st st.  
(Move your markers please)

From our next round, we’re going to use a fpsc or a Front Post Single Crochet.  
Front post single crochet : fpsc :  Post stitches are stitches worked around the post of a stitch on the row below.  Here is an easy video tutorial for the fpsc at https://youtu.be/OQa8YLpkdXs

Next Round : (Using red) :
sl-st into the 2nd  sc ; sc in the same 2nd sc ; 
sc in each sc till the 1st marker ; 
*fpsc in the next st ; 
sc in each sc till the next marker* ; 
rep *to* till last marker or end ; 
fpsc in the last st. 
Join with a sl-st to the 1st st.

Now you can put your markers away, as you have your fpsc in the place you had your marker.

Next Round : (Using red) :
sl-st into the 2nd  sc ; 
sc in the same 2nd sc ; 
sc in each sc till the 1st fpsc ; 
*fpsc in the next st ; 
sc in each sc till the next fpsc * ; 
rep *to* till end ; 
fpsc in the last st.  
Join with a sl-st to the 1st st.

Rep this last round for about an inch.

Next Round :  (Using white) : If  you decide to do the white break , after an inch of your solid colour, please follow the same pattern from the earlier round, but with white for just one round.

We will now introduce our black into the design. 
So if  using two colours, attach your black yarn now.
We will be using these two colours one after the other, so you will carry the un-used yarn along.  Please check the video on ‘how to’ carry the yarn along at the top of this blog.

Next Round : (With black) :
sl-st into the 2nd sc ; 
sc in the same 2nd sc ; 
sc in each sc till the 1st fpsc ;
*(Change to red) fpsc in the next st ; 
sc in each sc till the next fpsc  ; 
(Change to black) fpsc in the next st ; 
sc in each sc till the next fpsc* ; 
rep *to* till end ; 
(Change to black) fpsc in the last st.  
Join with a sl-st to the 1st st.

Yet another note : I decided to work in rounds without joining with sl-st, (so working in spirals) and found that this worked really well for me.  So if this works for you too.. yaay 

Continue this round till your pencil case is the length you want for your finished case. 
I chose to make it the length of a full-sized pencil.
Fasten off and weave in ends.


Part 3 :  Pencil point
For the pencil / pen point, we will start with the black lead bit and then work in brown down the conical part of our pencil point. 
We will end with two lines of the MC and CC so that when this part overlaps over the bottom part of the pencil, it appears seem-less.

Start (Using whatever colour you want for the lead /pencil point) 
with a magic circle and 4 sc in that circle
Join with a sl-st to the 1st st.

Round 1 : sc in the 1st sc and in each sc all around.  
Join with a sl-st to the 1st st.
 (4 sc)

Round 2 : Increase round : 
2 sc in the 1st sc , 
sc in the next sc ; 
2 sc in the next sc and sc in the last sc.  
Join with a sl-st to the 1st st.  (6 sc)

Round 3 :  sc in the 1st sc 
and in each sc all around. 
Join with a sl-st to the 1st st.  (6 sc)

Rep Round 3 once more.

Change to brown yarn

Round 4 :  2 sc in the 1st sc 
and in each sc all around. 
Join with a sl-st to the 1st st.  (12 sc)

Round 5 :  sc in the 1st sc 
and in each sc all around.  
Join with a sl-st to the 1st st.  (12 sc)

Round 6 :  2 sc in the 1st sc ;
sc in the next sc ; 
*2 sc in the next sc ; sc in the next sc* ; 
rep *to* all around. 
Join with a sl-st to the 1st st.  (18 sc)

Round 7 :  sc in the 1st sc and in each sc all around.  
Join with a sl-st to the 1st st.  (18 sc)

Round 8 :  Rep Round 7

Round 9 :  2 sc in the 1st sc ;
sc in the next 2 sc ; 
*2 sc in the next sc ; sc in the next 2 sc* ; 
rep *to* all around.  
Join with a sl-st to the 1st st.  (24 sc)

Round 10 :  sc in the 1st sc 
and in each sc all around.  
Join with a sl-st to the 1st st.  (24 sc)

Round 11 :  sc in the 1st sc 
and in each sc all around.  
Join with a sl-st to the 1st st.  (24 sc)

Round 12 :  Rep Round 12

I’m sure you’ve figured what we’re working on here. 
So now continue increases and then 2 round with no increase until you have the number of stitches you started with.  
(The top portion must fit the bottom portion, right)

Once you’ve got the number of stitches right, continue without increase for 2 rounds. 

We will now repeat four rows of the dual (two) colours along with fpsc for the edge of our pencil point to match up with the base bit.  
Though I’ve not asked you to place markers, you now know how many stitches come in between two fpsc, so carry on.

Next Round : (With black) :
sl-st into the 2nd sc ; sc in the same 2nd sc ; 
sc in each sc till the 1st fpsc ;
*(Change to red) fpsc in the next st ; 
sc in each sc till the next fpsc  ; 
(Change to black) fpsc in the next st ; 
sc in each sc till the next fpsc* ; 
rep *to* till end ; 
(Change to black) fpsc in the last st.  
Join with a sl-st to the 1st st.

Rep this round 4 times.  Fasten off and weave in ends.


Part 4 :   Finishing :

1.       Attach the bottom and top of pencil : Sc in two sections of your hexagon (so if you have say 30 sts all around, you will sc the top and bottom of 10 sts together.  This will form the hinge for opening / closing of your pencil case)
2.      Continue sc all around and when you reach the exact opposite centre of the back, make a button loop.  For button loop ch 6 (or number of stitches needed to go through your button and then continue sc in the next sc and sc all around.  Check to see that the button loop is the right size needed to go easily through the button, else tweak number of chain stitches .
3.      Fill polyfill into the top (only brown) portion of the pencil point.  Cover with a small cardboard so that the polyfill does not come out.
4.      Cut a small portion of the top of your toilet / kitchen roll to fit into the last 4 coloured rows of the top pencil point.  Glue this round into the inside to stiffen it.  (If you are crafty enough to do a neater job with a piece of cloth, instead of the cardboard round, and then also cover all this in neatly, great.. else this will work
5.      Push your toilet / kitchen roll into the bottom part of your pencil case to stiffen it.  Yes, I used two toilet rolls in total – using part of one for the top pointy bit.
6.      Attach a button onto the lower part of the pencil case on the side opposite the ‘hinged’ side of the top.

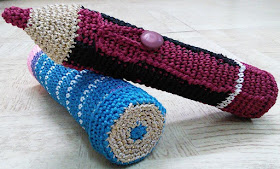

photo showing how I inserted the kitchen roll to stiffen the pencil boxside profile photo of the red and black pencil box

photo detail of both the pencil boxes

And just like that.. ta da.. we’re done !  One superb R-R-R D.I.Y (Recycle, Re-use, Refuse Do-It-Yourself) creation that I am so happy and proud of… hope you are too.


PENCIL BOX 2 (Blue n white striped with eraser at the bottom)

photo detail of the side profile of the 2nd pencil box

This is a simpler pattern without the fpsc and much of what we’ll do here is going to be a repeat  of Pencil Box 1.

The idea for closing this box is a little different.  
So I have found a nice plastic (screw top) bottle that is just right for this project. 
I cut off the base of this plastic bottle, and fitted it onto a kitchen roll holder.  
This then allowed me to have a longer pencil case (not limited by the size of my bottle) but yet gave me a neat screw top.
At the end, I have glued the screw top cover onto the crochet top bit that I've made for a neat finish

photo showing the screw top bottle that is used for the second pencil boxphoto showing the top and body of the screw top 2nd pencil box


I have now worked the same pattern as for Pencil Box 1, but I have not done the fpsc stitch.  So all the increases etc, just not the fpsc to make it hexagonal.

The colours, as you see, are just stripes – So I’ve done four rounds of blue followed by one white.
I started with pink to to mimic the eraser at the bottom of some pencils.
Use whatever color you want for your little eraser to start.

Part 1 :
Start (Using pink) with a magic circle and 6 sc in the circle. 
Join with a sl-st to the 1st st.
Pull the circle to a close.
                                                                    
Continue with the same instructions as for Pencil Case 1 till you reach the white line. 
I am going to just change the colour here to grey – once again just to mimic the little metal bit that holds the eraser to the base of the pencil.

Continue with the rest of the pattern as for Pencil Case 1, just that we’re not doing the fpsc here, but just alternating colours.
I simply did 4 rounds of blue and one of white.
Instead of joining with a sl-st at the end of each row, I just kept a marker at that last st, and continued working in rounds, changing colours as needed.

Once you have reached the length needed, fasten off and weave in ends.


Part 2 :  Pencil point
For the pencil / pen point, I thought our tweak here would be to make this like it’s a new unsharpened and un-used pencil with a flat top.

For that, you will need to decide which colour lead you want (for authenticity. Oh it also needs to probably be the color that you used for around the pencil) and start with that colour for the magic circle round. 
You will then change to brown for the next rounds till you have the same number of stitches as you have for your base (i.e for the last round of the base of this pencil)
You will then go back to the colour combination used for the bottom part of this pencil (so in my case, I’ll use the blue and white combination) just until I have a top that will go over the screw top of my bottle cap. 
Simple enough.. so lets get going.

Start with a magic circle and 6 sc in that circle (using whatever lead colour you want this pencil to be)

Round 1 : (Change to brown ; fasten off lead colour and weave in ends) :
sc in the 1st sc and in each sc all around. 
Join with a sl-st to the 1st st.

Round 2 : (Using brown):
sc in the 1st sc  ; 2 sc in the next sc ;
*sc in the next sc ; 2 sc in the next sc* ; 
rep *to* all around.  
Join with a sl-st to the 1st st.

Round 3 : (Using brown):
sc in the 1st 2 sc  ; 2 sc in the next sc ;
*sc in the next 2 sc ; 2 sc in the next sc* ; 
rep *to* all around. 
Join with a sl-st to the 1st st.

Round 4 : (Using brown):
sc in the 1st 3 sc  ; 2 sc in the next sc ;
*sc in the next 3 sc ; 2 sc in the next sc* ; 
rep *to* all around. 
Join with a sl-st to the 1st st.

Continue increasing 6 sts every round in the same way, till you have the same number of stitches as you started your base with.

You can then do the same round with the sc-blo using whichever colour you’ve used for the base of your pencil – i.e not  brown, but blue in my project.

Continue with the same pattern as you have for the base of the pencil (so in my case, alternating blue and white) for about an inch or so, or till you have neatly covered the screw top.


Part 3 : Finishing :
1.       Slide your toilet / kitchen roll into the bottom portion of your pencil case and glue it in.
2.      Push in the screw top and the screw lid into their respective portions – so the screw top bit will go into the lower part of the pencil case, and the cap will go into the top part of your pencil case
3.      Ensure all ends are neatly woven in and glued down.  Ensure that there is space for the pencil case to neatly screw in. Set it aside and allow it to dry.

And just like that.. ta da.. we’re done !  One superb R-R-R D.I.Y (Recycle, Re-use, Refuse Do-It-Yourself) creation that I am so happy and proud of… hope you are too.

Enjoyed this ?? I sure did.. Come back right here for more freebie patterns

Remember to share this blog post when you share your photos with me on Facebook.  I’d love to feature your photos on my FB page.  Cheers.

If you're visiting me here for the first time, and have liked the experience, do add me to your mailing list (for your convenience) , and all my future free patterns will come straight to your mail box.  

I’d appreciate if you could credit my blog (and link the original pattern link) when you make your own creation.  Thanks.

Check out my awesome pins on Pinterest at https://in.pinterest.com/shyamanivas/


Join me on YouTube at https://youtube.com/shyamanivas

And on my Facebook page at https://www.facebook.com/Sweet-Nothings-Crochet/ for more patterns.

Do follow me on Twitter https://twitter.com/ShyamaNivas


Find me on Ravelry at ravelry.com/projects/shyamanivas/


Have a great day and see you soon. 

You may want to take a look at some of my other beautiful and unusual bag / purse patterns.


and some miscellaneous home use projects


No comments:

Post a Comment

Thanks for taking the time to stop by. Do tell me what you think. Cheers