Monday, 7 January 2019

CUTE BOW MOTIFS

free crochet pattern, free crochet bow pattern, free crochet jewelry pattern, free crochet hair clip pattern, free crochet tic tac clip pattern, free crochet beaded bow pattern, Shyama Nivas, sweetnothingscrochet, blogaday, spreadsmiles, Pradhan Embroidery stores, kankri yarn, kamal kadai yarn, Anchor pearl knitting cotton, Milford Satin knitting cotton, handmade, easy crochet pattern, great gift idea,
CUTE  BOW MOTIFS

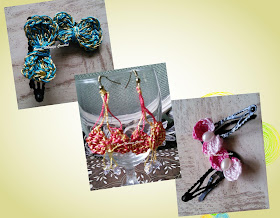
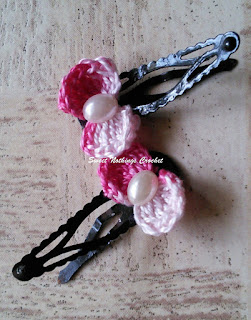
All this needs is a little bit of yarn, time and a little bit of patience and you will have added a smile to a little girl’s face.. Come along, let’s work on a tiny cute bow motifs that we will make into a hair clip and ear ring today.

Do remember to tag me when you make and show off your creation. 

Thank you for joining me.

In case you have just joined me, know that you can access all of my earlier creations by checking under ‘categories’ on the right hand side of this blog under “Labels”.  Then, for your convenience, follow me here or on Facebook, You Tube, Pinterest, Twitter or Instagram.

Check out all my social media handles at the bottom of this blog

Oh, and may I add that the fastest way to find any of my blogs is via Pinterest.


All my blogs can be printed.  Find the printer friendly (green) link at the bottom of this blog.  You can also hit Control P (or Command P for Mac) on your keyboard, and the blog will go directly to the connected printer.

Remember that you only print if absolutely essential.  Save paper – Save Our Earth. 


Do remember to add my blog URL when you make and show off your creation. 

Just copy the link on the search bar above - that's the blog URL.


To purchase this or similar yarn online, click here to buy your yarns online via Amazon.  While you will still pay the same, I may get paid by Amazon as well. 

This is a free blog - so do pay it forward for me.  Cheers.


Materials used : Today I’ve used a little Anchor  Pearl thread, as well as our lovely Indian kankri / kamal kadai polyester silk yarn with a 1.3 mm crochet hook ; ready-made ear ring hooks (one pair minimum) ; tic-tac hair clipbeads, if needed ; glue to seal ends.
For Indians : You could use Red ros ; Red rose metallic or unbranded knitting cotton as well
General yarn info : The yarn used today is not specific to this pattern.
You can use any yarn with a suitable hook to make this project to any size.

International yarns :  Among the international yarns I have used in this thickness, I’d suggest Aunt Lydia Cotton 10, Aunt Lydia Bamboo-Viscose 10, DMC Petra, Sullivans knitting cotton (Australia), Milford Soft, Hilaza Rustica Eclat , Alize cotton yarn and Alize bamboo yarn.

Difficulty level : Intermediate to advanced.
The difficulty is the puff stitch / dc-tog that is the crux of this pattern. If you have done this stitch before, come along..

Stitches used :
Starting slip knot : This is a neat new way to start your work without a slip knot.

Magic circle : To refresh your skill, please view this easy video https://www.youtube.com/watch?v=WLuSVyKvoUg

Hdc : Half Double Crochet : yo, insert hk into st ; yo (3 lps on hk), yo, draw through all 3 lps.  One hdc made.

Chainless dc start : Instead of the usual start with ch 2 or ch 3, I’d like to introduce this lovely new way of starting a dc row.  Do take a look at this self-explanatory super video http://www.mooglyblog.com/chainless-starting-double-crochet/
In case you are unhappy with this start, or do not like it, do continue with the usual ch-2 or ch-3 start.  However, all instructions will be given assuming that you are using the chainless dc start.   


Instruction information
Tiny bow motif pattern : Go straight to this lovely free pattern at https://www.everythingetsy.com/2015/06/crochet-bow-pattern-easy-peasy-tutorial/

free crochet pattern, free crochet bow pattern, free crochet jewelry pattern, free crochet hair clip pattern, free crochet tic tac clip pattern, free crochet beaded bow pattern, Shyama Nivas, sweetnothingscrochet, blogaday, spreadsmiles, Pradhan Embroidery stores, kankri yarn, kamal kadai yarn, Anchor pearl knitting cotton, Milford Satin knitting cotton, handmade, easy crochet pattern, great gift idea,

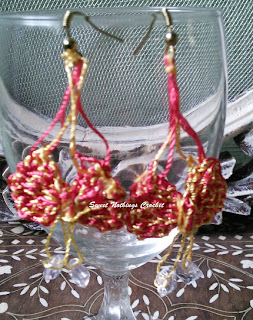
For the ear ring, I decided to add a hanging set of beads. For that, I attached the beads onto the yarn after I’d wound it around the centre of the bow, and then allowed them to dangle free off that centre bit.. Looks lovely, doesn’t it?  Of course, you then need to attach the ear ring hook as well.  I attached yarn to the two ends of the bow and then chained on a few chains attaching the hook onto the centre of the chain.  This way the bow hangs free and the little blingy bits twinkle as the wearer moves ;)

free crochet pattern, free crochet bow pattern, free crochet jewelry pattern, free crochet hair clip pattern, free crochet tic tac clip pattern, free crochet beaded bow pattern, Shyama Nivas, sweetnothingscrochet, blogaday, spreadsmiles, Pradhan Embroidery stores, kankri yarn, kamal kadai yarn, Anchor pearl knitting cotton, Milford Satin knitting cotton, handmade, easy crochet pattern, great gift idea,


free crochet pattern, free crochet bow pattern, free crochet jewelry pattern, free crochet hair clip pattern, free crochet tic tac clip pattern, free crochet beaded bow pattern, Shyama Nivas, sweetnothingscrochet, blogaday, spreadsmiles, Pradhan Embroidery stores, kankri yarn, kamal kadai yarn, Anchor pearl knitting cotton, Milford Satin knitting cotton, handmade, easy crochet pattern, great gift idea,

For the second set of blue n pink bows I worked a really simple pattern as follows.  For the pink bow I’ve used Milford Satin knitting cotton yarn with a 1.3 mm crochet hook.
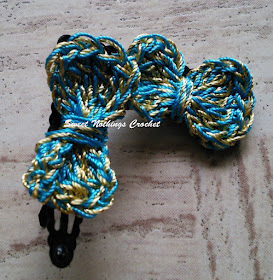
For the blue/yellow one, I've used one strand each of  blue and yellow kankri polyester silk embroidery floss with a 1.3 mm crochet hook.

All the stitches are worked into a magic circle.  Now if you find that hard, then just work a ch 3 or ch 4 circle and join with a sl-st to the 1st st and then work all the stitches into the ch-3 or ch-4 sp.  At the end, you will need to add in the pearl button or bead to cover your hole. In case you start with the magic circle, you can finish without the bead.
Right then .. onwards with the pattern ..

Start Round 1 : with a magic circle and work all these sts in that circle ( ch 3 + 3 dc + ch 3, sl-st in the magic circle + ch 3 + 3 dc + ch 3, sl-st in the same circle). 
Pull lightly to close.

That’s it.. our bow done.  But hang on before you cut off that yarn.. check finishing ideas..

Finishing :
1.        You could attach a bead in the centre, so then all you need is a little yarn that will allow you to attach this bow motif as desired.  So cut off your yarn, and fasten the motif as desired.  Then using a sewing needle and thread, sew in the little bead in the center
2.      You could decide not to use a bead, but wrap the yarn around that centre portion.  In this case, wrap around first, fasten off at the bottom and then cut yarn off.
3.      To make this into a pair of ear rings : Attach yarn to the centre of the motif and attach that yarn to the hook of your ear ring. 
4.     To make this into a pendant : Attach a little pendant hook onto the centre of the motif and slip it neatly into a necklace chain. 
5.      For ear ring or pendant, if you want to add more bling, before you cut off your yarn, attach beads that will hang off the bottom of your bow, like the two bow ties that one usually has and then neatly glue in ends.

I’ve made lots of cute little ear rings (also from motifs, that can be converted into hair clips). For a quick one-stop-shop, check out these ideas at https://in.pinterest.com/shyamanivas/17-my-jewellery-made-by-me/

Enjoyed this ?? I sure did..come back right here for more freebie patterns

If you're visiting me here for the first time, and have liked the experience, do add me to your mailing list (for your convenience) , and all my future free patterns will come straight to your mail box.  

I’d appreciate if you could credit my blog (and link the original pattern link) when you make your own creation.  Thanks.

Check out my awesome pins on Pinterest at https://in.pinterest.com/shyamanivas/


And please join me on my Facebook page at https://www.facebook.com/pages/Sweet-Nothings-Crochet/248919438644360  for more patterns.

Do follow me on Twitter https://twitter.com/ShyamaNivas


Have a great day and see you soon. 

Sweet Nothings Crochet free crochet pattern blog, full photo for the Buttercup doily,
BUTTERCUP DOILY

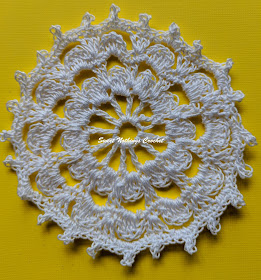
This is a quick project for a friend who just bought some new wine glasses and wanted something light and lacy to showcase them 

Thank you for joining me.
In case you have just joined me, know that you can access all of my earlier creations by checking under ‘categories’ on the right hand side of this blog under “Labels”.  Then, for your convenience, follow me here or on Facebook, You Tube, Pinterest, Twitter or Instagram.  All social media handles at the bottom of this blog.
Oh, and may I add that the fastest way to find any of my blogs is via Pinterest.

Do remember to add my blog URL when you make and show off your creation. 
Cheers.  Enjoy 

Materials used : Today I’ve used some local Indian Red Heart / Coats Doli thread with a 1.75 mm crochet hook
General yarn info : Today’s yarn is not specific for this pattern.For this project, use any yarn with a suitable hook to make this project to any size. 

Difficulty level : Easy to Intermediate

Stitches used : Using US terminology
Starting slip knot : Here’s how you start with a slip knot.  https://youtu.be/lJcqsVcs8cw 

Starting slip knot 1 or the Sloppy Slip knot : This is a neat new way to start your work without a slip knot.  https://youtu.be/YfC7KmGpifs

Magic circle : To refresh your skill, please view this easy video https://youtu.be/ISC39yOqWro

What is a chain stitch ? Here is an easy video tutorial https://www.youtube.com/watch?v=pXx5ukBjKkY

What is a slip stitch : Here is a neat video tutorial at https://youtu.be/weB3QNbA8Iw

Single Crochet : Sc : yo, insert hk into st ; yo (2 lps on hk); yo, draw through both lps.  One sc made.  Check out the video at https://youtu.be/ghACqBpA-3k

First stitch for Single Crochet : This is how I like to start my row of sc. Check out the video at https://youtu.be/6pVYRfsf4_M

Double Crochet : dc : yo, insert hk into st ; yo (3 lps on hk);
[yo, draw through 2 lps] twice.  One dc made. 
Check out the video at https://youtu.be/xdnjB27zpYo

Chainless start for Double Crochet : I dislike the ch-2 / ch – 3 start, and this is what I do to start my row of dc.
Check out the video at https://youtu.be/wskv3iTjRx0

Double crochet 4-tog as a decrease stitch : dc 4-tog :   Here is an easy video tutorial for working a dc 4-tog over 4 sts at https://youtu.be/WjSNi7ithIU

Double crochet 4-tog as a decorative stitch : dc 4-tog :   Here is an easy video tutorial for working a dc 4-tog all in the same stitch as a decorative stitch at https://youtu.be/_B0-ye0cClU
  
Abbreviations used : Using US terminology
sc : single crochet               dc : Double crochet
ch : chain                             ch-sp : chain space
sp : space                            rep : Repeat
hk : hook                              lp (s) : loop(s)
yo : yarn over                       sl-st : slip stitch  
dc 4-tog : Double crochet 4-together


Instruction information
While making my 10 cm doilies, I chanced on this chart. 
This is my take on this chart. 

Sweet Nothings Crochet free crochet pattern blog, full chart for the Buttercup doily,

Please note that I start all my rounds with a ch 1 turning chain for ease.
Please check the top of this blog for a video tutorial on all the stitches needed to make this full project.
Finally please note that I take a lot of trouble trying to make my notes as easy as possible - so do go through all my detailed notes before you pick up your yarn.


My project finished size = 10 cm

Start Round 1 : with ch 8 ; join with a sl-st to the 1st st.

Round 2 : dc in the ch-8 sp ;
*(ch 3, dc in the same ch-8 sp) ;
rep (to) 10 times ;
ch 3, and join with a sl-st to the 1st st.

Round 3 : (sc ; ch 1 , 3 dc , ch 1, sc) all in the 1st ch-3 sp ;
rep (to) all around ;
Join with a sl-st to the 1st st.

In Round 4, we will work in the “space” between 2 sc. 
What does this mean?
Look at Round 3. 
We start and end the (to) with sc, right? 
So in each ch-3 sp there is an sc next to each other, but there’s no st in between.
We will work our sts for Round 4  in that “space” between the sc of two adjoining ch-3 sps. Got it?

Round 4 : 2 dc in the 1st sp between sc ;
(ch 4, sk next 2 sc and 3 dc, 2 dc in the next sp) ;
rep (to) all around ;
Join with a sl-st to the 1st st.

Round 5 : sc in the 1st 2 dc ;
(sc ; ch 1 , 4 dc , ch 1, sc) all in the next ch-4 sp ;
*sc in the next 2 dc ; rep (to) in the next ch-4 sp* ;
rep *to* all around ;
Join with a sl-st to the 1st st.

In this round we are only going to work 3 dc in the 2 sc between the flower-like petals. 
What are the flower like petals? 
These are all the sts that were worked (to) in the ch-4 sp of Round 5.  
So rather than write a confusing instruction, let’s call all these 6 sts the “flower petal”

Round 6 : 3 dc in the 1st sc ;
(ch 4, sk next sc and the next “flower petal”, 3 dc in the next sc)
rep (to) all around ;
Join with a sl-st to the 1st st.

In our last round, we will work a ch-3 picot stitch.

How to work a picot stitch : 
In case this video doesn't come on, go to  https://youtu.be/8s3zVaBcn4s

Round 6 : sc in the 1st dc ; sc + picot in the next dc ; sc in the next dc ;
*(2 sc in the next ch-4 sp ; sc + picot in the same ch-4 sp ;
2 sc in the same ch-4 sp) ;
[sc in the next dc ; sc + picot in the next dc ; sc in the next dc]* ;
rep *to* all around ;
Join with a sl-st to the 1st st.

And with this beautiful round of picot all around, we finish our small 10 cm round doily.  Fasten off and weave in ends.
Block as per your yarn requirements.

Enjoyed this ?? I sure did.. Come back right here for more freebie patterns

Remember to share this blog post when you share your photos with me on Facebook.  I’d love to feature your photos on my FB page.  Cheers.

If you're visiting me here for the first time, and have liked the experience, do add me to your mailing list (for your convenience) , and all my future free patterns will come straight to your mail box.  

I’d appreciate if you could credit my blog (and link the original pattern link) when you make your own creation.  Thanks.

Check out my awesome pins on Pinterest at https://in.pinterest.com/shyamanivas/


Join me on YouTube at http://youtube.com/shyamanivas

And on my Facebook page at https://www.facebook.com/Sweet-Nothings-Crochet/ for more patterns.

Do follow me on Twitter https://twitter.com/ShyamaNivas


Find me on Ravelry at ravelry.com/projects/shyamanivas/


Have a great day and see you soon. 


.. and some headwear patterns..


No comments:

Post a Comment

Thanks for taking the time to stop by. Do tell me what you think. Cheers