Monday 19 June 2023

OWL WALL HANGING or FLOOR MAT

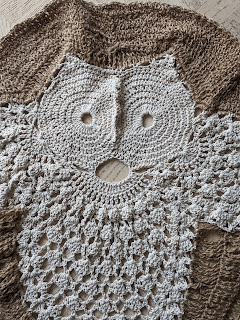
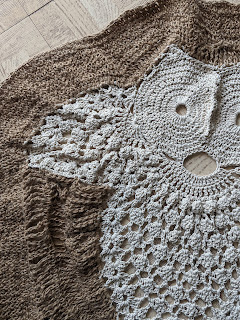
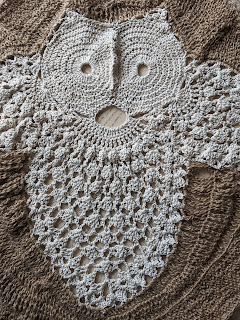
 My owl floor mat
OWL WALL HANGING or FLOOR MAT

I saw a lovely owl wall hanging and thought hmmm wonder if I can use this lovely jute yarn and make it into a floor mat.. and Voila! here you are.
I've used an (off-white) bleached treated jute and (brown) regular (rough) jute yarn for my creation today - and not only has it wowed loads of people it's sitting happily on someone's floor being used and loved.

In case you have just joined me, know that you can access all of my earlier creations by checking under ‘categories’ on the right hand side of this blog under “Labels”.  Then, for your convenience, follow me here or on Facebook, You Tube, Pinterest, Twitter or Instagram.

Check out all my social media handles at the bottom of this blog

Oh, and may I add that the fastest way to find any of my blogs is via Pinterest.


All my blogs can be printed.  Find the printer friendly (green) link at the bottom of this blog.  You can also hit Control P (or Command P for Mac) on your keyboard, and the blog will go directly to the connected printer.

Remember that you only print if absolutely essential.  Save paper – Save Our Earth. 


Do remember to add my blog URL when you make and show off your creation. 

Just copy the link on the search bar above - that's the blog URL.


To purchase this or similar yarn online, click here to buy your yarns online via Amazon.  While you will still pay the same, I may get paid by Amazon as well. 

This is a free blog - so do pay it forward for me.  Cheers.


Materials used : Today I’ve used 250 gms 2 types of jute yarn with a 7 mm crochet hook 
For Indians : You could use Anchor , Red ros ; Red rose metallic or  unbranded  knitting cotton as well 
General yarn info : I used jute because I had it handy, but for this project, use any yarn with a suitable hook to make this project to any size.  

Difficulty level : Advanced

Stitches used :  Using U.S terminology
Starting slip knot : https://youtu.be/lJcqsVcs8cw
Starting slip knot 1 or the Sloppy Slip knot : https://youtu.be/YfC7KmGpifs
Foundation Single Crochet : fsc :  https://youtu.be/mcT85fwh4mA 
What is a chain stitch ?  https://youtu.be/pXx5ukBjKkY
Single Crochet : Sc : yo, insert hk into st ; yo (2 lps on hk); yo, draw through both lps.  One sc made.  Check out the video at https://youtu.be/ghACqBpA-3k
First stitch for Single Crochet : This is how I like to start my row of sc. Check out the video at https://youtu.be/6pVYRfsf4_M

Instruction information  Using U.S terminology
Please note that I start all my rounds with a ch 1 turning chain for ease.
Please check the top of this blog for a video tutorial on all the stitches needed to make this full project.
Please read through all my detailed notes before you pick up your hook. 
This helps you get an idea of what we’re creating and what notes / videos to look out for.

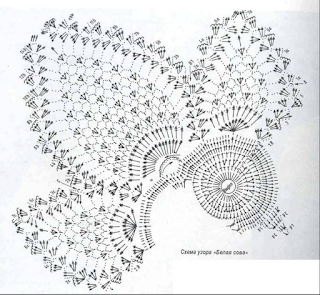
The original pattern makes this into a wall hanging where the designer has first made the owl and then found a ring and attached the sides on. The attachment is the same as one would for any wind or dream catcher.  I'd suggest if you want to make this, then you need to just count the number of sts from one ear to the wing (one one side) and replicate that on the other side. For all the other spaces, you just work as many sts as needed to 'hide' the ring.  Read on to the end of this blog for ideas on attaching to the ring or making this a floor mat.

I only found charts for this project, so as I work on mine, here are my notes.
The original pattern by the designer - not my photo
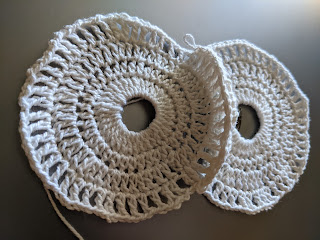
We start with the eyes.  We will work one eye first, then the next one - and join the two together before we carry on with the next part of our owl

Chart for the owl wall hanging
Magic circle :  https://youtu.be/ISC39yOqWro
What is a slip stitch :  https://youtu.be/weB3QNbA8Iw
Double Crochet : dc : yo, insert hk into st ; yo (3 lps on hk);
[yo, draw through 2 lps] twice.  One dc made. 
Check out the video at https://youtu.be/xdnjB27zpYo
Chainless start for Double Crochet : I dislike the ch-2 / ch – 3 start, and this is what I do to start my row of dc.
Check out the video at https://youtu.be/wskv3iTjRx0

Part 1 : Eye : (Make two)
Start Round 1 : with a magic circle and work 34 dc in it.  
Join with a sl-st to the 1st st.
Pull close to shut the circle.

Round 2 : hdc in the 1st dc and in each dc all around ;
join with a sl-st to the 1st st. 

Round 3 : dc in the 1st hdc ;
(2 dc in the next hdc ; dc in the next hdc) ;
rep (to) all around ;  
and join with a sl-st to the 1st st.

Round 4 : dc in the 1st dc ;
ch 1, dc in the next dc ;
(dc in the next dc ; ch 1, dc in the next dc) ;
rep (to) all around ;  
ch 1, and join with a sl-st to the 1st st. 
Fasten off and weave in ends.
Part of first eye complete.

Part 2 : Joining the two eyes to make the nose / beak
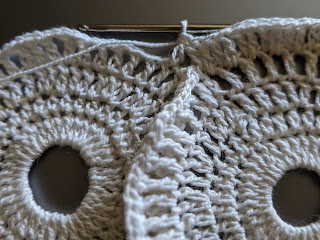
joining of the eyes

side view of the 3D eye
Work the 2nd eye till this point.
We will now join the two eyes. I've joined with the single crochet join, but you use what suits you.

Whipstitch to join : https://youtu.be/wZ-9LNzftMA

Invisible join : https://youtu.be/a6XZQ6VzJFM

Single crochet to join : https://youtu.be/6FXoW_47_dI

We join in 2 ways :
1) either join in every stitch (i.e. every dc and every ch-1 sp) ; OR
2) join every ch-sp and work ch-1 in between (for the skipped dc)
Again see what suits you.

How many stitches do we join?
You place a marker on the 1st st and count 36 dc (anticlockwise) or 13 dc and 1 ch-sp (clockwise i.e along the way you would continue crocheting)
This joint makes the 'nose' or 'beak' of the owl

We will continue now to work around the eyes and then on to the lower part of the body.  
As we're working on a new part, I'm restarting round number count for clarity.

Double crochet 2-tog : dc 2-tog :  [yo, insert hk in st or ch-sp, yo and pull up a lp ; yo and draw through 2 lps] 2 times (3 lps on hk) ; 

{yo, draw through 2 lps on hk} 2 times.  One dc 2-tog made. 

This video tutorial at https://youtu.be/1_oPlUfN5eg shows you how to use the dc 2-tog to decrease. 
Detail of dc 2-tog around eye
Part 3 : Around eyes & creating ears
Round 1 : sl-st into the 1st ch-1 sp ;
dc in the 1st ch-1 sp ;
(dc in the next dc ; dc in the next ch-1 sp) ;
*rep (to) all around till the dc before the nose joint* ;
dc 2-tog over the last dc on Eye 1 and the next dc on Eye 2 ;
rep *to* once ;
dc 2-tog over the last dc on Eye 2 and the next dc on Eye 1.
and join with a sl-st to the 1st st.

Round 2 : sl-st past the 1st dc into the 2nd dc ;
dc in the same 2nd dc ;
*dc in the next dc and in each dc all around till the dc before dc 2-tog* ;
dc 2-tog over the last dc on Eye 1 and the next dc on Eye 2, skipping the dc 2-tog in between ;
rep *to* once ;
dc 2-tog over the last dc on Eye 2 and the next dc on Eye 1, skipping the dc 2-tog in between ;
and join with a sl-st to the 1st st.

For ease of explanation, let's place markers.
Counting the stitch after the dc-tog as the 1st st ; place a marker on the 8th st (Marker Go back to that dc-tog and count from the 1st st before the dc-tog as the 1st st ; place a marker on the 15th st (Marker 2).
So this means we have 22 sts between markers. 

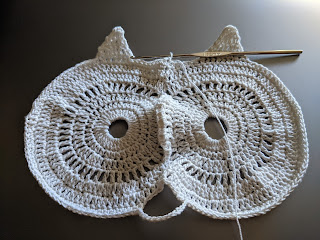
Working the ears : While working the last round around the eyes, we will work the 2 ears.  One ear will start at Marker 1 and one ear will start at Marker 2.
We will work Ear 1 first, (from the base to tip), then slip stitch down to the 'face/eyes' and continue around till we reach Marker 2.  We will then work Ear 2 and sl-st down and continue till we reach the end to join.
Round 3 : hdc in the 1st st and each st till one stitch before Marker 1 ;
Ear Row 1 : 
[dc 2-tog over the next 2 sts (i.e. the marked st and the next one) ;
dc in the next 4 sts ; 
dc 2-tog over the next 2 sts] ; Turn

Ear Row 2 : dc 2-tog over the 1st 2 sts ; 
dc in the next 2 sts ;
dc 2-tog over the next 2 sts ; Turn

Ear Row 3 : dc 2-tog over the 1st 2 sts ; 
dc 2-tog over the next 2 sts ; Turn

Ear Row 4 : dc 2-tog over the 2 sts ; Turn
sl-st all the way down the side of the ear to reach the side of the eye/face
Continue around face
Just before we go off, we've got to sk a few stitches at the base of the eyes/face. 
Let's once again place markers for convenience.
So find the centre st (which is the dc 2-tog one) ; sk 4 sts on either side of it & place Markers 3 & 4 - (this means we have 9 sts between the marked sts).

Round 3 continued : hdc in the 1st st and each st till Marker 3 ;
[ch 13, sk 9 sts , hdc in the Marker 4 st) ;
hdc in each st till one stitch before Marker 2 ;
Rep instructions for ear ;
Continue around face ;
Join with a sl-st to the 1st st.
Eyes / Face complete. Fasten off and weave in ends.
Detail of eye
Part 3 : Body
Great going so far.  Now we need to move down the eyes / face to get to the lower part or the body.
Again there are two ways to do this :
1) sl-st till the point I ask you to ;
2) fasten off and weave in ends after the ears round and re-attach your yarn where I ask you to ;
Choose what suits you.

Let's once again place markers for convenience : 
Go to the centre ch-13 sp and count off 25 sts on either side. Place Markers 1 & 2
We will work from Marker 1 to Marker 2 for the body.
Re-attach your yarn at Marker 1 (on the left hand side of the project, when it is facing you right side up)
Once again as we're starting on a new part, I'm going to start renumbering for convenience.

Triple Crochet : trc : wrap yarn twice around hook, insert hk into st ; yo (4 lps on hk); [yo, draw through 2 lps] three times.  One trc made.  

Check out the video at https://youtu.be/A0y4BbgDTbs

Chainless start for Triple / Treble Crochet : I dislike the ch-2 / ch – 3 start, and this is what I do to start my row of trc. 

Check out the video at https://youtu.be/f42MO0cGYC0  


Our Shell stitch for today's pattern is (3 trc ; ch 3, 3 trc) all in the same st or ch-sp
Row 1 : Shell stitch in the marked st ;
sk next 7 sts, 10 trc in the next st. ; 
sk next 7 sts, Shell stitch in the next st ;
18 trc in the next ch-13 sp ;
sk next 7 sts, Shell stitch in the next st ;
sk next 7 sts, 10 trc in the next st ; 
Shell stitch in the marked st.  Turn.

From now on, we will work a Shell stitch in the ch-3 sp of the earlier Shell stitch, unless otherwise indicated
Row 2 : sl-st into the 1st ch-3 sp of the 1st Shell stitch,
Shell stitch in the same 1st ch-3 sp of the 1st Shell stitch ;
trc in the next trc ; 
[ch 1, trc in the next trc] ; 
rep [to] 8 times ;
Shell stitch in the Shell stitch ;
trc in the next trc ; 
rep [to] 17 times ;
Shell stitch in the next Shell stitch ;
trc in the next trc ; 
rep [to] 9 times ;
Shell stitch in the next Shell stitch.  Turn.

Row 3 : sl-st into the 1st Shell Stitch ,
Shell stitch in the same 1st Shell stitch ;
ch 2, sc in the next ch-1 sp ;
[ch 5, sc in the next ch-1 sp] ;
rep [to] 7 times ;
ch 2, Shell stitch in the next Shell stitch ;
ch 2, sc in the next ch-1 sp ;
rep [to] 16 times ;
ch 2, Shell stitch in the next Shell stitch ;
ch 2, sc in the next ch-1 sp ;
rep [to] 8 times ;
ch 2, Shell stitch in the next Shell stitch.  Turn
Detail of stitches in body section
Note : Our Shell Stitch still continues using trc but the rest of the pattern moves to dc
Row 4 : sl-st into the 1st Shell Stitch ,
Shell stitch in the same 1st Shell stitch ;
{ch 3, sc in the next ch-5 sp ;
(3 dc in the next sc ; sc in the next ch-5 sp ;
ch 5, sc in the next ch-5 sp)
rep (to) 2 times ;
3 dc in the next sc ;
[ch 3, Shell stitch in the next Shell stitch] };
ch 3, sc in the next ch-5 sp ;
rep (to) 7 times ;
3 dc in the next sc ; sc in the next ch-5 sp ;
rep [to] once ;
rep {to} once.  Turn

Row 5 : sl-st into the 1st Shell Stitch ,
Shell stitch in the same 1st Shell stitch ;
*ch 3, sk sc and 1st dc, sc in the next dc ;
(ch 5, sc in the next ch-5 sp ;
ch 5, sk next sc & dc, sc in the next dc)* ;
rep (to) 2 times ;
[ch 3, 3 trc ; ch 3, 3 trc ; ch 3, 3 trc all in the next Shell Stitch] ;
rep *to* once ;
rep (to) 6 times ;
rep [to] once ;
rep *to* once ;
rep (to) 2 times ;
ch 3, Shell stitch in the last Shell stitch.  Turn.

In this row we will work only part of the row as we're working the left wing of the owl. We will turn at the end of the row and work on body and other wing later.
I'm numbering the rows Wing Row so we can replicate it for the other side easily.
Wing Row 1 : sl-st into the 1st Shell Stitch ,
Shell stitch in the same 1st Shell stitch ;
{ch 3, sc in the next ch-5 sp ;
(3 dc in the next sc ; sc in the next ch-5 sp ;
ch 5, sc in the next ch-5 sp)
rep (to) once ;
3 dc in the next sc ; sc in the next ch-5 sp ;
ch 3, Shell Stitch in the next ch-3 sp. Turn
detail of stitches for wing
Wing Row 2 : sl-st into the 1st Shell Stitch ,
Shell stitch in the same 1st Shell stitch ;
sk 1st dc, sc in the next dc ;
(ch 5, sc in the next ch-5 sp ;
ch 5, sk next sc & dc, sc in the next dc) ;
rep (to) once ;
ch 3, Shell Stitch in the last Shell Stitch.  Turn

Wing Row 3 : sl-st into the 1st Shell Stitch ,
Shell Stitch in the same 1st Shell Stitch ;
ch 3, sc in the next ch-5 sp ;
(3 dc in the next sc ; sc in the next ch-5 sp ;
ch 5, sc in the next ch-5 sp)
[3 dc in  the next sc ; sc in the next ch-5 sp] ;
3 dc in the next sc ; sc in the next ch-5 sp ;
ch 3, Shell Stitch in the last Shell Stitch. Turn

Wing Row 4 : sl-st into the 1st Shell Stitch ,
Shell stitch in the same 1st Shell stitch ;
ch 3, sk sc and 1st dc, sc in the next dc ;
sc in the next ch-5 sp ;
ch 5, sc in the next ch-5 sp ;
ch 5, sk next dc, sc in the next dc ;
ch 3, Shell Stitch in the last Shell Stitch.  Turn

Wing Row 5 : sl-st into the 1st Shell Stitch ,
Shell stitch in the same 1st Shell stitch ;
ch 3, sc in the 1st ch-5 sp ; 
ch 5, sc in the next ch-5 sp ;
ch 5, sk next dc, sc int the next dc ;
ch 3, Shell Stitch in the last Shell Stitch.  Turn

Wing Row 6 : sl-st into the 1st Shell Stitch ,
Shell stitch in the same 1st Shell stitch ;
ch 3, sk next dc, trc in the next dc ;
ch 3, Shell Stitch in the last Shell Stitch.  Turn

In the last row we will work our Shell Stitch over the two last Shell Stitches
Wing Row 7 : sl-st into the 1st Shell Stitch ,
3 trc in the 1st Shell stitch ch-3 sp ;
3 trc in the 2nd Shell stitch ch-3 sp. 
Fasten off and weave in ends.
One side of owl with wing complete 

We will now work across the body to the other side (other wing) and complete that wing like we did this one. 
Now numbering.. we're going back to the main numbers - the one's we had before we started the Wing Row numbers. 

So let's re-attach yarn at the ch-3 sp of the Shell stitch we stopped at and carry on
Row 6 : Shell stitch in the 1st Shell stitch ;
ch 3, sc in the next ch-5 sp ;
(3 dc in the next sc ; sc in the next ch-5 sp ;
ch 5, sc in the next ch-5 sp)
rep (to) 5 times ;
3 dc in  the next sc ; sc in the next ch-5 sp ;
{ch 3, 3 trc ; ch 3, 3 trc ; ch 3, 3 trc all in the next Shell Stitch} ;
ch 3, sk next dc, sc in the next dc ;
[ch 5, sc in the next ch-5 sp ;
ch 5, sk next dc, sc in the next dc] ;
rep [to] 3 times ;
ch 3, Shell stitch in the last Shell stitch. Turn

Row 7 : Shell stitch in the 1st Shell stitch ;
ch 3, sc in the next ch-5 sp ;
(3 dc in the next sc ; sc in the next ch-5 sp ;
ch 5, sc in the next ch-5 sp) ;
rep (to) 2 times ;
ch 3, Shell stitch in the next ch-3 sp. Turn
We will now work the 2nd wing - the right hand side one.
Work Wing Rows 2 - 7
Fasten off and weave in ends.
Thje dual colored owl floor mat
Now let's finish the body.
You have worked two wings and now know the pattern.
One row has the sc in ch-5 sp + 3 dc + sc in ch-5 sp and the Shell sts at the ends followed by a row of ch-5 sps all through - again starting and ending with the Shell sts.
The final row you will work just like you did for the wings.
Fasten off and weave in ends.

Joining to the ring
Usually when working a dream catcher, you will join the circular pattern in the final round to the ring.
In this pattern however, we will work around the ring with sc and only join the ears, wings and the lower part of the body.
May I suggest that you block your project so that it lays flat and joins easily

How do we join?
So every time we work an sc in the ch-sp, we will work it around the ring and in the ch-sp together ; for all the sc in between the ch-sps, they are just around the ring.
Got it?

Now here's where it gets a little complicated.  The number of sts that you work between the two ch-sps depends on the thickness of your yarn and the size of your ring.  Place your motif in the centre of the ring and then clip it to the ring - this will  stretch the motif and can then work till you reach the next set to be worked on.
There are no fixed number of sts but do keep track of the number you work per section so you can duplicate it for the other side for evenness.

While plain sc all around the ring works, you could also add in a picot stitch if you want.

How to work a picot stitch : Traditionally for a ch-3 picot, you work (ch 3, sl-st in 3rd ch from hook).  For a ch-5 picot, you will do (ch 5, sl-st in 5th ch from hook).  

Here’s a great video https://youtu.be/8s3zVaBcn4s

If you want a beaded end round, add a bead instead of the picot stitch.
Its just that if you decide to add beads, the simplest way is to thread them in first - so rather than fuss around with them from the start, cut the yarn then add beads and carry on - bit fussy but the end effect will be worth it.

How to add beads : https://youtu.be/EcpgMgBox8I

How to work with beads in crochet : https://youtu.be/yanbAnF_pr0


Fasten off and weave in ends

If you are making this into a dream catcher, then you need to work in a long tie along one side that will hold your creation up.
Decide where you want to make this holding tie, and then work as many chain as you need.
I worked this tie chain at the end of the final round.

Then go ahead and add all the feathers, beads and baubles to beautify your creation.

How to make this into a floor mat : For advanced crocheters
This is a little more complicated than a dream or wind catcher and that's because of the shape. If you zoom into the photo below you'll see that I have used lots of long stitches under the wing (till the base) to try to get this into a circular shape.
I used stitches in sets of 3 (for convenience) starting with hdc at the base of the owl ; then dc ; e-dc ; trc ; e-trc ; dtrc ; e-dtrc and ddtrc 
(e-dc : extended double crochet ; e-trc : extended treble crochet ; dtrc : double treble crochet ; e-dtrc : extended double treble crochet ; ddtrc : double double treble crochet)

Extended half double crochet (e-hdc) : https://youtu.be/vtbAaieJmnA 

Extended double crochet (e-dc) :  https://youtu.be/hf8XIciS8AE

Triple Crochet : trc : wrap yarn twice around hook, insert hk into st ; yo (4 lps on hk); [yo, draw through 2 lps] three times.  One trc made.  

Check out the video at https://youtu.be/A0y4BbgDTbs

Chainless start for Triple / Treble Crochet : I dislike the ch-2 / ch – 3 start, and this is what I do to start my row of trc. 

Check out the video at https://youtu.be/f42MO0cGYC0 

Double Treble /Triple Crochet : dtrc :  wrap yarn three times around hook, insert hk into st ; yo (4 lps on hk); [yo, draw through 2 lps] three times.  One dtrc made.  

Check out the video at https://youtu.be/XyPrnAtOs3U
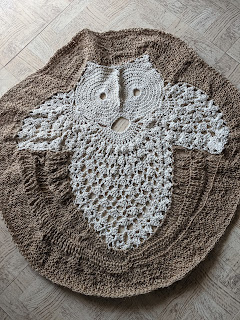
For the extended stitches : For the e-trc and e-dtrc, work the same number of wraps around the hook as you do for the trc or the dtrc, but work the first st like we do for the e-hdc or e-dc, i.e work into that first loop first and then work into each loop after that. This means that for the trc we work 3 times into the 4 loops, but for the e-trc we will work 4 times into the 4 loops. Similarly for the e-dtrc we work one extra into the loop.
For the ddtrc (Not sure if this is a st at all but this is what I did), I worked 4 times around the hook (one more than the dtrc)
Basically I wanted longer stitches so do whatever you think works.

Now once you reach the end the wing, I attached it 1/3rd of the way down the wing, stretching that last st and sl-st attaching it.
On the way back, I worked the same sts back in reverse.
3 rows of this worked for me - and I was end to end from tail to end of wing tip to finish the lower portion of the owl.
I worked from wing to wing, around the bottom of the owl - but you could work from one end of the wing to the bottom and then join when you work the 2nd side too.

The top of the nose again demands longer sts - but it also needs 'together sts'. So I worked hdc, dc, trc and dtrc and then a along the nose, I have worked trc 2-tog and dtrc-2tog to bring the centre flat and together.

Once I had the ears and wing in a circle of sorts, I worked 3 rounds all around to finish it all off.
Yes, this was a challenging project, but I love challenges so I really loved this. Hope you do too - and do tell me how you went with my notes.

Detail of extended stitches around wing and top of eye


The completed OWL WALL HANGING or FLOOR MAT
Enjoyed this ?? I sure did.. Come back right here for more freebie patterns

Remember to share this blog post when you share your photos with me on Facebook.  I’d love to feature your photos on my FB page.  Cheers.

If you're visiting me here for the first time, and have liked the experience, do add me to your mailing list (for your convenience) , and all my future free patterns will come straight to your mail box.  

I’d appreciate if you could credit my blog (and link the original pattern link) when you make your own creation.  Thanks.

Check out my awesome pins on Pinterest at https://in.pinterest.com/shyamanivas/


Join me on YouTube at http://youtube.com/shyamanivas

And on my Facebook page at https://www.facebook.com/Sweet-Nothings-Crochet/ for more patterns.

Do follow me on Twitter https://twitter.com/ShyamaNivas


Find me on Ravelry at ravelry.com/projects/shyamanivas/

Have a great day and see you soon. 


No comments:

Post a Comment

Thanks for taking the time to stop by. Do tell me what you think. Cheers