Double Crochet : dc : yo, insert hk into st ; yo (3 lps on hk); [yo, draw through 2 lps] twice. One dc made. Check out the video at https://youtu.be/xdnjB27zpYo Chainless start for Double Crochet : I dislike the ch-2 / ch – 3 start, and this is what I do to start my row of dc.
The beauty of this pattern is that you can use any stitch you want, any yarn you want with a suitable hook and make it to any size you want.
This project is truly creative and you should just let your mind flow.
1) So we start with a row of foundation single (fsc) or double (fdc) crochet stitches.
2) We work in either sc / half double crochet (hdc) or double crochet (dc) for the body of your work
3) We work either a rectangle or a square
4) We add on the fiddle things on the top of this square or rectangle to finish
Start Row 1 : with fsc or fdc for the length you need for your blanket. Turn
Row 2 : dc in the 1st st and in each st till end. Turn
Rep Row 2 till you get the width or height you want for your blanket
Fasten off and weave in ends.
Fiddle embellishments
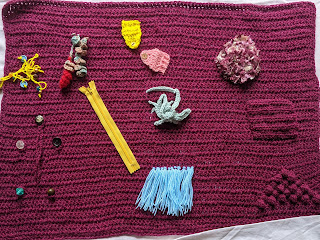
Here's what I've added onto my fiddle blanket
1) A pocket :
I have used the same color as the blanket but you could add another color just to add some variety to the blanket
Start Row 1 : with as many fsc as you need for the length of your pocket. Turn
So how do you decide how many sts you need? Easy.. just work a fsc chain and then hold it against your palm.. if your palm fits, you have the length needed. 😁
Row 2 : dc in the 1st st and in each st till end. Turn
Rows 3 - 9 : Rep Row 2 OR till you get the width or height you want for your pocket
Fasten off and leave a tail for attachment.
Using a needle, attach the pocket to your blanket
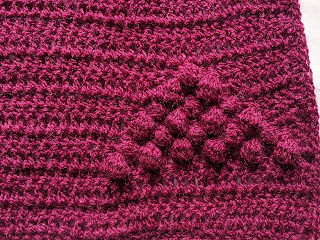
2) A set of bobbles :
I worked my bobble stitch as I was working my blanket but you could well work it as a patch (using a different colour) and stitch that on as well.
If working it when working the blanket, then all you need to do is follow the stitch idea from the video link given below
The simpler way is to make a little patch work bobble square.
I have used the same color as the blanket but you could add another color just to add some variety to the blanket.
For the bobble stitch we need stitches in multiples of 3
So may I suggest you take a look at the video and just follow instructions there?
Now two ideas here :
a) Work a square with all bobbles through like in the video ; OR
In case you are working the blanket and the bobble stitch as grapes along with it, here is what you need to do :
a) Decide where you want to work your bobble square.
b) Check out the video for the bobble stitch
c) Work your 1st row of bobble stitch as given in the video
d) Work the following row as given in all dc (if you are working your blanket in dc)
e) Then work the next row of bobble stitches in between the earlier row of bobbles
When doing this you will work work one bobble stitch less every row
f) Continue working (d) and (e) till you have only one bobble stitch left to finish your bobble triangle.
Yeah this is a little more work and complicated than working the bobble stitch patch from the video, eh?
So just work that bobble square ; fasten off and leave a tail for attachment.
Using a needle, attach the bobble square to your blanket
For this you just need some super soft fuzzy yarn - so blanket yarn or super soft pom pom yarn .. anything that feels like a soft kitty belly when you rub your hand over it 😍
Join with a sl-st to the 1st st. (12 sts)
Round 3 : 2 dc in the 1st dc ;
(dc in the next dc ; 2 dc in the next dc) ;
rep (to) all around.
Join with a sl-st to the 1st st. (36 sts)
Round 4 : 2 dc in the 1st 2 dc ;
(dc in the next 2 dc ; 2 dc in the next dc) ;
rep (to) all around.
Join with a sl-st to the 1st st. (48 sts)
Fasten off and leave a tail for attachment.
If you find this too small a soft mushy circle, then increase till you are happy with your mushiness.
To increase you will rep Round 4, increasing the distance between increases by 1 every round (i.e. : in Round 5 you will work dc in the next 3 dc and then increase dc in the next st ; Round 6 the distance between increases is 4 dc. Got it?)
4) Laces :
Lacing seems to be yet another activity that requires focus. It is also a fun activity to teach kids to lace their shoes.
For this all you need to do is work a set of 'holes' in your work
Again there are two ways to do this :
a) Work the 'holes' as you are working your blanket ;
b) make a patch with lace holes in it.
Either way the idea / principle is the same :
How do you make holes ?
You work dc in all sts till the place where you want your hole ; (ch 1, sk next st ; st in the next st). I say 'st' because you can work whichever st you are working for your blanket.. if you are working your blanket in all sc, then you will sk a st and then continue working sc. This applies if you are working sc / hdc / dc too.
As we are working a set of holes to lace into, picture your shoes - there are two sets of holes next to one another with a small distance separating them.
So that's all you need to do here as well - one hole ; then stitches in between followed by the 2nd hole.
Then there are rows of sts between the two holes (like in your shoes).. so for that you will work 1 st in each st, and 1 st in the hole (or ch-1 sp) as well.
I have worked my hole rows 2 rows apart.
All you need to remember is to work the holes one on top of another.
Again the simpler way to do this is Plan (b) - make the patch with holes on it.
If choosing this method remember to leave a tail at the end to attach your patch onto. your blanket. Before you attach your patch on, remember to add in your laces.
For the (shoe) lace :
Either work a fsc / fdc row that is as long as you need for a lace ;
OR Easiest I-cord : https://youtu.be/e_AQ9m0QeZI
Now lace the cord into the prepared holes and then attach your patch on.
The above ideas are not for patches - but they are cute pattern that will work as well. Check them out

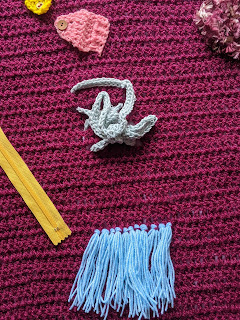
5) Tassels :
Tassels are not a lot of work (for us) but they seem to spread calm - so adding tassels is a simple thing.
I added my tassels after I finished the blanket.
6) Zipper :
This is the easiest - I just bought a zipper and stitched it on.
The activity of opening and closing the zipper is repetitive and calming.

7) Buttons and buttonholes :
Add on the buttons as you would for any garment and then take a look at the video to see how to make a button hole
https://youtu.be/oocVo-ZNIcMOnce again you can add it directly onto the blanket (as I have) or you can make it as a patch (using the video - make two little bits one each to hold the button and button hole) and attach it on.
I have done this too (the photo under the tassels tab - the two little pink and yellow bits - they have a button and button hole)
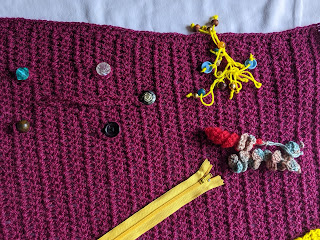
And then I added a few buttons with long button holes as well - that's all the buttons you can see left of the yellow zipper in the photo above (5 buttons and long loopy button holes)
So how do you add a long button hole once you have made the blanket?
a) When working the blanket, decide where you think you'd like to add buttons, and then add in the button hole as you go.
This involves a little thinking and pre planning. I'd suggest that you then work a plan out (on paper) drawing in the different elements so you can plan as you crochet ; OR
b) Attach your yarn after you are finished making your blanket (you'll have to attach on the reverse or back of work and pull the yarn through) ; and then work the chains for the button hole.
When finished, push that end bit back through the blanket and secure at the back.
A little messy but will still get the job done
If you think of any other way(s) to get this done, do write to me (at the bottom of this blog or via Facebook) and we can add that to this -
- obviously I'll credit you for the idea 😄
8) Curly wurlies :
Just keep thinking of stuff that will give a little fascination .. and I think curly wurlies will.. just small springy bits and bobs..
So I made a set of curly wurlies, left a long tail and then held a set together and attached them onto the blankie.. Not only do they add a spot of color, but I ended up
playing with them myself - pretty addictive 😂

9) Hanging buttons and shells :
Again using the hanging curly wurly idea, I added a few buttons and shells - as this could be used by children or elderly alike, ensure that all that you use does not have sharp features.
I just threaded yarn through the buttons and added a bunch of them (different lengths of yarn for each- that's what's on the left hand side of my blanket). I tied them together and neatly secured them from under the blanket.
Play with color combos, different ideas.. join them up and see the beautiful end result.
As before, if you think of other stuff that will be fun on a fiddle blanket, do let me know.. it's always fun to incorporate new ideas - so lets do this together 🤝


No comments:
Post a Comment
Thanks for taking the time to stop by. Do tell me what you think. Cheers