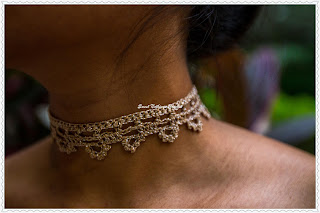
EXTRAVAGANT NECKLACE
The pattern itself uses easy stitches. The way it is worked needs advanced skills.
Check out the video at https://youtu.be/6pVYRfsf4_M
There is a possibility of adding beads, if you so decide.
There are 12 points (picot) all around the last row ;
there are 4 rows and 3 centre points on these rows and there are the “V”-sts across.
Once you have decided on how many points,
just slip on that many beads before you start.
Please note though that this pattern is complicated,
so I'd suggest you work it without beads the first time around.
So let's look at this pattern and visualise what we're going to do.
The pattern is worked continuously in one piece.
This pattern is worked in rows from the left to right of choker.
We start with the Shelled “V”-stitch and work all the way across the length of the choker first, and then work down the patterned width.
Each pattern set is made up of 6 “V”-sts and 3 ch-5 sps joined to your chain.
The pattern is worked directly onto the chain that goes around your neck.
So first wear your choker chain across your neck and mark off the right hand side point that you want the choker to start at.
The rest of the chain will go around the back without pattern.
Count off the same number of chain link from the other end (left hand side of your neck) and place a 2nd marker.
Now this part is a bit tricky.
If you are working with a slender chain, then count off 15 chain link per set.
One set is this large pattern marked 1 in pink on the chart.
If you are working with a chain with larger links, then count off 5 chain link per set.
Please note that the instructions will be general and you will need to figure out joining points yourself.
In case you are using the 5-chain or the larger-links chain then you will join your crochet choker to the metal chain at every chain link.
In case you are using the slender 15-chain link idea, you will join in the centre chain of each set (5 sets of 3 chain links.. so the center chain would be chain link #2, sk link 3 and 4 and attach again for next set and so on)
Please also note that there are several brackets / parenthesis and though the symbol may be repeated, follow the symbol in red and black accordingly.
How do we work this pattern?
We work it one triangular pattern at a time - (i.e. Its one Pink number 1 , 2 etc on the chart) . So first we work the "V"-sts and then work one triangle, and then go down the chain to finish each triangle as a continuous piece as we work down the choker.
Our “V”-st is (2 dc ; ch 1, 2 dc) all in the same ch-sp
Start with ch 3.
Turn and work 1 dc in the 3rd ch from hk ;
ch 1, 2 more dc in that same 3rd ch ;
* {(ch 2 + attach to chain link + ch 2 ;
Turn ;
“V”-st in the ch-1 sp) ;
ch 5, Turn ;
“V”-st in the next ch-1 sp} ;
rep {to} once ;
rep (to) once ;
You have two ch-5 sps on the free side of your choker and are attached to your choker chain in 3 points and 6 "V"-sts.
We will work on our first pineapple pattern over this set.
We will now work on that 2nd ch-5 sp from the starting end , go back to the 1st ch-5 sp from the starting end and continue back and forth forth to complete this Pink 1 piece.
ch 2, Turn ;
[5 dc ; ch 5, 5 dc] all in the ch-5 sp ;
ch 2, sc in the next ch-5 sp ;
Now we will turn once again and work on the 5-dc set we just made.
ch 2 ; Turn ;
dc in the next 5 dc ; 3 dc in the next ch-5 sp ;
ch 3, 3 dc in the same ch-5 sp ;
dc in the next 5 dc ;
We will now work back on our “V”-st row.
ch 2, “V”-st in the next “V”-st ;
rep (to) once ;
Once again we’re going to work on the lower part of the choker – so on the 8-dc set we just made ;
ch 3, dc in the next dc ;
[ch 2, sk next dc, dc in the next dc] ;
rep [to] 2 times ;
{ch 2 dc in the ch-3 sp} ;
rep {to} 2 times in the same ch-3 sp ;
rep [to] 4 times ;
We are at the starting end of the choker, so we will now attach to the dc on that 1st “V”-st ; and then immediately turn and work down to complete this 1st bit of pattern.
Take a look at the chart to see what we have done so far.
In this last bit, we will work a ch-3 picot.
In case the video tutorial does not come on, please go to https://youtu.be/8s3zVaBcn4s
ch 3 + sl-st into the dc of the 1st “V”-st ; Turn ;
ch 3, sc in the ch-3 sp just made ;
< ch 2 + picot + ch 2 + sc in the next ch-2 sp > ;
rep < to > 9 times ;
ch 2 + picot + ch 2 + sl-st into the next ch-3 sp ;
ch 3, “V”-st in the next “V”-st * ;
and we’ve completed one bit of the choker from * to *
We now need to attach back onto the choker chain and we are back to the start of our pattern.
So rep this pattern all the way from *to* and re-attaching to the “V”-st to work each triangle of our choker pattern.
When you reach the other end, you have completed this beautifully extravagant necklace.
Yes, this one was a bit of a toughie - and a tough one to write out as well... but we did it together, didn't we..!!
Do remember though that this is where you read all about this cute choker necklace. So please add my blog link when you share and show off your project. Thanks in advance.
If you're visiting me here for the first time, and have liked the experience, do add me to your mailing list (for your convenience) , and all my future free patterns will come straight to your mail box.


No comments:
Post a Comment
Thanks for taking the time to stop by. Do tell me what you think. Cheers