Abbreviations used :
lp(s) : Loop(s) sc : Single crochet
dc : Double crochet sp : Space
sl-st : Slip stitch ch : Chain
st(s) : Stitch(es) hk : Hook
yo : Yarn Over
fsc : Foundation Single Crochet
General Instructions :
Please note that I start all my rows with a ch 1, turning chain for ease.
Please check the top of this blog for easy video tutorials on all stitches used in today's pattern. For your convenience there video tutorials through the blog too
Please read through all my notes before you pick up your hook, so you know just where we're heading in our pattern.
In my patterns I work with the principle of stitch count and body measurement.
This means that you need to work the stitch count in pattern, till you get the measurement (length and/or width) that you need for your project.
This is not my original pattern and it’s just one of those wonderful free floating freebies over the net. I am, as usual, writing down my notes, and am sharing them with you.
Now our stitch count is in multiples of 6, and with a 2 dc (placket) on each end, we need a multiple of (6 + 4).
However, if we start with this count, I found the neckline too
wide.
So what I thought is I need about 100 sts – so I started with 66 fsc. I then worked 1 dc in the 1st dc,
and 2 dc in the next dc, all the way to the end = 99 dc and then an extra dc
thrown in at the end to make the 100 dc I needed.
Not sure how the designer has worked
her first line counts.. as the chart is a little misleading,
methinks.
Some day I am going to revisit this
pattern and see if I can figure out a clearer way.
In the meantime, if you figure
how the count(s) are done, do add it to the comments and/or email me, so we can
resolve this for future users.
Now as I'm not really sure what will work,
I’m going to write it per chart.
Start with fsc in multiples of 6 + 4. Turn.
Double Crochet : dc : yo, insert hk into st ; yo (3 lps on hk);
[yo, draw through 2 lps] twice. One dc made.
Chainless start for Double Crochet : I dislike the ch-2 / ch – 3 start, and this is what I do to start my row of dc.
Row 1 : dc in
1st fsc and each fsc till end. Turn.
Our
“V”-st is (dc ; ch 2, dc) all in the same st or ch-sp.
Row 2 : dc in
1st 2 dc ;
“V”-st in next dc ;
*(ch 2, sk next 2 dc, sc in next dc)
;
ch 2, sk next 2 dc, “V”-st in next dc* ;
rep *to* till last 2 dc
;
dc in the last 2 dc. Turn.
dc 3-tog : Double crochet 3-tog : [yo, insert hk in st or ch-sp, yo and pull up a lp ; yo and draw through 2 lps] 3 times (4 lps on hk) ; yo, draw through all lps on hk.
One dc 3-tog made.
Row 3 : dc in
1st 2 dc ;
*[(dc 3-tog ; ch 2, dc 3-tog ;
ch 2,
dc 3-tog) all in the next ch-2 sp of “V”-st] ;
ch 1, sk both ch-2 sps and sc , rep
[to] once* ;
rep *to* till last 2 dc ;
dc in the last 2 dc.
Turn.
Row 4 : dc in
1st 2 dc ;
*(ch 1, sk next dc 3-tog, dc in next
ch-2 sp) ;
rep (to) once ;
[ch 1, sk next dc 3-tog, dc in next
ch-1 sp]* ;
rep *to* till last 2 dc
;
dc in the last 2 dc.
Turn.
Row 5 : dc in 1st 2 dc ;
*2 dc in next ch-1 sp ; dc in next dc* ;
rep *to* till last 2 dc ;
dc in the last 2 dc. Turn.
Rows 10 - 12 : Rep Rows 2 –
3.
Note : Quick
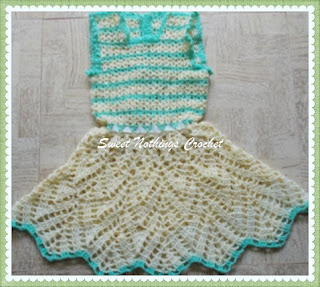
size check here : Yoke measures ~ 5”.
Now the chart here is a bit
different from the lovely photos posted.
So I am going per photo.
The designer seems to have
stopped increasing yoke and after a quick ‘edging’ for this yoke, she’s moving
on to the skirt portion of our dress.. and that’s what I am going to do too.
Row 13 : dc in 1st 2
dc ;
*ch 3, sk next dc-3 tog, sc in the
next ch-sp* ;
rep *to* till last 2 dc ;
dc in the last 2 dc. Turn.
Row 14 : dc in 1st 2
dc ;
*ch 3, sc in the next ch-3 sp*
;
rep *to* till last 2 dc ;
dc in the last 2 dc. Turn.
Right, we’re done with our little
lacy edge for the yoke, so we’ll now start on the skirt portion.
We’ll work on the 1st five 3-dc tog sets, sk a few sets
for the armhole, then do the back 11 3-dc tog sets, sk the sets for the armhole
and then work on the last five dc-3 tog sets. OK?
So first let's place our markers
:
Place first maker at the end of the
1st five dc-3 tog sets
(so the ch-3 sp after the
15th dc-3 tog , which is the last of the fifth dc-3 tog)
;
sk the next five dc-3 tog sets and
place marker in the next ch-3 sp.
Now go to the other side and count
off the 1st five dc-3 tog sets from this end
(so the ch-3
sp after the 15th dc-3 tog , which is the last
of the fifth dc-3 tog),
and place a 3rd marker here ;
and sk the next five dc-3 tog sets
and place last marker in the next ch-3 sp.
So we now have 2 front pcs, 2
armholes and 1 back – divided by these four markers.
Row 15 : dc in 1st 2
dc ;
ch 2 , dc in 1st ch-3 sp ;
*ch 2, dc in the next ch-3 sp* ;
rep
*to* till you’re at the first marker ;
ch 6, sk dc-3
tog sets till the next marker and dc in the next ch-3 sp ;
rep *to* till the next marker ;
ch 6, sk dc-3
tog sets till the next marker and dc in the next ch-3 sp ;
rep *to* till last 2 dc
;
dc in those last 2 dc. Turn.
Note : ch
6 is
the number of chain shown per chart for under the armhole.
If you feel that this is
insufficient for the armhole for child you’re making this project for, suggest
you increase in multiples of 6.
Row 16 : dc in 1st 2
dc ;
2 dc in 1st ch-2 sp and in each ch-2 sp ;
dc in each dc ; 6 dc in the two ch-6
sps ;
dc in each dc till end. Turn.
Note : Check
that you have a multiple of six.
Good, you remembered!
Rows 17- 19 : Rep Rows 2 -
4 once.
Row 20 : dc in 1st 2
dc ;
*dc in next ch-1 sp, dc in next dc*
;
rep *to* till last 2 dc ;
dc in the last 2 dc.
Turn.
Rows 21- 23 : Rep Rows 2 -
4 once.
Row 24 : Rep Row 20
once.
Rep Rows 21 - 24 till your dress is
of the length you desire ; ending with Row 3.
Finishing : Rep Rows 13
and 14 once.
Fasten off. Weave in ends.
Attach a row of buttons along the front placket.
Block as per yarn
instructions.
Dress your beautiful baby girl and show off on social
media.
No comments:
Post a Comment
Thanks for taking the time to stop by. Do tell me what you think. Cheers