Abbreviations used : Using U.S terminology
ch : Chain sk : skip
dc : Double crochet sp(s) : Space(s)
st(s) : Stitch(es) sc : Single crochet
hk : hook. lp : loop
rep : repeat
fsc : Foundation single crochet
Instructions : Using U.S terminology
Please note that I start all my rows with a ch 1, turning chain for ease.
Please check the top of this blog for easy video tutorials on all stitches used in today's pattern. For your convenience, I have also added links for stitches to be used just before the rows.
Please read through all my notes before you pick up your hook, so you know just where we're heading in our pattern.
In my patterns I work with the principle of stitch count and body measurement. This means that you need to work the stitch count in pattern, till you get the measurement (length and/or width) that you need for your project.
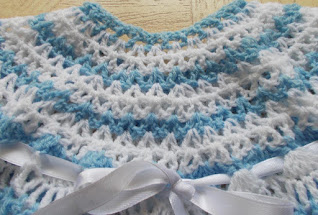
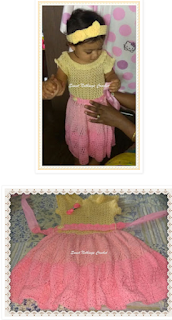
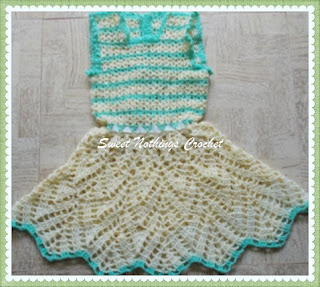
So before we set off on our new creative journey, let’s take a quick look at what we’re creating here today. This cute dress has been made from neck down.
In the original pattern, the designer has started with plain chains.
However, I prefer the foundation chain start as it lends a softer and better finish to “little” clothing, so have changed the pattern a little.
Original charts have been used here, so if you prefer the chain start, do follow the chart. For your convenience, I have cut the chart into smaller sections and the whole chart is at the end of this blog.
We start with the yoke and then work down to the skirt part of our cute little dress.
Now the yoke is worked in one piece, and we work back and forth so that we leave a 4 dc placket at the back for closure.
How do you calculate how many stitches you would need for a round neck ?
The simplest way would be to keep a well fitting dress of the child you are making this dress for – if unable to do that, then see if you can get a loose round neck measure and then work your first foundation row to that measure.
We will work our yoke in rows, and then our skirt portion in rounds.
Right so depending on how large / wide you want your yoke, rep an Increase row followed by the next row of just V-sts, but with every increase row, add one more V-st between shell sts.
i.e. In our last increase row (Row 7) we have 4 V-sts followed by one Shell st ; so for the next increase row, you will have 5 V-sts followed by one Shell st.
Once you have the yoke you are happy with, do the border shelled row (below) for the yoke.
So the next question .. how does one calculate the yoke sizing?
Well, I usually take the easy way out and use a well-fitting dress of the person for whom this is intended as a marker, but the thumb rule is also that the yoke is just about 1/3rd of the whole dress length, for younger kids (i.e till Age 1).
For older kids, the yoke should come just under the armhole, so that the skirt portion of the dress starts just under the armhole.
Border shell : 7 dc in the same st or ch sp
Next Row : dc in the 1st 4 dc ;
sk 1st ch-1 sp, Border shell over next 2 dc ;
*sk next ch-1 sp, sc in next dc ;
sk next ch-1 sp, Border shell over next 2 dc* ;
rep from *to* till last 4 dc ;
dc in last 4 dc. Turn.
The other thing we need to mark off is the armhole openings.
Depending on the round arm measure of your child, let’s mark this off.
So we fold the yoke ; mark the centre front and two sides.
Then mark off the round arm measure from the two side and place markers along the back and front of your yoke.
Our stitch count is in multiples of 6 – so after marking off the armholes, ensure you have this stitch count.
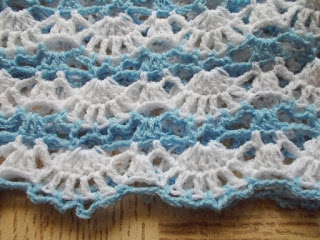
The hardest part is now calculating how many shells you need on this first round of the skirt.
So what I usually do is just work the basic number of shells per pattern count, see if I am happy with the result, and if not, then add shells to give it the ‘body’ / flared skirt that I want.
Once this first round is done, we are ‘stuck’ with the number of shells we have.
So how do I add shells / or body to the skirt portion .. well…
You can either work in extra shells reducing the number of skipped stitches (i.e if the pattern says sk 3 sts, then you sk 2 sts instead and add in one shell)
… or you do a row of sc along the edge first, adding scs in a way that will easily give you the pattern repeat and keep the distance between shells (i.e you add in sc’s in multiples of 6, for this pattern, such that you get the number of shells you want for the body of the dress).
You could also add a chain length under the armhole ensuring that you keep the pattern stitch count.
Round 1 : dc in the 1st dc ;
*ch 2, sk 3 sts, 5 dc in the next st ;
ch 2, sk 3 sts, sc in next st* ;
rep from *to* all around,
and join with a sl-st to the 1st st.
Round 2 : dc in the 1st dc ;
*dc in the next dc ;
(ch 1, dc in the next dc) ;
rep (to) 3 times ;
dc in next sc* ;
rep from *to* all around,
and join with a sl-st to the 1st st.
Round 3 : sl-st into the 1st ch-1 sp, sc in the same ch-1 sp ;
*(ch 3, sk next dc, sc in the next ch-1 sp) ;
rep (to) 2 times ;
ch 4, sk next 3 dc, sc in next ch-1 sp* ;
rep from *to* all around,
and join with a sl-st to the 1st st.
Round 4 : 2 dc in the 1st ch-4 sp ;
*ch 2, sc in the next ch-3 sp ;
ch 4, sk next ch-3 sp, sc in the next ch-3 sp ;
ch 2, 2 dc in the next ch-4 sp* ;
rep from *to* all around,
and join with a sl-st to the 1st st.
Round 5 : sc in the 1st dc ;
ch 2, sc in the next dc ;
*ch 3, 5 dc in the next ch-4 sp ;
ch 3, sc in next dc ;
ch 3, sc in the next dc* ;
rep from *to* all around,
and join with a sl-st to the 1st st.
Round 6 : sl-st into the 1st ch-3 sp ;
2 dc in the same 1st ch-3 sp ;
*dc in the next dc ;
(ch 1, dc in the next dc) ;
rep (to) 3 times ;
2 dc in next ch-2 sp* ;
rep from *to* all around,
and join with a sl-st to the 1st st.
Round 7 : sl-st into the 1st ch-1 sp, sc in the same ch-1 sp ;
*(ch 3, sk next dc, sc in the next ch-1 sp) ;
rep (to) 2 times ;
ch 4, sk next 4 dc, sc in next ch-1 sp* ;
rep from *to* all around,
and join with a sl-st to the 1st st.
Round 8 : 2 dc in the 1st ch-4 sp ;
*ch 3, sc in the next ch-3 sp ;
ch 4, sk next ch-3 sp, sc in the next ch-3 sp ;
ch 3, 2 dc in the next ch-4 sp* ;
rep from *to* all around,
and join with a sl-st to the 1st st.
Round 9 : sc in the 1st dc ;
ch 3, sc in the next dc ;
*ch 3, 6 dc in the next ch-4 sp ;
ch 3, sc in next dc ;
ch 3, sc in the next dc* ;
rep from *to* all around,
and join with a sl-st to the 1st st.
Round 10 : sl-st into the 1st ch-3 sp ;
2 dc in the same 1st ch-3 sp ;
*dc in the next dc ;
(ch 1, dc in the next dc) ;
rep (to) 4 times ;
2 dc in next ch-2 sp* ;
rep from *to* all around,
and join with a sl-st to the 1st st.
I am sure you’ve figured that we’ve done the same four rounds twice now – so that’s Rounds 3-6 and Rounds 7-10 that are similar – the only difference is that we’ve increased one dc in the second set of rounds.
So using this repeat as a basic idea, go ahead and make as many repeats as you need to get the desired length that you need for your baby’s dress, ending with Round 8.
Now I found that I was pretty happy with the ‘flared’ shape after Round 10, and did not make any increases, but then I’m also making this dress for a younger child.
Right then.. as usual, once done, fasten off.. weave in all ends…










No comments:
Post a Comment
Thanks for taking the time to stop by. Do tell me what you think. Cheers