Welcome to Sweet Nothings Crochet for loads of free crochet patterns, video tutorials & awesome creations. If you want to learn, or just want to see some great free patterns, you're in the right place. All my blogs have video tutorials with loads of ideas thrown in for good measure. Thanks for dropping by and I hope you'll stay a while.
For the yoke we work a tried-and-tested option and for the skirt portion, I found this chart that I thought was just too sweet. Let's see how this works together. While the charts are not mine and found on the internet, the instructions are my original notes as I work on my own project. I’m glad that you’re back here with me as we explore this new creation together. I have added a small bolero and a hat as well - to complete this full ensemble.. and a tiny flower motif to bring it all beautifully together.
Thank you for joining me.
In case you have just joined me, know that you can access all of my earlier creations by checking under ‘categories’ on the right hand side of this blog under “Labels”. Then, for your convenience, follow me here or on Facebook, You Tube, Pinterest, Twitter or Instagram.
Check out all my social media handles at the bottom of this blog
Oh, and may I add that the fastest way to find any of my blogs is via Pinterest and if you are looking for more children wear, then come straight HERE
Do also check my long Pinterest “to-do” list for little girl’s dresses here
All my blogs can be printed. Find the printer friendly (green) link on the right side of this blog. You can also hit Control P (or Command P for Mac) on your keyboard, and the blog will go directly to the connected printer.
Remember that you only print if absolutely essential. Save paper – Save Our Earth.
Do remember to add my blog URL when you make and show off your creation.
Just copy the link on the search bar above - that's the blog URL.
To purchase this or similar yarn online, click the highlighted links below to buy your yarns online via Amazon. While you will still pay the same, I may get paid by Amazon as well.
This is a free blog - so do pay it forward for me. Cheers.
Thanks for joining me once again as we work on and discover this new pattern together.
Here is a sizing chart for general neck sizinghere or here
Here is a sizing chart for general body sizinghere , here or here
Abbreviations used :
ch : Chain sp(s) : Space(s)
dc : Double crochet hk : Hook
st(s) : Stitch(es) sl-st : slip stitch
sk : Skip sp : space
rep : repeat
fsc : Foundation single crochet
Instructions
Please note that I start all my rows with a ch 1, turning chain for ease.
Please check the top of this blog for easy video tutorials on all stitches used in today's pattern.
Please read through all my notes before you pick up your hook, so you know just where we're heading in our pattern.
In my patterns I work with the principle of stitch count and body measurement. This means that you need to work the stitch count in pattern, till you get the measurement (length and/or width) that you need for your project.
Quick analysis of what we’re going to do here today.
With this stunningly simple pattern, we’re going to work a raglan like yoke from the neck down to the chest.
We will then check the stitch count for the skirt portion of the dress and , and work the pattern to complete this project.
We will also make a small bolero and a matching hat - plus as promised a lovely flower motif .. so lots to do and loads of ideas and photos to inspire you.
Remember that you need to work a back placket opening for the child, and I suggest that you keep it open all the way to the waist for a younger child.
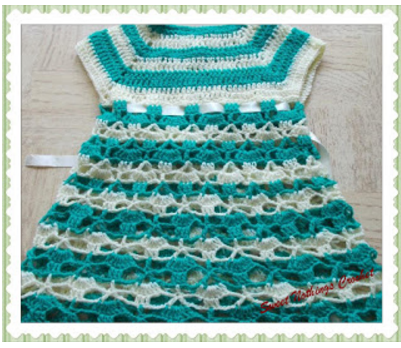
PATTERN 1 : THE DRESS
Part 1 : Front (Make one piece)
Please note : I have worked a similar pattern on another project, so some photos (in light brown / fawn color) are from the earlier project.
Start : with fsc using one the charts given for the neckline above depending on the age /size of child you are making this dress for.
Chart 1 : This is just a sample chart to explain what we're working on
As I have you captive here, let me throw in a few thoughts.
I've made the dress for a 12m old but the chart here is for a 0-6m - and the chart is given for explanations only. Use whichever size chart suits your project.
I have been often asked how I figure out the size using different yarn. I don’t.. I also do a little bit of trial and error. The charts have been set out and I have found that the charts that I share here do work (for me) – but what one should remember is that the age of the child (though important) is not as important as the size. So once you get the chest size (for example) but thanks to the yarn you are using or say the hook size, and you find that you have not got the length needed - *Do Not Worry* .. this is where your creativity comes in.. you just continue on till you get the length.
If the chart given for a 0-6m does not work for your 0-6m child, that is not a worry either.. there are so many charts on that link.. just work one size up or down to fit the child.
Sadly, when I am asked a question about how you can get it to fit, this is all I can say – as I do not know the size you are looking at /for and even if you do give me those details, I can only give you ideas – you would have to physically pick up that yarn and hook and work at it.
So let’s get that hook n yarn going.. shall we?
We may be working on different sizes – so here’s what I suggest. You take a look at the chart and first mark out the stitch for the four corners. I will now give you instructions on what you will do from one marker to the next.
So looking at the chart above, we will work the fsc row for 54 stitches (cadenas) and then our 1st marker will be on the 8th stitch ; 2nd after 11sts from 1st marker ; 3rd after 16 sts from 2nd marker ; 4th after 11sts from 3rd marker and finally you'll have 8 sts left.
Double Crochet : dc :yo, insert hk into st ; yo (3 lps on hk);
Row 1 : dc in the 1st fsc and in each fsc till the 1st marker ;
(2 dc ; ch 2, 2 dc) all in the same 1st marked stitch ;
*dc in each fsc till the next marker ;
rep (to) in the marked stitch* ;
rep *to* till end. Turn.
You can now remove the markers.
Our corners are the ch-2 sps that we have just created.
We will work the next 2-dc sets in that ch-2 sp in each row.
Row 2 : dc in the 1st dc and in each dc till the 1st ch-2 sp;
(2 dc ; ch 2, 2 dc) all in the same 1st ch-2 sp ;
*dc in each dc till the next ch-2 sp ;
rep (to) in the same ch-2 sp* ;
rep *to* till end. Turn.
Rep Row 2 till you have the shoulder width / chest width / armhole measurements as per the chart or as per the child measurements.
So once again back to Chart 1 above : the half round chest measurement will be 22 cm ; from shoulder to chest should be 8.5-9 cm and the shoulder width is 7 cm. This will be for a yoke that is just till the chest.
Once you have got the above measurements, we will join the two corners under the armhole to then (a) work in rounds and (b) increase the length of the yoke till the waist level… or the level you wish to start the skirt portion from.
back to front attached, leaving armhole opening
So to join the front and back yoke, you will work all the way in dc till the 1st ch-2 corner sp, skip all the next stitches till the next ch-2 corner sp and join the 1st and 2nd corner sps. You will then work all the way till the 3rd ch-2 corner sp and once again join the 3rd and 4th corner sps. In this way, you have a front and back along with two armholes created all in one go.
Continue working in rows from back placket across front to other back placket till you reach the chest / waist length you want
So what length do you work till? Easy – once again, do refer to the charts given (Pinterest links) above for lengths of skirts as well as regular lengths of yoke etc and make a creative decision.
Now once you reach that length, what I have done is work on the back placket. I have not done this technique before and I love the clean finish.
So when I reached the required waist measurement, finishing at the back placket left hand side, I turned my work and worked up along the placket, working 2 sc in each dc all the way to the neckline. I then worked back down along the left hand side of the placket till I had a placket width that worked for my button. (Ladies button on left hand side placket). I then continued up along the placket one last time till I reached the neckline and worked along the neckline till I reached the other side placket (right hand side back)
I similarly worked along this placket working the same number of stitches as I did for the left hand side. I worked 2 rows in all sc.
In the 3rd row, I worked my button holes. For this I worked 1 sc in the 1st st : then (ch 2, and skipped the next 2 sts ; sc in the next 8 sts) ; rep (to) till the end.
In the following row, work 1 sc in each st and 2 sc in the ch-2 sp till end.
In the following row work 1 sc in each st till end. You should be at the waist end (not neckline end - if you are at neckline sl-st all the way down)
Now I held both back plackets together to overlap and worked sc into both plackets for the first few sts to hold the plackets together ; and then worked sc all around. In this sc round, ensure that you have the required number of sts for the skirt as per stitch count given.
You could decide to work a row of picot along the edge of the placket as well - the edge that will show on the outside.
Note : If using press buttons instead of a button and button hole, remember which side goes on top for girls
How to work a picot stitch : Traditionally for a ch-3 picot, you work (ch 3, sl-st in 3rd ch from hook). For a ch-5 picot, you will do (ch 5, sl-st in 5th ch from hook). Here’s a great video https://youtu.be/8s3zVaBcn4s
We will work a ch-3 picot which is (ch 3, sl-st into the 3rd ch from hk).
OPTIONAL Part 2 : Belt : I have decided to add a row for the belt. If you decide against this, please go straight to Part 3 for the skirt.
Remember we have already worked the number of stitches we need for the skirt portion and that does not change.
You can work dc or hdc. I chose to work hdc.
Belt Row 1 : hdc in the 1st 5 sts ;
(ch 1, sk next st ; hdc in the next st ;
ch 1, sk next st ;hdc in the next 5 sts) ;
rep (to) till end. Turn.
Belt Row 2 : sc in each st till the 1st ch-1 sp ;
(sc in the ch-1 sp ; sc in the next st ;
sc in the next ch-1 sp ; sc in the next 5 sts) :
rep (to) till end. Turn.
Continue to skirt portion.
The above information is from an earlier project. For this project I did not work in a belt, but threaded in a satin ribbon instead.
PART 3 : SKIRT PORTION OF THE DRESS
For the skirt we will work in one piece, so ensure that you join the two parts of the yoke back in the last row of work.
The stitch count for the skirt is in multiples of 16 + 2
Notes for Advanced crocheters :
As I have said in my blogs before, depending on how much flare you wish for your skirt, increase the number of stitches (still keeping the multiples right) so that you get a better flare.
All that said I'm giving you the pattern as charted.
I would also like to add that though I have indicated number of row repeats, I would suggest that you work it your own way with these ideas in mind :
a)Work a few rows and see how many inches you get (in length) per row – i.e work out your gauge. One pattern repeat is four rows.
b)Decide how long you want your skirt part and the whole dress from shoulder down
c)Working with your gauge, figure out how many rows you can repeat with the pattern. So say I have indicated 2 rows per increase, you could work more rows if you are not getting as much as a length increase as needed
d)With this pattern, as with many of my earlier patterns, I urge you to be creative and explore the pattern a bit.
We start & end at the back of the dress for a neat finish.
Round 1 : sc in the 1st st ;
(ch 3, sk next 2 sts , sc in the next st) ;
rep (to) all around ;
and join with a sl-st to the 1st st.
At the end of this first round ensure that you have ch-3 sps in multiples of 5 + 1. Our pattern has a stitch count of 16 but the pattern worked in rounds needs multiples of 5 + 1 ch-3 sps. Yes, a bit confusing, but after this it gets easy as ...
Round 2 : sl-st into the 1st ch-3 sp ; sc in the same 1st ch-3 sp ;
*(ch 3, sc in the next ch-3 sp) ;
7 dc in the next ch-3 sp ;
sc in the next ch-3 sp ;
rep (to) once* ;
rep *to* all around ;
rep (to) once ;
and join with a sl-st to the 1st st.
Round 3 : sl-st into the 1st ch-3 sp ; sc in the same 1st ch-3 sp ;
Round 4 : sl-st into the 1st ch-1 sp ; dc 3-tog in the same 1st ch-1 sp ;
*(ch 2, dc 3-tog in the next ch-1 sp) ;
rep (to) 5 times ;
ch 2, sc in the next ch-3 sp* ;
ch 2 and join with a sl-st to the 1st st.
Round 5 : sl-st into the 2nd ch-2 sp past the 1st dc 3-tog ; sc in the same ch-2 sp ;
*(ch 3, sk next dc 3-tog in the next ch-2 sp) ;
ch 5, sk next 2 dc 3-tog in the next ch-2 sp ;
rep (to) once ;
ch 5, sk dc 3-tog in the next ch-2 sp* ;
ch 5 and join with a sl-st to the 1st st.
Round 6 : sl-st into the 1st ch-3 sp ; sc in the same 1st ch-3 sp ;
*7 dc in the next ch-5 sp ;
sc in the next ch-3 sp ;
ch 3, sc in the next ch-5 sp
ch 3, sc in the next ch-3 sp* ;
rep *to* all around ;
rep (to) once ;
and join with a sl-st to the 1st st.
and that's our four-row of pattern done.
Rep Rows 3 - 6 till you have the length you need for the skirt portion of your dress.
from 6 to 7 dc 3-tog on this round
Note : I conducted a small experiment and it has worked for me. I wanted to slowly increase the flare of the skirt portion of the dress so I started adding stitches.
I added 8 dc in the next set (one set being four rows) and then added a ch-5 sp instead of ch-3 sps. This did increase the 'holiness' (a.k.a laciness 😆) of the garment so you see what works for you. To continue I added 9 dc in the next set so there was a gradual increase in the flare of the dress. Of course this means that you need to change where we attach the chains in between as well as the number of sts per chain - what I'd suggest is that you ensure that your chain sps sit flat (the ch-sps between the dc 3-tog which are the foundation 'blocks' for the next round)
PART 4 : SLEEVES
There are several ideas for the sleeves : They can be made oversized and puffed. For this, first run a round of sc all around the armhole edge. Remember as usual, that you will work one sc in each st, and 2 sc per horizontal bar of dc.
Then mark the centre st (at shoulder) and work 1 dc in each st till 3 sts before that marked st. Work 2 dc in each st till the marked st and 2 dc in each st after the marked st (so 7 sts in total have 2 dc each) and then dc in each st till end.
In the following round work 1 dc all around till end.
Now you can increase once again like we did before for the 7 sts around the centre of the sleeve and then work 1 dc all around in the following rounds till you get the length you want for your sleeve.
In the last round, you could add elastic and that will make it a puffed sleeve.
I have decided not to add the elastic and I have a bell sleeve finish. I then worked the first four rows of the skirt pattern ending with a picot finish to wrap it all up neatly.
Adding elastic :
In case you want to add elastic, work as many rows as you want for the length of your sleeve and add the elastic in the final round. Measure the round arm and the elastic needs to be about 3/4ths round arm measure. Secure the two ends of the elastic and then work as shown in the video below.
And that’s done.. yet another project brilliantly executed !
Oh and before you leave here, let me show you another similar dress that I made for an older lil girl HERE
PATTERN 2 : THE FLOWER MOTIF
Flower motif : You can add a small rose and a satin ribbon.
Note : While I made this in blue, I forgot to take photos and photos below are from an earlier project.
The satin ribbon is of course, store bought.. and for the small rose, check out this link and you’ll get not only the rose but also some fun stuff for hair.. and which little girl doesn’t like stuff for hair.. so have fun.
Single Crochet : Sc :yo, insert hk into st ; yo (2 lps on hk); yo, draw through both lps. One sc made. Check out the video at https://youtu.be/ghACqBpA-3k
First stitch for Single Crochet : This is how I like to start my row of sc. Check out the video at https://youtu.be/6pVYRfsf4_M
Start Round 1 with a magic circle and work 20 sc in it.
Join with a sl-st to the 1st st
Round 2 sc in the 1st sc :
(ch 3, sc in the next sc) ;
rep (to) all around ;
and join with a sl-st to the 1st st.
Triple Crochet : trc :wrap yarn twice around hook, insert hk into st ; yo (4 lps on hk); [yo, draw through 2 lps] three times. One trc made.
There are two ways to use this floral motif. Use the tail you have left to attach it as you desire
1) Permanently attach it to the dress
2) Attach it to a safety pin so it can be used for different pieces of clothing.
3) You can also add a bead in the centre
PATTERN 3 : THE BOLERO
The bolero is worked as a rectangle that spans the back and then in rounds for the part that goes around the back of the neck and the two front lapels. It is a really beautiful pattern and can be made in several sizes.
See how that lovely flower motif just jazzes it all up.. lovely eh?
Chainless start for Half Double Crochet : I dislike the ch-2 start, and this is what I do to start my row of hdc. Check out the video at https://youtu.be/lWXpl1KdbZ8
Start Round 1 : with a magic circle and work 12 hdc in it.
Join with a sl-st to the 1st st (12 sts)
Round 2 : Increase round : 2 hdc in the 1st st and in each st all around.
Join with a sl-st to the 1st st (24 sts)
Round 3 : Increase round : 2 hdc in the 1st st ;
(hdc in the next st ; 2 hdc in the next st) ;
rep (to) all around ;
and in each st all around.
Join with a sl-st to the 1st st (36 sts)
Round 4 : Non - Increase round : hdc in the 1st st and in each st all around
Join with a sl-st to the 1st st (36 sts)
Round 5 : Increase round : hdc in the 1st st ;
(hdc in the next 2 sts ; hdc in the next st) ;
rep (to) all around ;
and in each st all around.
Join with a sl-st to the 1st st (48 sts)
Stop and measure the diameter of your round. Look at the circumference calculation notes before continuing with pattern.
Circumference calculations
Here's a great way to check circumference
To check, you are either going to wear the beanie, or check with the head size chart given at the top of this blog.
Remember that yarn stretches - so if it's a bit snug, it's good
1.Hat circumference = measure around the head just above ears and subtract one inch for a nicely fitted finished hat.
2.Crown width = (this is a flat circular top of the hat) you need to divide hat circumference by 3.14 (pi).
3.Hat height = Head circumference / 10 x 4.
So you need to measure circumference of the head (round head measurement) and keep checking the outer circumference of your work.
There is another trick for measuring circumference (without running your measure tape all around the edge of your circle as you are working).
This works for a cap that you are working top down, from the crown of the head.
It works by dividing your round head measure by pi (3.14).
So say your head measurement is 22, divide 22 by 3.14 = 7.
Remember when calculating diameter, you must account for the stretch of your yarn too.
So once the ‘flat portion’ for the crown (or the first few rounds while you are still increasing) of your cap is 7” diameter, you can stop increases and start increasing just the length (without increasing stitches for the round)
Now what does this mean ?
Let's take a practical example. Take the 3month beanie size from the head sizing chart below (which is from the links above, just fyi)
So the circumference of a 3-month old beanie is 16". Our circumference calculations say divide the circumference by 3.14 - so we divide 16/3.14 = 5.09"
This means that once your circumference of work is around 5", you stop the increase rounds and start working just the non-increase rounds.
You will then continue working the non-increase round pattern all the way till the length desired (which for this 3-month baby beanie example is 6"
Exactly the same thing for all sizes - so for Adult Small it is 22/3.14 = 7 and work this for a length of 8.25".
and here is asizing chart for general head sizing :here or here
Rep Rounds 4 & 5 increasing till you have the circumference needed then stop increases and work till you have the length needed for your cap.
We will then work the pattern for the brim of your cap.
About 1" before I reached the length needed for the cap, I worked the shelled skirt pattern (from the skirt portion of the dress) for the floppy lacy brim.
For babies, I advise that you add in a ribbon which you can easily thread through the last or second last row of your cap just before the pattern bit. This helps keep it snug around their tiny heads.
BRIM PATTERN : Rep Rounds 1 - 4 of the skirt pattern.
For the final round, you could work one sc in each st and ch-sp all the way around ; or you could decide to work in a picot as well ; or you could work a round of sc followed by a round of crab stitch or reverse single crochet all around.
I have opted to work just a round of sc all around.
How to work a picot stitch : Traditionally for a ch-3 picot, you work (ch 3, sl-st in 3rd ch from hook). For a ch-5 picot, you will do (ch 5, sl-st in 5th ch from hook).
Yes, wasn't this just a superb creation. I’d appreciate if you could credit my blog (and link the original pattern link) when you make your own creation. Thanks.
Enjoyed this ?? I sure did..come back right here for more freebie patterns
If you're visiting me here for the first time, and have liked the experience, do add me to your mailing list (for your convenience) , and all my future free patterns will come straight to your mail box.
I’d appreciate if you could credit my blog (and link the original pattern link) when you make your own creation. Thanks.


